No Code Workflows
 No Code Workflows
No Code Workflows
In 2016, Microsoft released the first new toolkit for SharePoint customization in nearly a decade, Microsoft PowerApps and Microsoft Flow. These tools aren't specific to SharePoint and can be used with a wide range of products, but with SharePoint they sing. This course demonstrates how to use PowerApps and Microsoft Flow to quickly create mobile apps and custom workflows without the need to write any code at all. After creating a custom SharePoint list, we'll use PowerApps to build an application. We'll tweak the app, modifying the layout, adding conditional formatting. We'll then switch to Flow and create a custom workflow that responds to the data entered in the app. With our app and workflow in place, we'll open our app on a mobile device, enter a record and view the results of our workflow. PowerApps and Flow let business users quickly create custom business apps. This course will show you how.
What You Need
This course has some prerequisites.
The first is that you need to have access to SharePoint. An easy way to do this is with SharePoint Online. As a matter of fact, an Office 365 subscription includes SharePoint Online, will get you all the tools that you will need for this course. If you're not using SharePoint Online, if you're using SharePoint Server 2016, then you'll need to have the ability to set up an on-premises data gateway or to work with your SharePoint administrator so that that can happen and I'll talk just a little bit more about that in a moment.
Next, you need to have Microsoft Excel 2013 or 2016 from either Office 365 or Office.
Then you'll need to have to have the ability to sign up for Microsoft Flow and Microsoft PowerApps. These are included with Office 365 subscriptions and with Microsoft Dynamics 365, so if you are setting up an environment simply to work with this course, I'd suggest an Office 365 trial subscription.
If you have SharePoint Online, if you have Office 365, if you have Dynamics 365, you're good to go.
A little bit more about that on-premises data gateway. You'll find the information that you will need at this bit.ly link. Remember that bit.ly links are case sensitive, so it's http://bit.ly/wfGateway and this will take you to the PowerApps article about setting up a gateway. Even if you are the first person using PowerApps in your organization, if someone else is already using PowerBI and needed to be able to expose data for example, from sequel server, there may be existing gateways already.
Once you have your requirements in place, SharePoint, Excel, Flow, and PowerApps, you're ready to go.
Workflow Tools: The Basics
What's a Workflow?
A workflow is an organizational process that has a clear beginning, some sequential steps, and then an end. And a workflow might sit at the very core of your business, like an order entry process or a shipping process to send products to customers. Or it could serve more of a supporting role, like a process that allows employees to submit a time sheet or request time off for a vacation.
This workflow is a small simple workflow. It was designed to allow an employee to apply to be part of a management training program.

In this workflow, the employee has an idea that they'd like to apply. And they fill out a form and submit that form to their immediate supervisor. Perhaps they carry it over and put it on their desk or maybe it's sent as an attachment to email. Perhaps it's a form that's filled out online. After their supervisor decides whether or not they should accept the request, they forward this form to the HR department and everyone who applies then is sent back an email indicating whether they were accepted or rejected for the program.
A workflow is an outline of a business process. It will typically contain some way for the users in that process to interact, often with forms, and some logic that drives the steps in between. The workflow is the encapsulation of that logic. The forms are just a mechanism. We'll spend the rest of this course learning how we use the new tools of PowerAbbs and Flow to develop and build workflow solutions in SharePoint.
Overview: SharePoint Workflow Tools
Let's take a look at the world of development tools for Microsoft SharePoint. First we have the Legacy tools that have been with us for a while. For forms, we have InfoPath Designer 2013, and for workflows, SharePoint Designer 2013. Both of these tools provide a really rich environment for creating Enterprise solutions. Notice though that we're looking at InfoPath 2013 and SharePoint Designer 2013. These are the current versions of these products. There will be no InfoPath 2016 or 2018. Microsoft has stopped development on these tools. The good news is that both InfoPath and SharePoint Designer will be supported until 2026, another decade, and there are still lots of uses for SharePoint Designer and for InfoPath if you're working with Enterprise Content Management or XML or if you have solutions that you've already created using these tools.
The next possibility is to create custom .NET solutions, and for many organizations, this is one way to be able to create, particularly forms, but also to work with workflows in SharePoint.
And we can't disregard the role of third party tools for SharePoint. Some of them are forms tools and some are workflow tools. However, there are third party tools like K2 and Nintex that are both form and workflow tools. And if you're creating Enterprise solutions this is another possible path.
But if you're goal is to be able to easily and quickly create solutions that address common business problems, if you like your business users to be able to create business solutions, then the next set of tools, the newer tools for SharePoint are really exciting.
First we have a forms application that's called PowerApps. This is a development environment, and a management and sharing environment for applications that you create and want to use in your organization. And for workflows, we have a new tool simply called Flow (see https://flow.microsoft.com/en-us).
We use Flow to automate processes, and part of what's exciting about Flow is it comes with lots of templates to address common business scenarios and it connects with a lot of services, not just SharePoint, but as of today 83 different services that are available to connect with Flow.
There are pros and cons to these new tools, particularly in relationship to some of the tools that we've used previously. These tools will be extended to work with document libraries but currently only lists, including custom lists, and only the basic field types, which will get us most of the way. But if you want to use some of the more advanced field types they are not as fully supported in Flow and PowerApps. However, this is a really quick way to create what are called mobile first apps, because that's what PowerApps is designed to do, to create apps that will run in a wide range of mobile environments, and also on the web.
Both Flow and PowerApps work with data sources beyond SharePoint. Therefore when you are learning new tools, it's nice when they have a really wide application. You're not learning something like SharePoint Designer that's specific to SharePoint, you're learning tools that will work with a wide range of services.
And the biggest pro of all, fast and accessible no code development.
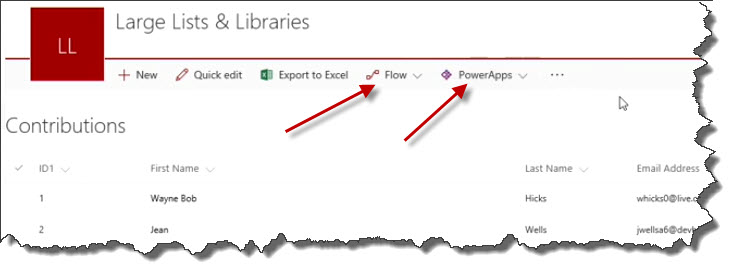 In a modern list, like this one, notice that Flow and PowerApps are included on the menu, at the top of the list, and creating a flow or creating an app are just a click away.
In this course, we're going to focus on these new tools, PowerApps and Flow, but if you're interested in creating Enterprise applications using Legacy tools, I'd like to refer you to two courses in the online training library, SharePoint Designer 2013: Custom Workflows, and InfoPath 2013 Essential Training, will give you what you need to know to be able to create workflows and forms that will work for the next decade with SharePoint online and with SharePoint 2016.
Now, let's plunge boldly forward with PowerApps and Flow.
Signup for PowerApps and Microsoft Flow
If you navigate to http://www.powerapps.microsoft.com, you will end up on a page that is the current version of what you're seeing here, which is Apps That Mean Business. Lots of different illustrations, several places you'll see sign up for free, get started for free, let's click one of those. And notice it says please enter your work or school account to get started. By work or school account what it is looking for is something that doesn't look like a personal e mail address. Therefore you won't be able to use Hotmail, Outlook.com, Gmail, Yahoo, even if your work address is a Gmail address, it doesn't matter, you need an organizational account here. Additionally, as of the time that this was recorded there was not support for government or military e mail addresses, so anything that ends in .gov or .mil also did not work. I'm going to enter my e mail address, and click submit. We know you, it says you're using this already with another Microsoft service, I am. So, I'm simply going to need to sign in, I won't need to provide anything other than a username and a log in, because it knows who I am from other applications that I'm using. There's my e mail address. I could provide my password, I already have, I'm going to click sign in. Almost there, there are some terms and conditions. If you would like to review those, you should. Notice that your name and e mail address will be visible to other people in your institution, good thing to know if I want to be anonymous here, where I work, click the button, and Microsoft PowerApps is being set up for me, one last thing. A brief introduction, create apps in minutes that work across the web and mobile. Connect to your data, no matter where it lives. Share your app so that everyone can do more, and get started. It knows who I am, notice that I have the familiar waffle that will allow me to get here, there's the PowerApps icon, as well as to other applications that are part of my subscription.
The reason I can do all this is that PowerApps is included in my Office365 subscription. It's actually included in all existing and new Office365 subscriptions at this point. However, if you don't have the ability to log in to PowerApps directly, because you don't have an account, you can still try PowerApps from the page that we launched from, with a 90 day plan, that you can try this out if you wish.
Additionally, there are two different versions of PowerApps. There's a PowerApps Plan One, and that PowerApps Plan One is the one that is freely available to everyone. And then there's a PowerApps Plan Two. And the difference between the two is that PowerApps Plan Two also includes support for the Common Data Service. So, if you need to have access to Plan Two, you have the ability also to do a free trial simply of Plan Two. For now, we will be working largely with the features that are included in both Plan One, and Plan Two.
Finally, if you're using Office365, and you can't log in to PowerApps at all, it may be then that your organization has turned off individual sign up for Microsoft PowerApps, and if that's the case talk to your IT department, and ask for licensing for Microsoft PowerApps.
You'll sign up for Flow in exactly the same way. You'll go to https://flow.microsoft.com, and you'll end up on a page like this, and it will also have a link at the top that will allow you to sign up. Notice that I'm already signed up for Microsoft Flow. This is how it works then, when you log in when you're already signed up.
After you have signed up for your accounts for Flow and for PowerApps, we're ready to go to work. See you in the next movie.
Import a Custom List From Excel
I've created a site just for the work that I'm doing in this course, I'm working in SharePoint Online, so this is what my site looks like. Your site might look a little bit different, but find yourself in the site that you want to use for the work that we'll be doing together. If you're already familiar with this, this is a little bit of a review, if you're not familiar with this, this is one of my favorite techniques to work with Excel and SharePoint together, because anything I can model in Excel, as a list, as a table, I can then import into SharePoint and this allows me to, very quickly, create apps where users can enter information, whether that app is going to allow them to enter in SharePoint or to enter it, in this case, in a PowerApp that we're going to create from this custom list.
If you have a premium subscription to the lynda.com Training Library, then in the Exercise Files folder, you will find a file called KinetEco product inventory and this range has already been formatted as a table. This is information about our inventory in the West Region and this is what we'll be importing into SharePoint. If you don't have access to the Exercise Files, just use any Excel workbook that includes a table that you would like to use and identify where that workbook is at this time.
Let's swing back to SharePoint. Click Site contents, create a new item and we want to create a new List. Now this would allow me to enter information about a list, I want to use the app to do this. So, I'm going to click New again, choose App, and here are my apps that are available. The app I want is on the second page in My Apps, and that is the Import Spreadsheet app.
Now, a word at this point, this particular app uses ActiveX, and that means that if I'm going to use this app, I really need to be using Internet Explorer. And that is my default browser for use in SharePoint. Edge is fine, Chrome is fine, they're all nice, but because I like using the ActiveX apps like this one, I pretty much stick to Internet Explorer while I'm doing development work in SharePoint. Let's fire up this app and I'm going to call this Inventory.
Actually, I'm going to call this west_inventory, and I'm going to put an underscore and the reason, is I'm not being asked to provide a URL, that means this name will be the URL, I'll clean this up afterwards. And this is Inventory for the West Region. Where's my file? Click Browse, and remember that we are finding this on our Desktop in our Exercise Files right here. I can anticipate this will cause a little bit of a problem because I haven't closed this file.
Let me go do that real quick. I'll simply close this and now I'm going to swing back into SharePoint and click Import. So at this point if you're seeing message that says, "An unexpected error has occurred," then there's an issue that won't allow SharePoint and Excel to work together dynamically in this way and this is usually an issue about either permissions or trusts. If you're working on a SharePoint site that you use every single day that's maintained by your IT department, the odds of you having an issue with this more than once are pretty slim because they will come fix you, they probably did it upfront.
But if you're working on site that you set up just to be able to work with me in this course the odds are a little greater that you might have an issue. So let's talk about how we can fix that, we're going to go now to Internet Explorer. And here in IE, because that's the browser we should be using to run this ActiveX control, we're going to go to our Internet options, we're going to go to Security, and we're going to make sure that our SharePoint site is listed in the Trusted sites.
So click Trusted sites, click Sites and then this list of sites should include your SharePoint site. There's mine right here. If your site isn't here, then put its URL in, you can go back to another tab the browser, wherever your SharePoint site is and you can paste that in and click Add and close this. The other thing you may need to do is to turn off Require server verification for all sites in this zone. You can try leaving it on at first, which would mean it's, you know, https sites are the only types that are allowed, but if you experience the same problem, come on back to this same dialog and try turning on Require server verification.
I'm not sure why that works, but sometimes it does. After you have added your current SharePoint site, it doesn't need to be each site, the highest level site will work just fine to your Trusted sites list. Simply click OK, go back and try the same thing again. One more possibility, after you've done this, you can also close Internet Explorer, start Internet Explorer again, go back into SharePoint site and continue from that point forward. If it's not trust that's an issue it's usually permissions, so talk to your SharePoint administrator.
And there is one more workaround, which is, from Microsoft Excel itself you can export a table to SharePoint and you can try that if you would prefer but often if importing doesn't work, exporting won't work for exactly the same reasons. Let's go back to SharePoint now. I'm asked what type of range I want and I'm going to actually use a table, the Western Region Inventory Table1.
Click Import, west_inventory and all of my columns of information. To clean up this name, that again, appears in the URL, click gear, choose List settings, List name, description and navigation and let's now change this to West Region Inventory.
Do I want it on the Quick Launch? Yeah, let's put it there and save this. And return now to my list, West Region Inventory. All cleaned up. As I noted earlier, this is a way that I like to create custom lists in SharePoint. Rather than needing to specify information about what data types I'm using and other information, in SharePoint I can do this, and Excel, which I'm very comfortable with, but more importantly, my users are comfortable with using Excel, so if I say, create the list that you'd like to see in SharePoint, but create it in Excel and pitch in a couple of records for me, this works really well for people who aren't that familiar with SharePoint.
Remember that when I go to my List settings not only do I have the ability to modify my List name, description and navigation, but I can double check and ensure that all of the information that I imported, all of my columns reflected the correct data types that we have, for example, Number for quantity and Number for Watts, Currency and so on. Where this information comes from is from the records that are in the data that I import, so even if I don't have any records, even if I have simply modeled by creating column headings, I want to include two or three rows of data, because that's how SharePoint determines what SharePoint data types should be used to store that information in your list.
Now that we have the list that we'd like to create a PowerApp for we can move on to PowerApps.
Create a PowerApp
PowerApps: The Basics
Microsoft PowerApps is a suite of Cloud-based software services that can be used to connect to many data sources, including SharePoint, which is our focus in this course. But to other services as well, all of the different types of connectors that we have for Power BI, for example, and Flow, they're all a common set of connections.
Using the PowerApps services, we can create, build, publish and share applications in web settings and for mobile and it's mobile where PowerApps really shine because we can leverage the capabilities of our mobile devices, the GPS, the camera, and so on, in our PowerApps.
The PowerApp components include web.powerapps.com, which we saw in the last movie. It's an online design environment, and this is also the place that we will manage our apps and share the PowerApps that we create.
Then, PowerApps Studio, which is a desktop application, a visual design environment.
PowerApps mobile, which we can download from Apple, for iOS, Android, Windows devices. And the PowerApps mobile solutions are used to be able to use those custom PowerApps that we've created.
Finally, there's a PowerApps admin center which is used to administer the PowerApps component. Let's return to our custom list in SharePoint and fire up PowerApps from there.
Create a PowerApp From SharePoint
Let's create a new PowerApp right here from the SharePoint online list. Notice that at the top in the command bar, we can click PowerApps and choose Create an app.

Name the app to get started, and we're going to call this West Inventory, and click Create.
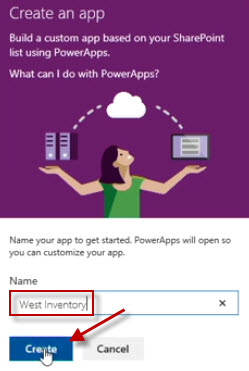
This will take a couple moments to build my app. Notice that what has opened is the web version of PowerApps studio. Which is all displayed in this second tab here in my browser. The app is being saved to my PowerApps collection and here is the first screen of my PowerApp. A quick tour to help us get started. We'll take this tour because it's a quick way to be able to understand how this interface works for the studio. First on the left we have thumbnails for the screens, and when we create a new PowerApp, by default we get three separate screens.
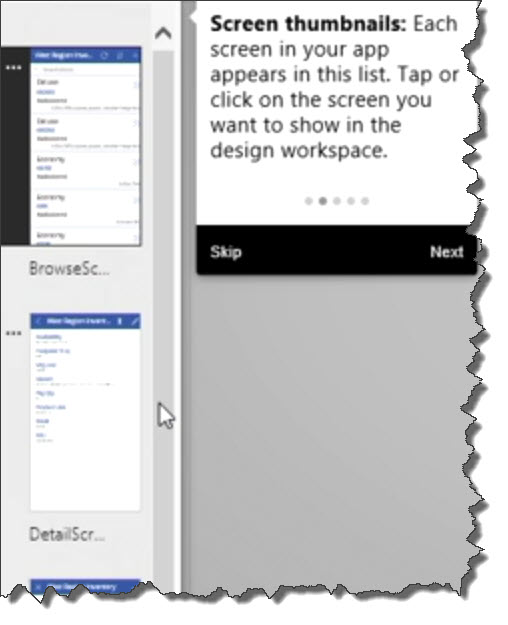
We get a screen that's used for browsing. We see that one here. We get a screen that's detailed for one item, and then we get a screen that you can use to create new items or to edit existing items. The browse screen is really a read-only screen. In addition to the thumbnails, we have this design workspace, the area in front of us where we're going to create a form just like it will look when it's being used on a mobile device.
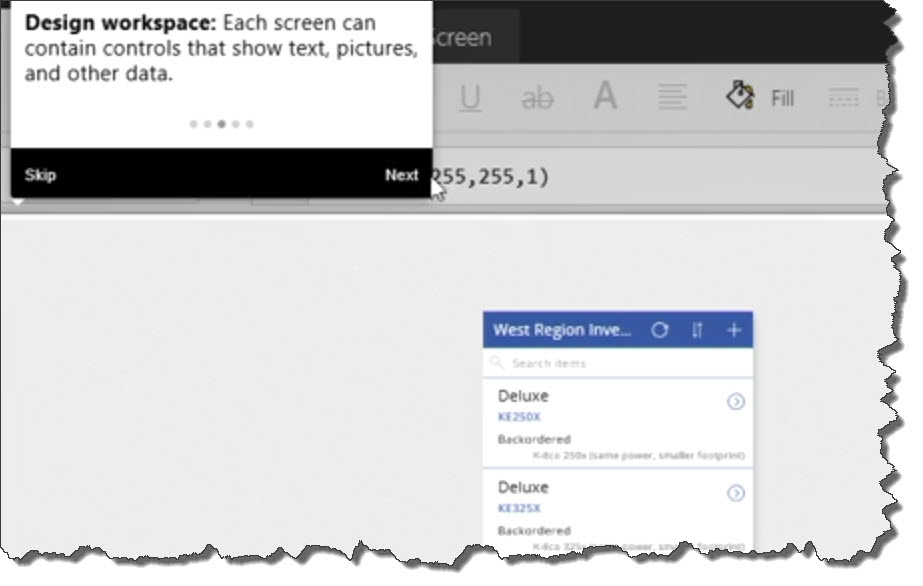
We have property dropdown menus that allow us to modify controls. We're going to talk about that in the next few movies, and formula bar. In this case, the formula bar is actually showing us the value of a color, but we can use other formulas that are PowerApps formulas similar to formulas that we would see in Excel.
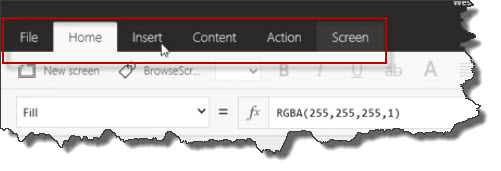
Other features of this interface include a menu at the top that has tabs.
On the right hand side we're seeing details for the selected screen.
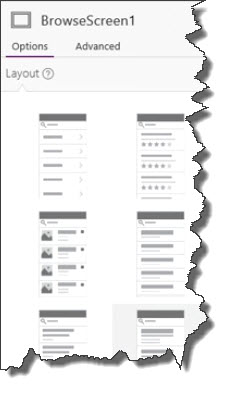
These are the different options that we could use to layout this screen, and we have advanced options, actions.
At the bottom, a zoom slider.

That's kind of nice, and the ability to click fit to window. So after we've zoomed, if we're looking at a high level of detail, the quick way back is simply to fit to window once again.
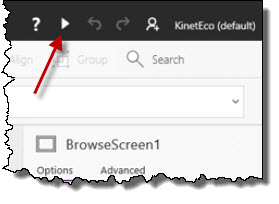
If we'd like to preview the app, we have a couple of different choices. First there's a preview button here that will show us how this app will look in a browser, which is similar to how it will look on a mobile device.
Remember that I said that we get three different screens. This is our browse screen.
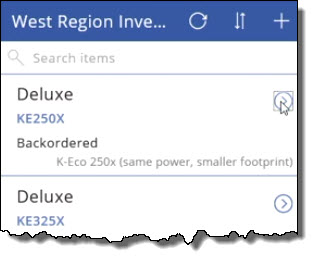
This is our detail screen.
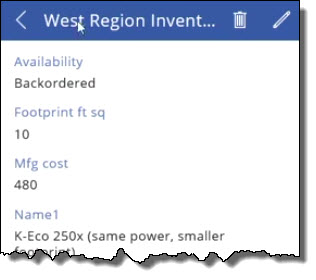
And if we wish to edit or create, that's what this screen looks like.
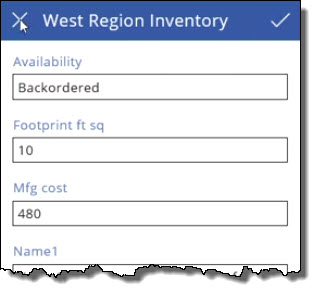
So there's the edit version of it, and if we were in our browse screen and we click plus, the empty version of that same screen, so three screens, and this is a preview, and to get out of the preview, simply click the X, and we'll be back in the PowerApps studio, but we also can launch that app from here because this is where we created it from.
Click Open.
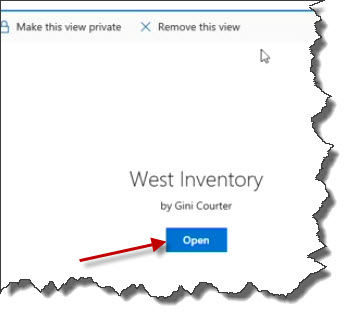
The first time you do this, it will take a little bit longer to load, and here comes our PowerApp connecting to our data. Looks exactly the same. Browse screen, details screen, new and edit screen.
This PowerApp is now available here essentially as a view.

If I'd like to work rather than with the list view with the app, click Open, and I'm taken to webs.powerapps.com so that I can view and use this app.
Manage Your App
Let's talk some basics of managing and working with your apps that you've created. First, based on your organizational role and how PowerApps is set up, you might find that every app that you create is created for you privately until you share it. In my case, the PowerApps that I create are being shared automatically, and if I want them not to be shared, then I need to make them private. There's actually two different and parallel things happening here. I have a view which is, really, you could think of it as PowerApp in the browser. But the PowerApp itself is not here. The PowerApp itself lives in http://web.powerapps.com. Therefore, if I do something like remove a view so that West Inventory no longer appears on the list, it says if you do the PowerApp will not be deleted. That PowerApp will go on and on. This is a way to create a mobile view that you don't necessarily want to have here in the browser experience for a user. If I make the view private, and I confirm this, notice that it says the PowerApp is still shared within the organization. If I go to web.powerapps.com, I have a shared public PowerApp but a private view. That doesn't make sense, so I'm going to make this view public again.
By making a view public, I make it available to all users of this site, so the question I'm being asked with public and private here, again, we have two different artifacts. We have the instance of the view that's happening here in the list, but I also have the PowerApp itself, which doesn't need to be available here to be available in mobile settings.
Remember also, I can always go back to all items which is just a matter of switching views, and then to get to my PowerApp.

I'm going to switch to this view and click Open to view it.
To edit my PowerApp, click Edit in PowerApps.
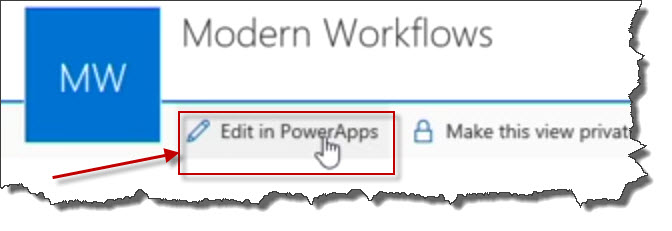
We will go to powerapps.com, which is loading, and then quickly we will be taken into the studio so that we can work specifically with West Inventory, our app that we created. If I close this app, I'm returned to PowerApps, where I can create a new app, I can open an app, I can view connections, flows, and so on.
And this allows me to start with my data, with my SharePoint data, my Dynamics data, or start with a blank canvas or template, so I could've begun here to create my app. Starting with SharePoint, for example. Choosing the layout that I'd like to have. Connecting to my SharePoint site, which starts like this but isn't quite just that. The easiest thing for me to do is to go grab my URL here because I'd like the workflows portion of this.
Copy it. Paste it in. And there's my West Region Inventory list that I can then use, connect to it, and build my app. If I'm building an app in SharePoint, I find it easier to start in SharePoint for what I think are some fairly obvious reasons. However, if I'm using a different data source other than SharePoint, it might actually be easiest to start here in create.powerapps.com in the studio.
I'm going to close this. I don't want to save it. Close PowerApps, and return here to my list in SharePoint.
Set Screen Layout and Sort Order
- [Narrator] When I created this app using the very powerful PowerApps tool, it didn't ask me a lot of questions about this app. It quickly put an app together for me, and the fact that I wasn't asked a lot of questions other than, "What would you like to call this?" means that there were a series of choices that were made either based on defaults or on the data that I have in my list or the columns that appear there, because otherwise there would be no way to be able to create this application. So I'm going to go back to PowerApps and take a look at a specific set of those choices. Choosing Open, PowerApps. So if I start with PowerApps.com, then this is how I will get to the things that I want to see, and I'm going to download this then into my browser so that we can do a little bit of editing on this PowerApp and see the choices that were made, specifically the choices around the layout of my browse screen and the impact that those choices have on my users' experience, because I'll want to change that layout pretty quickly. There were many choices available for the Browse screen. You'll see them here on the right hand side in the Layout. If you look at the Details screen, which is really a read only version of our Edit screen, you'll see there's only a couple of layouts, but it's not unusual that there are a lot of layouts available for our Browse screen. With the Browse screen selected, I ultimately want to end up on this layout. I've already reviewed these and decided that this is the one that I like best for this particular set of data, but let's take a look at the intricacies here. First, I'm going to zoom up a little bit so that you can see a record, and notice that the most important information for my user, which is going to be either the item number or the description is not the largest fonts or the most dominant. What we have is really the classification, which in this case is the product line Deluxe or Economy. That's not what's most important. What's most important is either the name, which is a product number, or the description. Now in different layouts, different items are given priority. Notice if I choose this layout the most important thing is whether it's back ordered or available. Also, this layout supports displaying a picture of the actual item. I don't have a field of images that's available to be able to populate this, however, if I did have images, I would want to choose a layout that has images if that would be meaningful to my users. This layout has a status bar on the left hand side, that's this dark bar, and notice that now I'm getting the description, then I have the product line, which is Deluxe or Economy, and its status. This is closer to what I want. This is better. Now that I have the layout that I'd like, I can modify the actual contents. This is a control, a large control called a Gallery Control, notice BrowseGallery1, a formula that indicates what information is going to be placed here. If I wish, I can choose an item, and when I choose a particular item notice this is formatted as a Heading1, and its availability, all of these different choices, but Name1 is what is being displayed here. So if I wanted instead of Name1 for example to have square footprint, or if I wanted to have Product Line, I simply choose that. That's what we saw previously, but I actually don't want Product Line, I want Name1. This is my Product Line, this is my Availability. So notice that as I choose controls, I can modify what appears here, and I only can do this by clicking in the very first item in the gallery, because the other items if I click nothing happens, but if I click this first item, this is the sample then that's being used. If I don't want to display Product Line in this third control, but want to instead to show the number that we have in stock, or the square footprint, I can choose that. I'm going to choose Units Available, and zero units available. Or, let's return to the Product Line, and rather than displaying that something is back ordered, let's simply choose rather than Availability Units Available. Same information, there are none in stock. This is the Deluxe Product Line. To set the sort order, I'm going to simply click the entire gallery, which means select any of the items other than the first one, and notice that for the gallery there's a formula that indicates how this is going to be sorted, SortByColumns, search in the West Region Inventory, TextSearchBox1, Availability, Name1, Product Line, SKU, so this is how my search is happening, so this is being searched by Availability, that's why the items that are unavailable or have an availability of zero are coming up first, okay? If I wanted to search by something else, for example Name1, in my TextSearchBox, there we go, Name1. Now I've replaced my former sort order so that I can now display my items in the order I want to see them in, which is in alphabetical order. Now that I've modified my screen layout and set my sort order, I'm ready to save this, File, Save, and we're saving this back to PowerApps.
Format Text, Modify Settings, and Brand Your App
Some additional customization we might be interested in. This is called BrowseScreen1. We have DetailScreen1 and so on. If you'd like to change the name from BrowseScreen1, you can do that. Simply on the Screen tab or on the Home tab with the screen selected, choose BrowseScreen. We could say BrowseInventory, for example. That's an internal name. It's the title here actually that bothers me because it gets cut off. It says West Region Inventory but there really isn't enough room for that in the label. I'm just going to say West Inventory, delete this. Change its name and notice, much better. I'm going to go to File and Save just to save the work I've done so far because that seems to be a good way to work in PowerApps. While I'm here though, let's take a look at the app settings. This is the West Inventory. This is a preview of how the icon looks. Where do we see that icon? We see that in the list of our apps. When you only have one or two, you probably don't care, but notice that there are lots of icons that will allow you to really visually group all of the different apps that you're creating within your organization or simply to be able to classify them for your own use. This app is an inventory app and I would take a look and scroll and see if there's something here that seems like it has to do with an inventory. Or I could simply say it's one of my starring apps. These sets of apps is for KinetEco so I'm going to turn it yellow. What can people do with this app? This description again will appear in the list of PowerApps, and this is a public app. This allows our users to browse, enter, and edit inventory in the west region's warehouses. Here we go. Also here, I have the ability to change the screen size and orientation. So I could say, always want this in landscape mode or I always want this in portrait mode. We're going to simply leave this in portrait mode. That looks good. Let's return now and take care of some detail about how this app looks. I'm going to select this title, and you may or may not have noticed but some of the items that are in the inventory have longer names and they get cut off. I'm simply going to give this more space. Right there. I also would like to make this font just a little bit smaller. Maybe in between the two. 26 isn't a choice on my list but I can enter it. I can change the color, and that would be this button that will let me choose any color from a theme. Themes, you say. Where are our themes? Right here on the dropdown arrow that has no name. Not only do I have layouts but I also have themes. For example, forest, rose, aqua. White or light text on a darker background can be very good to work with on a mobile app particularly in low light conditions, however, it's really hard for you to see here on the screen so we'll be switching back. This will work well for us. Now, when I choose a particular control like this control and choose colors. I see a different colors compatible with this theme including also the list of standard colors. I'm going to choose rather than the blue that's been selected I'm going to choose an orange. And I'm going to choose semibold for my text, and the result is that this looks like this which is more in keeping with our colors for KinetEco. Now, what I'd like to do is I'd like to add a background image. If I have my screen selected and I click the Screen tab, Background Image as a choice, I can add an image file. I have an image file for you if you have access to the exercise files, but choose any other image file you wish. I'm going to use KinetEcoLogo124x91. It will drop that image in right here. It's larger than I want. I would simply like to center this as a small image here on the screen. Just like that. Save my changes. Back to PowerApps. And return. Notice this light gray fill, light blue fill, and I choose something even lighter. So Background Image, Position, and Fill drive how this screen looks but they're also driving how the other screens look. Notice that when I switch from one screen to the next, the theme persist, the image and fill do not. If I wish therefore to have a different fill on this screen, for example, I can simply choose the screen and on the Screen tab, click Fill, and switch for example to a light yellow. This is one way to make my screens looks different so that when my user is looking at this screen, they know they can't easily edit on it, but this screen, notice that the editable areas are set off much more from the blue than they are from the yellow. I like this. Let's save this again. If I click Preview, I have an app that looks far more like KinetEco in terms of its colors and in terms of its branding than it did a moment ago. Just a few minutes make this app look like our app.
Customize App Detail and Edit Forms
The choices that were made by PowerApps about what fields, what columns of data were most important was a little different than the choices that I would make because my users aren't as focused on whether something is back ordered as they are in being able to find it in order.
The same problem exists here on my details screen and on my edit screen. I'd like to be able to rearrange, to reorder, the information on this screen so that name is at the top, very first. That's the most important thing. Second then, is we have information about availability and not necessarily in stock or not in stock but the quantity that are available. How do we modify this particular screen? Well, it's super easy. With the detail screen, or the edit screen selected, these both work the same way. Simply click and when you do you'll actually see something that says card here. Each of these is a card. If I would like name to be moved up, for example, I'm going to take name over here on the right and drag it to the top. If I wanted name to be hidden. See that eyeball? Just click it. It's gone; where did it go? It's back in the list of items we're not showing. Scroll down, click it again to turn it back on. And drag it up to drag it up to the top of the list. After name, the next thing that I'd like to see, is I would like to see how many we have in stock. Units available, right here. Turn that on. Notice that it doesn't immediately fill in the data. Don't worry about it; it will. This will be the last item on the list of the columns that we're showing. I'm going to take this and drag it up to the top, little by little.. And put that second. If I'd like to keep in stock here I can. Footprint, square feet, that's actually not something I care about, not in this app. Off it goes. When I can create apps this quickly there's no reason to keep data in an app that will be in the way of my users, because I can create two different apps. One for my sales folks, one for my field technicians. My field technicians care about how much space something takes up. Manufacturing cost, again, not something that I want to show in this app. Turn it off. I'd like to modify this so instead of saying name one, the label for this first column says name, to do that I simply click and change its name. So now we have name, units available, in stock, as opposed to back ordered, one in a package. If I'd like to move retail up, which I'd like to. Let's drag that up. If this is all of the information that a user would need to enter I would then modify my edit screen so that the items were in the same order. That just makes sense because users don't want to see lists in different orders for no apparent reason within the same app. So I would make exactly the same changes. Simply choose, for example, name one. Drag this up above availability. Drag availability down. Change name one so that is says name and so on. All of the same changes that I would wish to make. There's a lot of further customization you can do to the cards. For example, you have the ability to view items that are numeric as a percentage or as a rating, versus text. You have the ability to set advanced options. And you can add custom cards, not just cards that would already appear in our list from our columns in SharePoint, but custom cards that you create that display other data. There's much more that you can do to customize screens and to customize forms and the cards within forms, that are beyond the scope of this particular course. For example, when you have a particular card selected, you can then modify how information in that card is displayed. Is it displayed as a rating, as a percentage, or as text? Or if you're looking at availability, something that is text, then you have choices to show email, phone number, and so on. So different choices based on the type of field, whether it's a string or a number. You can also edit cards, modifying their advanced options. You can add custom cards. Cards that reflect data that is not already included in the SharePoint list that we used as the basis of this particular PowerApp.
With PowerApps, we can quickly and easily create beautiful, mobile apps that can also be displayed in a browser. And we have the ability to go deeper with more tools to provide different types of content in our applications.
Update the Data Source for an App
The inventory that's maintained in this SharePoint list is calculated based on items that are removed from inventory and purchases that are added to inventory. But there is not a visual inspection of these items most of the year. However, twice a year, we take a physical count of all of the items in our inventories so that we can reconcile the number of units available with the actual number of units that are in stock. And we'd like to make it easy, we want to create a mobile app that will do that, a PowerApp. First though, we need to modify our list by adding another column to the list.
Let's go to Settings, and then to List settings.
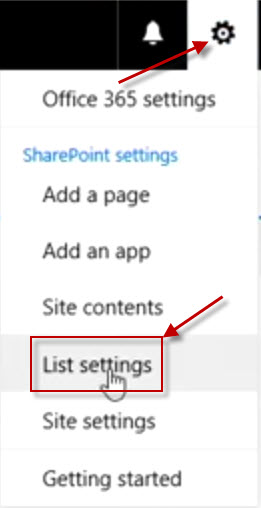
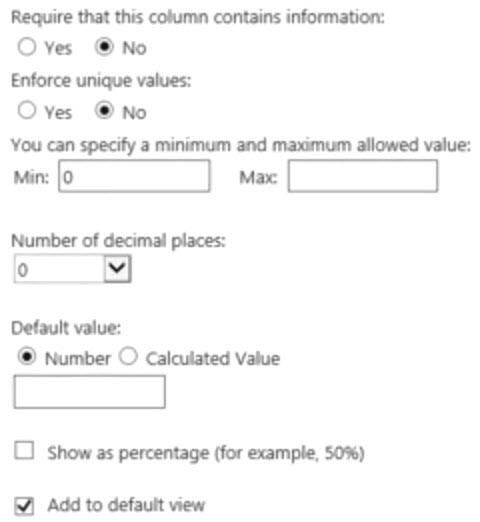
In our set of columns, there's Units Available, which is defined as a number. Let's create a new column called Actual Count. Set the follow fields accordingly:
Let's go back to West Region Inventory. Now, if we return to our PowerApp, you might wonder, how will our PowerApp actually know that there's new data elements available? Well, if we choose Content and Data Sources,

We have the ability to refresh our data source.
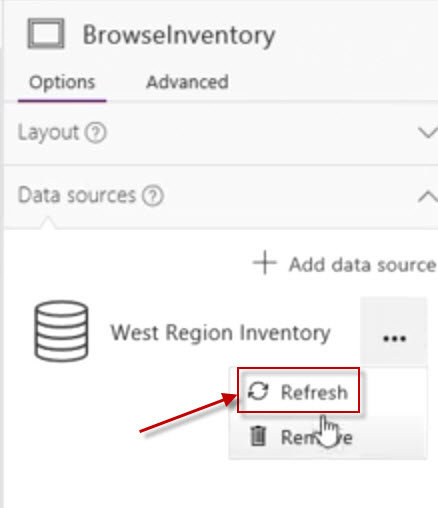
And when we do, we will now have access to that brand new field that we added. For example, if instead of our product line, we would like to display our count, there it is, actual count. Now, that's zero right now. We haven't counted any of these and yet, it's very easy for us to refresh our data source and add this particular column to our application. To change it back... Simply choose the field that we do wish to display. And in this case, I'm going to modify the field that I had there originally. Rather than having product line, I'm going to once again list availability, in-stock or back-ordered. That looks great. I'm going to come back and save my PowerApp.
Update App Forms
I'd like to add the new column, then, to my details screen and to the edit screen. Let's do that then. Here are the units that are available, and what I'd like to do is I'd like to actually add another card. Simply click on any of the existing cards, scroll down to actually count. Unhide it, and here it is. I'd like this right after units available. So I'm going to drag it up here. Sometimes you can catch this and drag the actual card, but I normally found it easier to drag the field here in the right pane.
Now we need to allow our user to enter the actual count. Let's go here, and notice that we haven't really modified this to be in the same order, I also didn't change the name here, I should probably do that. Drop down to our details screen. Let's modify that label. And on the detail screen, it's then units available and actual count. That would be a good order to follow here. Let's turn on actual count, so that it's available. Name, followed by units available. I don't need to have the product line, we can hide that. I don't need the retail cost either. We'd like availability moved up. We'd like the actual count moved up. Again, it's really helpful if the order is the same within the app, unless there's a reason that it shouldn't be. There's our units available turned back on. Two items in package, there's the SKU. We don't care about the footprint or the manufacturing cost in this particular use of the app, but I think that it looks fine to leave them there. There might be a reason to add them later. If we need more space, notice that we can expand, however even if we resize this text box, it doesn't matter because on the card there is no property to be able to wrap this like there is, for example, on our browse screen. Here, where we allow it to wrap. So I'll just leave the size as it was. Looking good.
Having now added our new column to both of these forms for our detail screen and our edit screen, I'm going to save my PowerApp, and close it.
Apply Conditional Formatting to a Control
Here's the last spiffy little thing we're going to do to this PowerApp, and that's to apply some conditional formatting to a control. This is the type of thing that makes an app much easier for our users. I'm going to select in the gallery, the very first item, and choose the Availability. What I'd like to do is flag if these items have been back-ordered. Now, generally, the color that we have applied here to this text is orange. I'm going to switch it back to something a little bit duller, like a dark brown, and now they are all dark brown.
If(Availability="Backordered", DarkRed, Black)
Now, if we wished, we don't have to satisfy ourselves with just two colors here. We could say if availability equals back-ordered, dark red, comma, if availability equals in stock, brown, comma, and then our else. Ultimately, our very last if is an else, just as it is in Excel, and therefore, if it's not back-ordered, and it's not in stock, perhaps it's unavailable, and that might be red. But this looks good, and notice that as I change these, the app itself is being updated.
In this case, if availability is equal to back-ordered, paint it dark red. Otherwise, it's in stock, and in that case, simply make it white. So, we only see that something is back-ordered if it's not in stock.
If(Availability="Backordered", DarkRed, White)
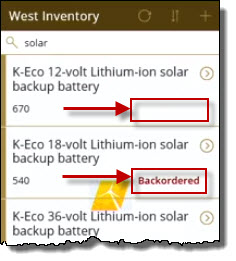
I'm going to save my app again, now that I've applied this conditional formatting, and return.
Automate the SharePoint List Using Flow
Flow: The Basics
We know how to create apps and we know how to create forms in screens in exciting mobile apps. Now it's time to add some automation. To do that, we will use Microsoft Flow. Like PowerApps, Microsoft Flow is a cloud-based service and it's an enterprise level service.
We can use Flow to automate processes across different services and different applications. For example, if we wanted to be able to automate a process that started in SharePoint and then move into Outlook, Flow will do that for us.
If we wanted to create a process where we were taking something and saving it to OneDrive, another part of SharePoint, that's something that Flow can do. We don't have to have a container that's called SharePoint only with Flow because we can work across the different applications.
Flow allows us to create, build, and publish automation apps for the Web and for mobile. And there are scores of existing templates for common scenarios. If you want to create a flow, you always begin by seeing what templates exist that you can use.
Flow has three major components. https://flow.microsoft.com, which is where you will store flows, where flows are served from. A Flow Design Editor, which is a browser-based drag-and-drop designer. And finally, the Flow Mobile Apps for Android, for Windows, for iOS that you'll download from the App Store, from the Windows Store, from Google Play. And Flow mobile allows you to not only launch flows but actually to design and edit flows as well.
Create a Flow for a SharePoint List
These are the items that we believe we have in our inventory or that we have available that are on back-order. What if the person conducting the physical inventory out there with their droid or their iPhone finds an item that isn't on the list, but nonetheless exists? It's part of the physical inventory, but we're not accounting for it. In that case, I'd like to allow them to add the item to the list. They can do that with their PowerApp; and then when that item has been added, I want to kick off an email to the head of the west region distribution and warehousing. That's Rod Tilden. Let's create a flow to do that. This is a lot better than telling people, hey, if you come across something that's not supposed to be there, make sure you let Rod know. We're going to send a customized email when a new SharePoint list item is added. And this is what flow looks like. We have templates and there are many, many templates that are available to meet a whole range of business needs. You can view these by whether they're for email, for approval. We can sort them by popularity. This one's been used 15,000 times, send myself a reminder in 10 minutes. Get a push notification with updates. Let me know when I'm getting email from my boss, and there are more and more of these. Notice that you can see what technologies are being used. So if we're going to send a customized email when a new SharePoint list item is added, we're going to be using email, Outlook. This is Office 365, and this works for Office 365 Outlook. If I'm using Outlook.com, which is also available as a choice, then I would choose send a customized email when a new SharePoint list item is added using Outlook.com. To use this template, I have to be signed in. Office 365 users, I'm signing in. It already knows I'm here because I'm signed in to Outlook and I'm signed in to SharePoint; and you might wonder, how did I get signed in here? Because I've been signed in previously when I've been working on flows. You may have to begin by signing in to each of these different accounts; but once you've done it, Flow will usually maintain those relationships. Switching accounts is kind of nice because if you want to create flows that use, for example, different email accounts, that's a good thing to be able to do. I'm going to click continue. This says when a new item is created. Now, I can add a comment to this and indicate the current list is assumed to be complete; therefore, a new item is an anomaly. And then there are parameters. So it's saying what site URL, what list. How did it know? We started there a minute ago. Get my profile. No additional information is needed for this step. It knows who I am, and I will be able to use the outputs in the next steps. Now we get to send email. That's pretty cool. And who is this going to? Well, this is what's called dynamic content when you see this orange content. This content is coming from Get My Profile, which is right here. I can also get dynamic content from when a new item is created. Our first step, and remember that this then is providing all of the information from our SharePoint list, including the items that we're not displaying in a view, like modified by, created by. These are nifty to have for work flows. For example, using modified by, I can send an email to the last person to touch a file. Or created by, to the person who's likely the owner of the file. All of this is good stuff, but it's sending it to my profile. I'm the only person in here, and this isn't who the email needs to go to, so I'm going to remove this. It says include a to, and I'm going to send this to rtilden@kinetico. It says no items; that's okay, that's not a problem. And if I wish, I could enter my email or any other email address; but I'm simply going to leave this just like that, and I can include anything that I'd really like to have in the subject. So it says new item added. What was the item that I added? Well, let's go grab the information from when new item is created; and the new item that was created has a name, and I can say new inventory item added. I like that. The color coding makes it easy to see where the dynamic content is coming from, and that's critical because some of these field names appear in multiple data sources. Hi, given name. Well, that would be me; and we don't need to say hi, given name. And these are all going to be going to Rodney, and he's actually going to get tired of the niceties pretty soon. He'd like to just have the information. So a new item was added at, by, created by, and the details. I don't want the category name. What I'd like to have is I'd like to have a couple of things. First, the name of the item. Let's just do this a little bit differently here. Details, name; and we'll use Name 1. We've used it once already, but it's nice to have it in the body of the email when somebody's searching and trying to figure out what they're doing, and the quantity that we found. That would be that actual count. Now we have some other options, some advanced options. Who this is to, subject, from, cc, and this is a great place to add my email. So I'm going to copy myself. If we wanted to allow attachments, we could. Importance, we'll say that this has high importance. If I'd like to add additional steps, I can; but these are really all the steps I want. I actually saved this flow partway through this process; and because of that, I'm now given the choice not to save this, but to update it. The first time you'll save it, you'll be saving. After that, you'll be updating. It says your flow was updated. To close, click Done. To see it work now, perform the starting action. This may take a few moments. So I'm going to click Done. It says my new flow is running. We'll come back here in a while to be able to manage this, but let's go back to our list and add an item to see our flow work. Flow doesn't actually care how this new item gets added to the list. Therefore, flow is all ready for us to add this item using a PowerApp or I can simply add an item here. Either way, it really doesn't matter. Let's go to our PowerApp though because we have it running. Let's click open. This is the first time we've done this since we modified the icon and the color for our splash screen, so this is going to look pretty cool. There's our cool yellow background, our star icon, our West Inventory; and it's loading our PowerApp in the browser. We're ready to test our flow, which we'll do in the next movie.
Add Data Using a Mobile App
The flow is assigned to the list, and our SharePoint list doesn't really care how we add a new record, so let's add it using our PoweApp. Better yet, let's begin using PowerApps Mobile, which I've downloaded using Itunes and I'm now logging in for the first time. So I'm going to sign in with my work or school email account, the same account I used when I logged in to PowerApps. And in a moment I'll be prompted for a password. I'll sign in. I will allow notifications from PowerApps. And even though that screen came back for login, we shouldn't worry about it because here we are. I can see all apps, favorite my apps, and there are also sample apps that have been provided, they're kind of nice to spend some time with to see what's possible. Not all of them use SharePoint by any means, but I'm going to go back to just my apps. Notice that I can sort them by name, modify date, date that they were opened. I also have the ability to search for apps. But I would like to go to my PowerApp. Notice that if I have a number of PowerApps, I can pin one to my home screen, which I do. I can also favorite it. Says add West Inventory to home screen to make it look and feel like a real app. And I can tap this and I'll be adding it to my home screen of my iPhone, separate from PowerApps. So I won't need to go through the PowerApps interface anymore to get to the app, that's kind of slick. And I want to add a new item. Looks good. What we have here is we have K-Echo2... 24-volt. And the unit count that was available, because this hadn't been added was actually zero, but the actual count, there are three packs of them. Obviously that means they're in stock. And each of the packs has two batteries in it. I don't have a skew or any other information to enter here. I am done, and I can check this off. Since this is the first time we've seen the app on a mobile device, let's spend just a moment taking a look, notice that we have good scrolling, our conditional formatting shows. If I want to switch to a detail screen for one of the items, I can just switch. If I'm in a detail screen and I want to edit, I can edit. If I want to delete, I can delete. And I can search for a particular item, like 24-volt backup battery, and find it right here. Anytime I'd like to refresh my data, I have a refresh button. I can invert the search if I wish. Nice app, and remember, swipe in from the left to close this app and return to PowerApps. In the next movie, we'll see the results of the flow that was launched when we added this data using the PowerApp.
View the Flow Results
When we added the new item to this list flow automatically ran a workflow. First let's make sure that we can find the item in this list. We can Search and 24-volt is going to find something for us. There's our K-Eco2 24-volt backup battery in stock three, that looks good.
And what about that email? Well remember that the email was sent not just to Rodney but also to me, so if we switch to my inbox in Microsoft Outlook. Notice, new inventory item added. K-Eco2 24-volt backup battery, a new item was added at date and time by Gini Courter. Details item name, quantity. Our flow is working and if we would like to see all of our flows, remember that we can easily click the drop down arrow and click See Your Flows and we will end up My flows, Send a customized email when a new SharePoint list item is added. Now if we'd like to edit that flow we can do that from here. We can turn this flow off if we don't want it to run for a while. So we could create this flow, only use it during the two weeks of the year that we're doing a physical inventory, turn it off the other 50 weeks of the year, that's pretty slick. If I'd like to see information about it, I can see the flow, here's the last time it ran 23 minutes ago, it took two seconds to walk through the first step, a second for the second step, and almost no time at all and notice that we have inputs and outputs for each of these steps. So we can see what the information was when a new item is created. There's the information from the item. If I ever want to see what's happening in a flow, no problem at all, simply go and take a look at it. Notice that I can also filter this and see if there were failures, if there were times that my flow was unable to run, if there are flows that are currently paused, currently running, that have timed out, that are waiting. All kinds of information about each of my flows. And the ability to quickly and easily go in and edit. If I want to get rid of a flow I can delete it. I often will turn a flow off if I believe I might not want to work with it, and simply turn it off and leave it off for a while and then make a decision about whether I actually wish to delete it or I simply want to keep it on the bench and use it when I wish to.
When I'm done looking at my flows, I can simply close https://flow.microsoft.com and fall back to my SharePoint site.
.ico)