InfoPath 2013: Essential Training
 InfoPath 2013: Essential Training
Welcome
Links
What You Can Do With InfoPath
- Fill out a form
- InfoPath Filler
- Browser (Internet Explorer)
- Submit a form
- by email
- to a SharePoint site
- to a database
- Aggregate and view form details
- SharePoint
Infopath captures data in the form of extensible markup language, or XML.
Introducing InfoPath 2013
Understanding the InfoPath 2013 Programs
There are two separate InfoPath programs that do two different things.
InfoPath Filler
InfoPath Filler is simply used to fill in forms.
InfoPath Designer
This is a form development environment.
Opening InfoPath Files
Both InfoPath Filler and InfoPath Designer can be used to open InfoPath files. By default, the InfoPath extension, xsn, opens a form with InfoPath Filler.
Starting InfoPath Designer 2013
Popular Form Templates
There are popular form templates available with InfoPath.
SharePoint List
When a SharePoint list is created, forms are also created that are associated with that list. They are
- view item
- edit item
- browse list
SharePoint Form Library
This is a form that is stored in a library. The library will serve as the form that users go and fill out and save there. A SharePoint location is not needed for this type of form.
This is just like the SharePoint Form library.
Blank Form
This form is supported by a browser. And because of this, the number of controls supported is much less than the Blank Form (InfoPath Filler).
Blank Form (InfoPath Filler)
This type of form is used by InfoPath Filler. This type of form is support by a long list of controls because InfoPath Filler supports the same long list of controls.
Advanced Form Templates
The Advanced Form Templates allow us to create some different types of templates connecting to data sources or for different purposes.
Database
This is for forms that need to connect to a database like SQL Server.
Web Service
This form is used to connect to a web service like a SOAP web service.
XML or Schema
Used to populate an XML file.
Convert Existing Form
And it maybe that your organization has a lot of templates that were built in Microsoft Word or Microsoft Excel. If you do then you can create a new InfoPath formed by converting that existing Excel or Microsoft Word template. That works well some of the time not so well more of the time
Document Information Panel
I can create a document information panel for use in the Microsoft Office Applications. This is when you open the panel at the top of a document in for example Excel or Word, and you display the custom properties and the built-In properties of that document, that's actually an InfoPath file that's been used there.
Template Parts
Starting with an XML file or Schema, or starting from scratch, I can create a section of a template that I want to use over and over again.
- Blank
- Blank (InfoPath Filler)
- XML or Schema
Using the InfoPath Designer Interface
Welcome to Microsoft InfoPath Designer 2013. This designer is built with the same interface that you've seen in all the other Office 2013 Applications. And if you worked with or even lightly looked at InfoPath Designer 2010, you'll find that the tools, and the commands and everything except the look here is eerily familiar. We have our Ribbon across the top, on the right we have a task pane that you'll see far more often than you do for example in Word or Excel. This task pane is critical pieces of the interface so don't get use to closing it down all the time; you'll want leave it open. Let's take a look at this entire user interface and see what we've got going on. Whenever we choose a new document template, we drop into the Designer with a Blank Form and it will have a little something going on, in this case the ability to click, to add a title, and a place to add tables. We have the Ribbon tabs across the top and these aren't necessarily in order. The reason I say that is in Word they actually are, but here we'll often want to come right away to this third tab, the Page Design tab, rather than the Home tab, because this is where we'll find things like other potential layouts, themes, and so on. But aside from the order, what you find is a really nice set of tools that you can use. For example, here are our text formatting tools that we'll use. We don't have a huge set of styles, but we have enough to get by and they're the same types of styles that we would use if we were publishing something for the web. We also have controls here that we'll use, Input controls that are places that users will enter information, whether they're entering regular text or Rich Text. This is where we have check boxes different kinds of dropdown lLists, all that different rich user experience controls that you'll find in great, great forms; the ability to have combo boxes, and date pickers and so on. So if you've seen a control used somewhere in Microsoft products the chances are good that it's here. We also have the ability to add objects whether we're adding buttons or calculated fields, allowing users to enter hyperlinks or place ink drawings that they would put together on their new surface, or being able to capture and insert a picture here. You'll also find Containers, which are sections that are used to group other controls, whether we're looking at something that's a strict section or something like a repeating table or detail that's driven off of one specific section of our form. On the Insert tab you'll find all of the different things you would insert particularly Tables. Microsoft InfoPath is Table centric. So we won't simply throw controls into a section, we'll always use Tables to be able to organize our content. So here you see for example text boxes with labels above them, here labels on the left and text boxes on the right and so on. But you'll want to use layout tables all the time you're working here in InfoPath and you can create your own custom tables as well, just as you would if you were designing a form in Microsoft Word, or somewhere else. We have the ability to add pictures and hyperlinks to set page breaks, to add symbols if we want, and to place a horizontal line. This is the extent of our tools for being able to insert objects. Under Page Design tab that we visited earlier, we have the ability to apply a theme, different colors, we have the ability to choose different page layout templates, but we also have the ability here to create views. So view is the way a user or group of users looks at a form in a particular period in time. So for example for an expense form I might have the default view, this is view that a user fills out to be able to say here are my expenses; but then we could create new views, a view for example for the accounting department to use that they would have different information that the user never needs to see. There's really no limit to the number of views that I can provide. One of the views I create will be a Print View, and all of the other views then our views that users can switch to either using the Ribbon or using some buttons that we provide. The Data tab is an incredibly powerful tab, because by default our form isn't connected to anything yet, but we can connect this form to get external data from a wide range of places. We can then send the data from this form to different locations through email to a SharePoint Library, or to other locations that we specify using a connection to a server including a web service. Then we have the ability to assign rules to our form that explain how the form works, based on whether the form is being submitted, or loaded, and the ability to inspect our form to make sure that the rules in the form are going to work. Here we have the Developer tab, and the Developer tab gives us the ability to assign different kinds of actions to events in the form. We can also load ome COM Add-Ins. In prior versions of InfoPath you had the ability to specify a code language and to actually write some light code here, for example C#. In InfoPath 2013 they've removed Visual Studio tools for applications, which was the code editor that was used by default in InfoPath. So if you want to write or edit code to go with your forms in InfoPath Designer, you actually now need to have Visual Studio 2012 installed on your machine. So the programming experience is basically the same, but you need to have Visual Studio in order to code at all. However in this course we're going to create all kinds of forms that aren't going to require code, so don't worry about it, we're going to be just fine. So if we go to our FILE tab we have some other choices here backstage, this is where we'll publish are completed form. To say we're going to distribute this by email, we are going to publish this to a SharePoint Library we're going to save this to a Network Share. This is where we set options for how the form is actually submitted. Submitting is different from publishing. Publishing determines how I'm going to distribute it. Submission determines what happens when someone fills out the form and then wants to send that data, not the form, but the data, somewhere else. I have the ability to check the design. And design checking here is not about accessibility, as it is in the other Microsoft Office Products. This Design Checker is actually checking to see if this form as it stands could actually be published and then opened, and completed, using a browser. Then we have some Advanced form options that we're going to use to configure the user's experience with this form. We'll talk about that later in this course. So now let's go back. Now we've seen how the tabs work, where the different commands are, and how the InfoPath Designer Interface works. So now in our next movies, we're going to take a look at the steps that we'll use to use this interface to create a brand-new form from scratch using InfoPath Designer.
Understanding the Steps for Creating a Template
Determine if you will be connecting to a data source or if you will be connecting to a data source later during publishing.
Layout for your form is the next step.
Choose the controls from the Home tab.
Determine if additional views are needed.
Use the Designer Checker in InfoPath to ensure it works.
Publish your form and determine your submit options.
Template-Creation Basics
Creating a Template from Scratch
It is possible to create templates from other templates. It is also possible to create a template from scratch. To create a template from scratch, open InfoPath Designer 2013. Select Blank Form from the list of Popular Templates and click on Design Form.
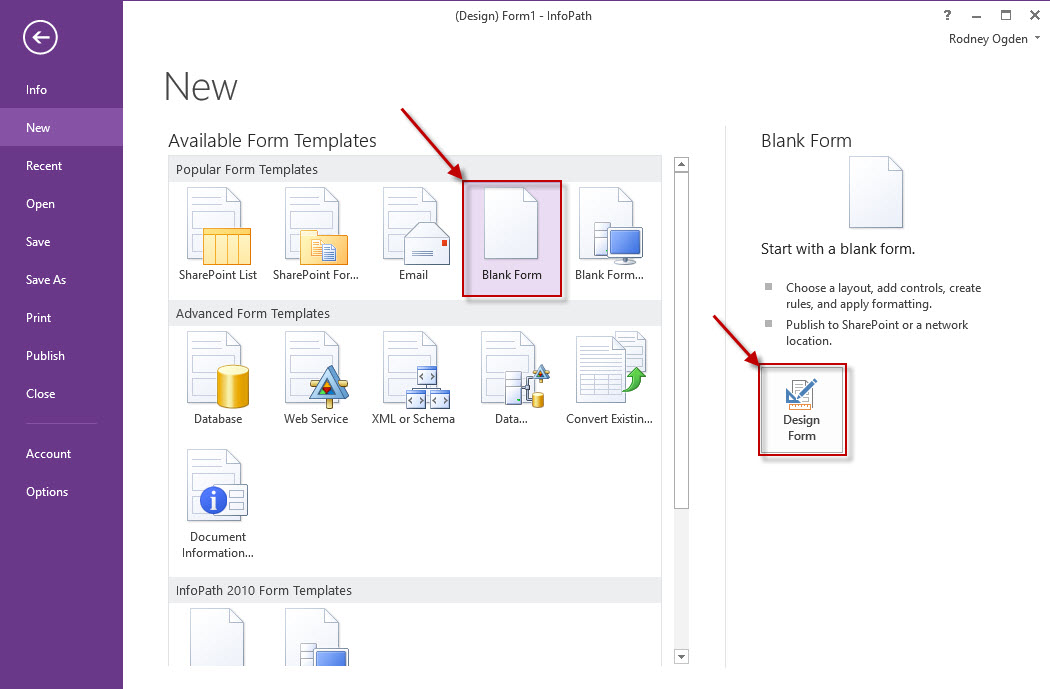
This is our form, ready to start from scratch.
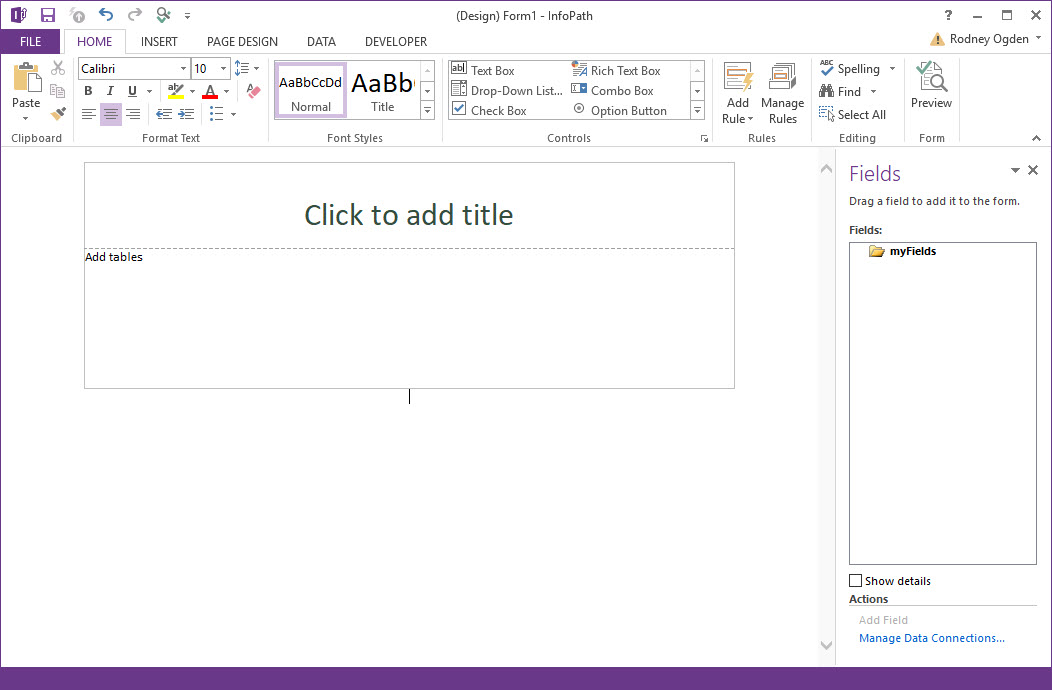
First, the title needs to be added. Click on the Click to add title label and this will clear the message. Now type a title. In this case, type the value Web Post Request.
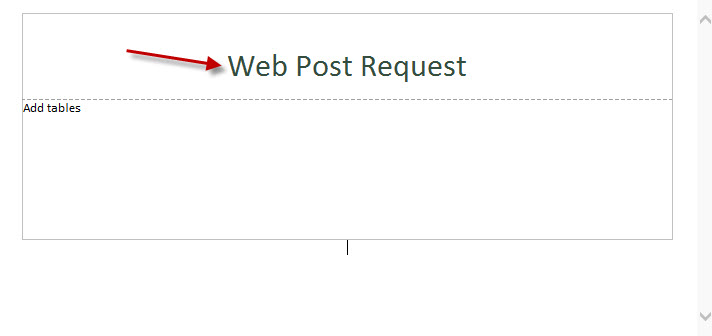
Next, we want to insert a four column table in the lower part of the form. This four column table will not have a header. To do this, click on the label Add tables to remove the label. The click on INSERT on the menu bar.
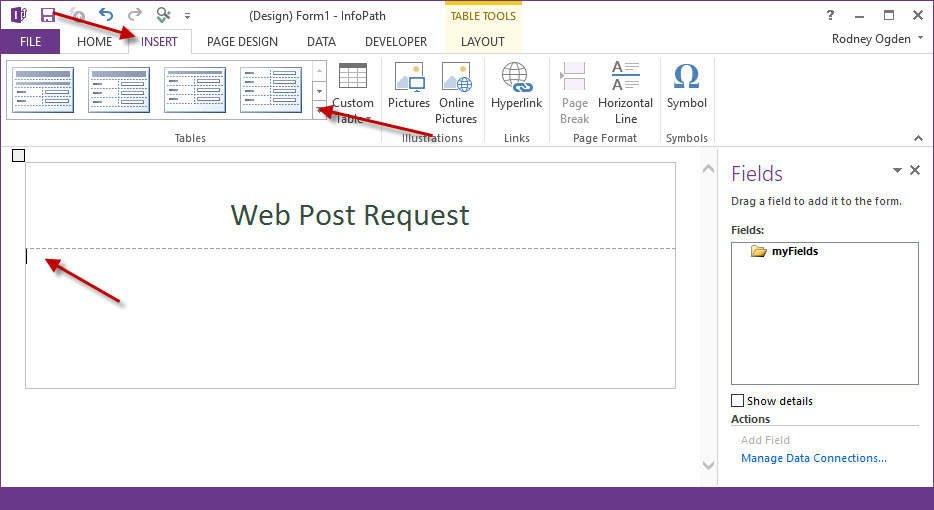
Then click on the indicated table.
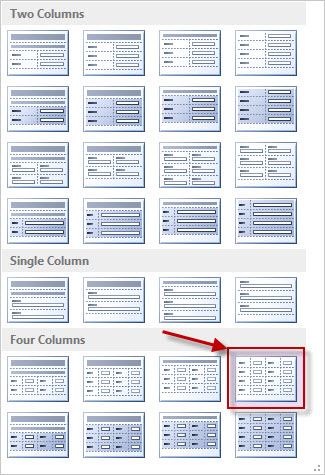
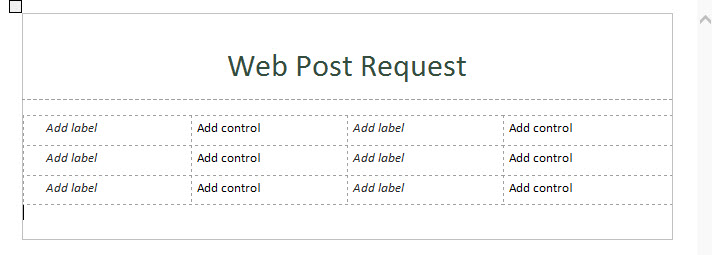
This action will add the table to the bottom section of the form.
Next, we need to add a date picker control to this form. Click in one of the cells that says Add control. This will clear it out. Then click on the HOME tab and the select the Date Picker control.
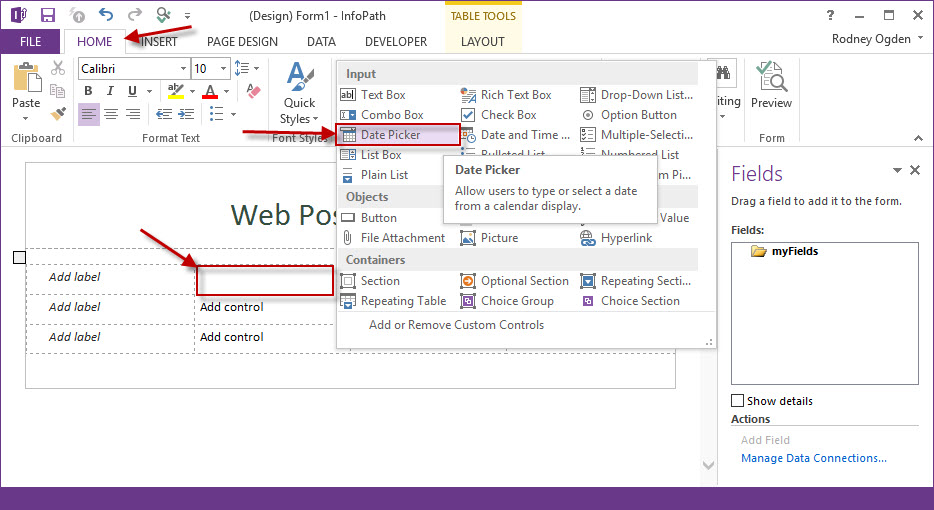
These actions will add a Date Picker control to the form.
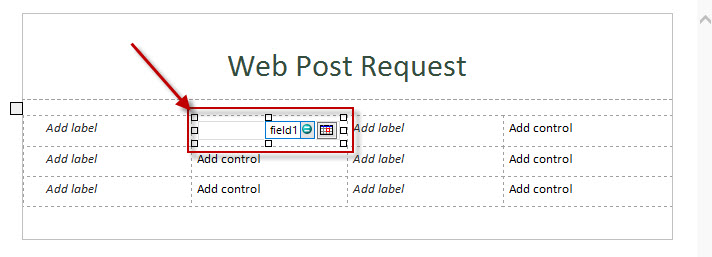
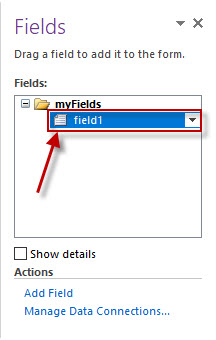
Notice that the name of the control, field1, is added to the list of fields on the right side of the dialog.
Previewing and Printing a Form
To experience a form like a user, it is possible to preview the form. To preview a form, click on the HOME tab and the Preview button on the menu bar.

While in a view, to exit from preview mode, click on the Close Preview button.

To print a form, click on the FILE tab followed by Print.

Saving a Template
To save a form, click on the FILE tab followed by Save.
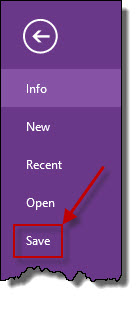
There are a number of choices that must be made. The first choice is where to save the template.
Secondly, the type must be selected. The default type is an InfoPath Web Browser Form Template. It is possible to save the template as an InfoPath Filler Form Tempalte or for an ealier version of InfoPath (i.e. 2003, 2007, 2010).
For the name, use something that is descriptive and meaningful.
Note that by saving a form, it is not available for users to use. To do this, it must be published (more on this later).
Importing Word and Excel Forms
InfoPath includes two different conversion utilities to take existing forms in Word or in Excel and convert them to InfoPath forms. Now I would be negligent if I didn't tell you about this early on because most of our organizations that we work with have lots and lots of existing forms. You might wonder why don't I just convert those. So I want to show you what that looks like, but it's little more difficult than it actually looks, so we'll talk more about this at the end of the course.
Here is my form in Microsoft Word. So it allows users to enter information. This form was originally created in Office 2010 so it uses the nice little XML here. You can see that it has fields and controls to capture information and that they are actually labeled. It has checkboxes on it, has some other information. The entire form isn't here, but this will be enough to give us a flavor. So I'm going to close the form in Word.
In InfoPath, when I choose new, one of my choices is Convert Existing Form so I'm just going to double-click. The import wizard only wants to know one thing. Is this an Excel Workbook form or is this a Word form? This is a Word form and there's a possibility if to out to the Office Marketplace and search for other converters that have been built as third-party products, but these are the two that are built in. So InfoPath importer for Word documents, click Next. Select the file to import. There's my file. And then I'm going to click the Options button so that you can take a look and see what some of the options are here. The default is to retain the layout that that form has and also the form fields. Notice that these choices here are not enabled and the reason is if I want to make some other choices here, I need to say yes, I also want to specify some custom conditions to configure this import. So the default is to convert any Word form field to InfoPath control. If there's a text box in Word, make it a text box there in InfoPath. To find repeating tables, those places where I put 20 rows so that people could enter all of their expenses or all of their requests. To detect rich text areas as different from areas where we had somebody just enter text in a plain text box in Word. And then if there's an empty underlying, turn it into a text box. If there's a colon and a space afterwards, assume that that's a place a user is going to put information, turn that into a text box. And then some choices that are turned off, but you might imagine that the way somebody created a form in Word was they just left an empty table cell as a place to put information. So if you want to turn that on, you would make this choice and you'd click the checkbox. That if we had a table cell that had label text in it, we might want that to become a text box and if someone simply put a set of brackets with space in between them that that would be a place to type information as well. Okay, so any of those that are found, you could convert to text boxes. Some people when they design forms, they use an open and close bracket set as a place that you would type an x and if those are detected those would be turned into checkboxes.
So these are the default options right here. If you like them click OK and then simply click Finish. Okay so, InfoPath says this form was imported successfully, but one or more potential issues were identified and we could find them in the Design Checker. So I'm going to click OK. The Design Checker comes on and it says, there might be somethings that were positioned incorrectly. We'll find out what that means. How incorrectly? Well, actually the incorrectly is there is some stuff centered here and the rest of our form is way over to left. That's actually not so bad. It could be much much worse. We can arrange that. But these are just labels, we can delete these and we can type them in again in a way that we would like to see them. Here the things that I'm interested in. The things I'm concerned about here is how did my data show up, because you'll notice that it brought the form in and there's really not a field here. There is just text. So if I go and click on data and I say show fields, you'll notice not a single data field came in here for Microsoft Word. Again, that's not unusual. There are some strategies that we can use to make InfoPath do a little better than it did in this particular case. But it might be that all we really want is the table, the structure, because this gives us a great head start. This is really well laid out. So, if I decided that I mostly wanted the layout and then I would go in here and say okay, I'm going to delete that text. I'm just going to throw in a text box. Look at how well that works, because the spacing is already here.
So let's take another swing at this. I'm actually going to close this version right here and not save it. And just say, I want to convert an existing Word document, our same document, and in this case, I just want the Layout. And I still have the same issue up at the top that I need to do something with that. But all I have is the layout and I don't really expect to get the form fields. It will focus really well on getting this layout down as cleanly and as crisply as it can.
So two different possibilities; Word and Excel, several options on how we would convert it. And again, we'll return to this topic later in the course. But if you really just want to grab the design out of a form and have your layout tables and go forward, this isn't a bad way to do it and it will give you a head start on creating your form in InfoPath.
Creating a Data Source
Understanding Data Sources
It is possible to create a drop down box, or combo box, that is populated with values that come from a SharePoint list. SharePoint is one of the tools that can be used to create a data source.
There are a variety of sources that can be used to supply values to a form. They are:
- SharePoint data
- Database
- Manual list (i.e. small text file)
- XML data
The data in a form can save saved to various locations. That includes:
- SharePoint
- Database
Automatically Creating a Data Source
To start, create a Blank Form. Set the title to Travel Request and insert a four column table into the lower section. Your form should look like this:

Insert a date picker control in the table. Notice that if you look at the field1 information, it added a date field. This is because it was a data picker control. It should look like this:

Everytime a control is dropped onto the form, InfoPath reacts by creating a connection for it.
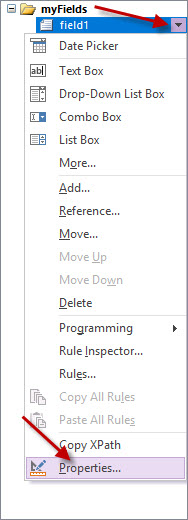
A field's properties can be changed. A field with the name field1 does not work well. So click on a field's drop down box and select Properties.
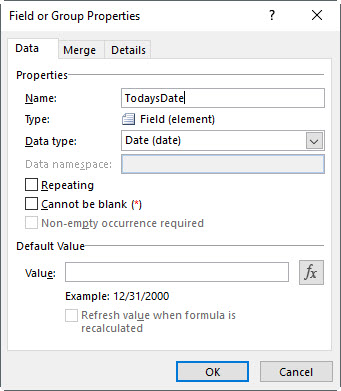
This is where a field's properties can be edited.
It is possible to add a field to the Fields list and not add it to the form itself. At the bottom of the Fields list, click on Add Field.
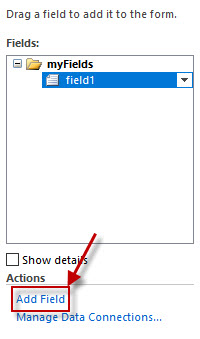
This will open the Add Field or Group dialog. Enter the text EmailAddress in the Name field then click OK.
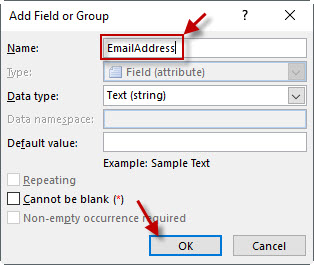
This will add it to the Fields list, but not on the form. To add it to the form, click, hold and drag the field from the list onto the form and drop it in a cell that says Add control. This will add the field to the form.
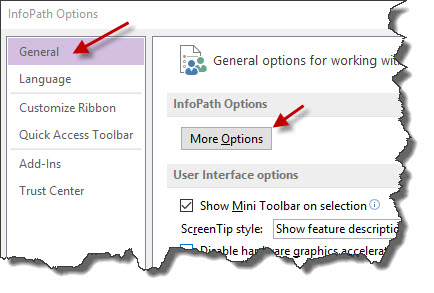
When you add a control to the form, notice that it also automatically creates a label for you. If you want to disable this feature, then navigate to the FILE tab and click on Options. This will open the InfoPath Options dialog. Make sure you have General selected and look for More Options button.
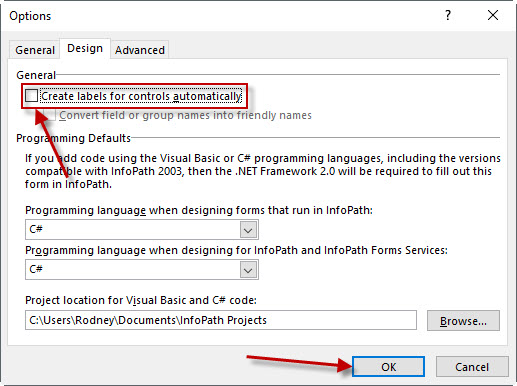
This will open the Options dialog box. Click on the Design tab. Remove the check mark on Create labels for controls automatically. Click on the OK button to save your change.
Setting Field Properties
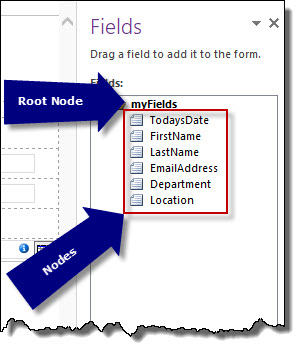
The top level field, myFields, is known as a root node. That is because the schema that is generated is in an XML format. Each of the individual fields are known as a node.
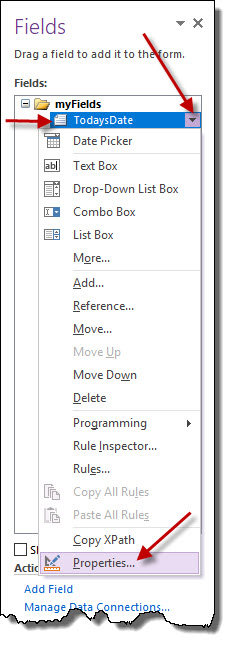
By selecting a field, clicking on the drop down box and clicking on Properties..., the Field or Group Properties dialog opens.
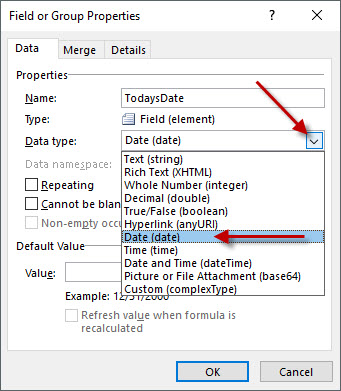
The Data type property is the type of data we expect the user to provide in this field.
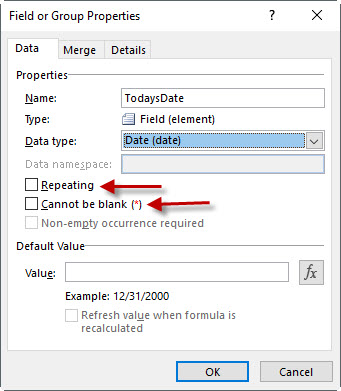
If a field is to occur more than once, that would be considered to be a Repeating field.
Cannot be blank (*) is the same as "Required". When checked, the field is required. When checked, InfoPath adds a small red asterisk to the field to indicate that it is required.
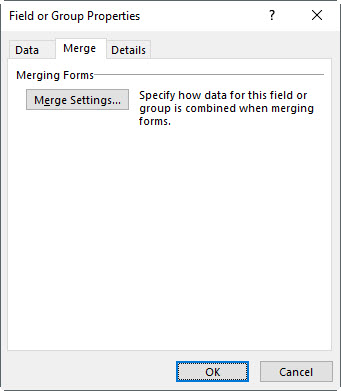
On the Merge tab, there are settings that allow multiple values to be combined into this field when you combine this form with other forms.
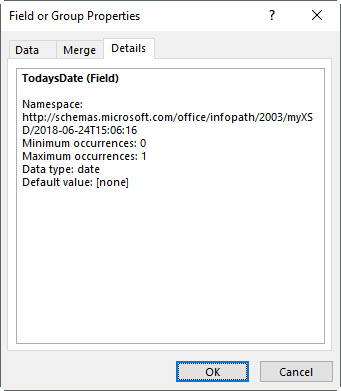
The Details tab contains information that is stored for the XML. This tab does not allow any changes. Any changes made on the Data tab will be reflected here.
Modifying a Data Source
At this point, makes sense to add some groups to the data source. To create a group, click on myFields and click on Add Field. This will open the Add Field or Group dialog box. for the Name, enter the value Traveler. For Type, click on the drop down box and select Group. Click on the OK button.
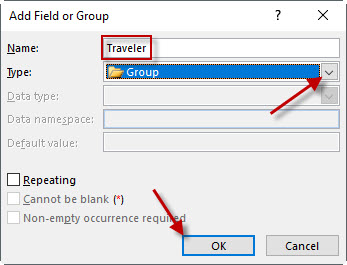
This action created a group named Travler and it was placed at the bottom of the list of fields.
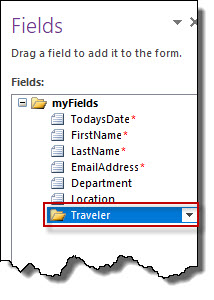
Next, several of the fields in the list need to be moved to the new group. WARNING: This action will delete any data that may already exist in the data source. To move the field named FirstName, click on FirstName field, click on the combo box and select Move....
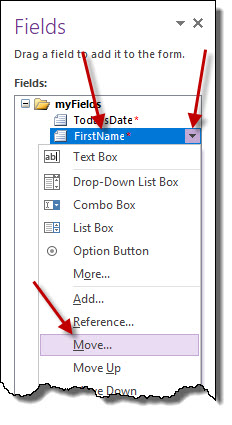
This will open the Move Field or Group dialog box. Click on the Travler group and click on the OK button.

You may receive a warning that this action will delete any data. If this is okay, the allow the move. This will complete the move.
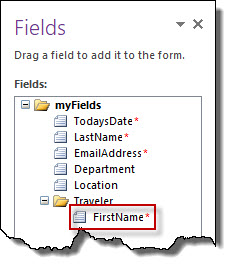
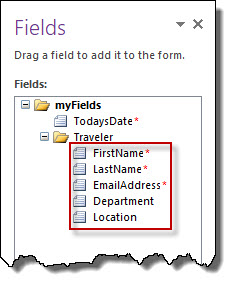
Repeat these steps to move the following fields:
- LastName
- EmailAddress
- Department
- Location
Create a new group named TravelRequest under the myFields group. For this group, make sure that Repeating is turned on.
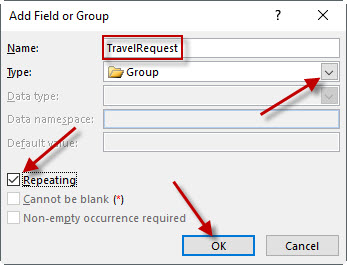
Our new group is added.

Add two fields to the TravelRequest group. They should be defined as:
- Name: City
- Data type: Text (string)
- Cannot be blank (*): unchecked
- Name: DepartureDate
- Data type: Date (date)
- Cannot be blank (*): checked
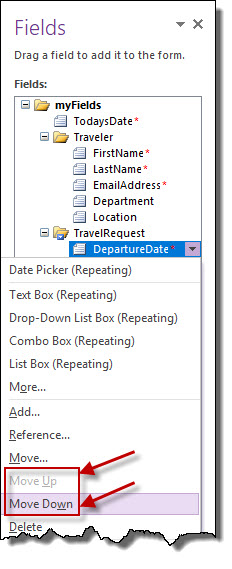
If it becomes necessary to change the order of fields in a group, the Move Up and Move Down commands can be used. They are found by clicking on the drop down box for the field that needs to be moved.
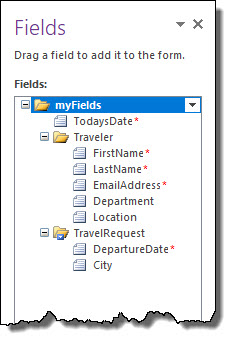
The list of fields should now look like this:
Formatting a Template
Selecting a Page Layout Template
If you want to change to any page layout templates, it is best to do it before you have added any content to your form. By using tables, the controls are left aligned and the labels are left aligned.
Adding and Formatting a Layout Table
Layout tables allow for a regular, standardized appearance to our forms. We also ensure that it's very easy for us to position controls on the page.
If an additional layout table is needed, simply select INSERT and select one of the tables that are available or select the option to create a Custom Table. Building a custom table works the same way as adding a table in Microsoft Word.
Some of the table layouts come with colors. Those colors come from themes. Themes determine the colors used in our forms.
Choosing a Theme
These themes are not the same as the ones seen in Microsoft Word, Excel or PowerPoint. Here, when a theme is selected, not only are you selecting color, but you are also choosing fonts, alignment and styles.
To choose a theme, select PAGE DESIGN, from the menu bar, then select the theme that is desired.
Inserting a Logo or Other Picture
If an image is needed on the form, resize the image outside of InfoPath, then insert the image as needed.
Inserting an Online Image
Images that are located online can be used as a source. To insert an image from an online source, click on the INSERT tab, then select Online Pictures.
Using Controls to Collect Data
Understanding the Use of Form Controls
There are three type of controls. They are:
- Input controls - capture text-based information from users
- Object controls - capture hyperlinks and picture and items that can be browsed to
- Containers - group input and object controls into useful organizational forms
When a field is dragged onto the form, by default, it creates a text box. But if you want the capability of deciding the type of control to use, then when the field is dragged, do so while you are holding the right-mouse button. When the field is dropped onto the form, a context menu is displayed.
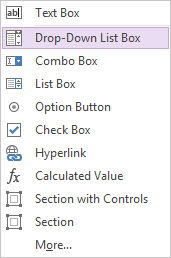
Just like there are properties on a field, there are also properties associated with a control. To view those properties, right-mouse click on a control and look for Properties on the context menu.

Properties
Data fields include the following properties:
- Field name
- Data type
- Required
- Repeating
- Merge settings
Form controls include the following properties:
- Binding
- Data format
- Default value
- Validation
- Display settings
- Size and position
- Accessibility
Organizing a Template with Sections
It is possible to place a section on your form. In this example, right-mouse drag the group Requester to the lower part of the form.
It is possible to sign a form with a digital signature. What that does when I have a user do that is it locks down the forms so it can't be changed. For example, once the requestor has filled some information in the form, they have the ability to say, I am going to sign this, this is how it was when it left me and I'm going to lock this down. When I sign forms in InfoPath, I have two choices of what I want to sign; I can sign a whole form or I can sign one or more specific sections. If I have a group of data that only one group in my organization is going to use, I want to make sure to put in a separate section, that way I can sign the rest of the form and allow my users then to have access to the parts that they need.

This action will open a context menu like this:
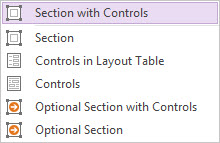
By selecting Selection with Controls, this action will add a section that is bound to the Requester group and create controls for all of the fields in the group.
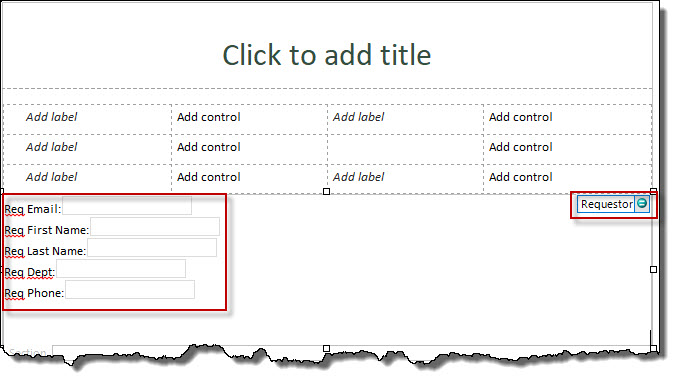
Another way to add a section to a form is to navigate to HOME, and in the Controls section, click on Section. This will add an unbound section to your form.
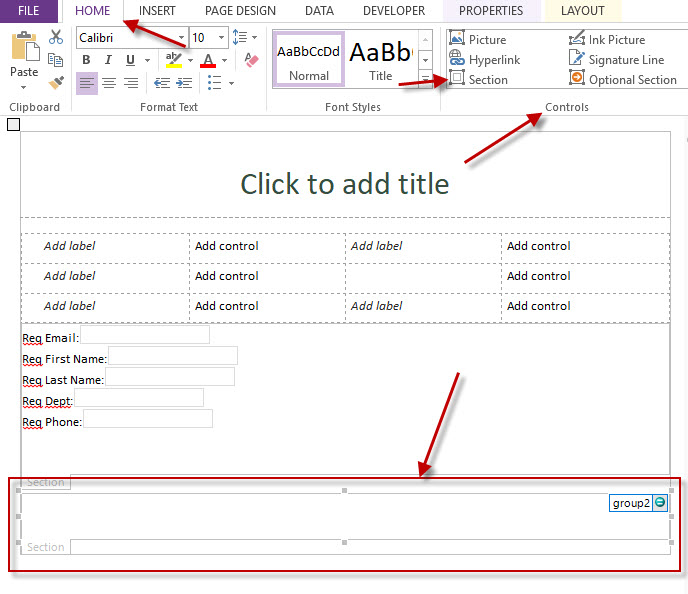
Sections can be added within sections. Select the section that you wish to add additional sections to and click on the Section button again two times.
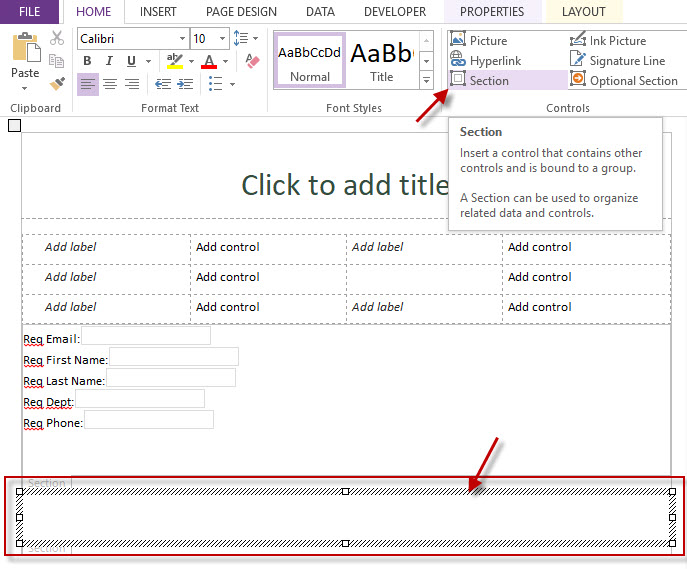
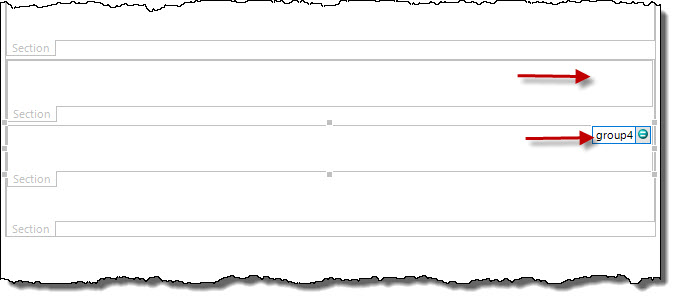
This will add two internal sections.
Changing Data Binding for a Control
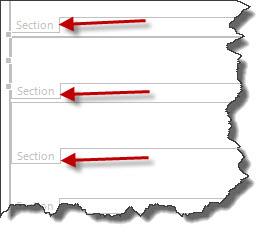
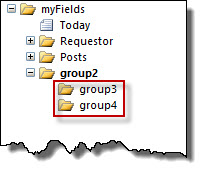
We have a unbound section with two embedded unbound sections. group2 is the section that contains both group3 and group4. To select a section, click on the grey Section tab to highlight.
The field list verifies that group3 and group4 are indeed inside group2.
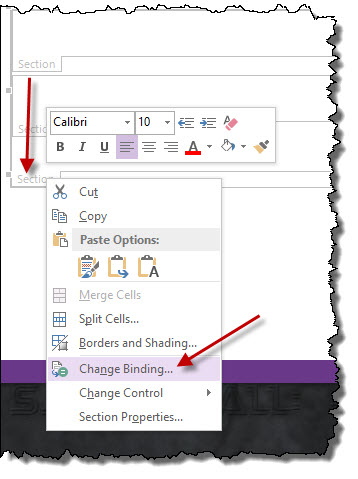
It is time to bind group2. This can be started one of two ways. Method 1 requires group2 to be selected and then right-mouse click in the group. Select Change Binding... from the context menu.
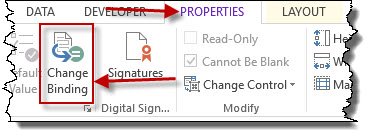
Method 2 also needs to have the control selected. When selected, click on the PROPERTIES tab and then Change Binding.
Ultimately, both methods will open the Section Binding dialog. On the Data source combo box, ensure that the Main data source is selected. Is possible to have more than one data source defined on a single form. Then ensure that the group Posts is selected. Then click on OK. Now, section group2 is directed to Posts.
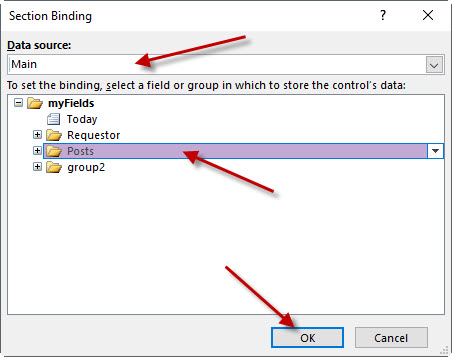
Now, change the binding for section group3 to PostCategories.
Next, change the binding for section group4 to News.
At this point the groups listed in our Fields list, namely group2, group3 and group4, are not needed. They need to be cleaned up. Note: The action that is about to be performed cannot be undone. To delete these groups, highlight group2, right-mouse click and select Delete from the context menu.
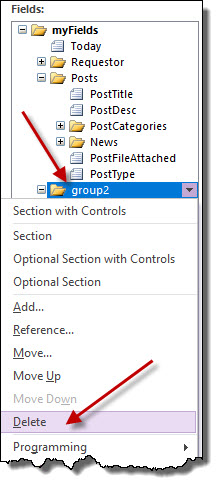
Click Yes on the verification window.
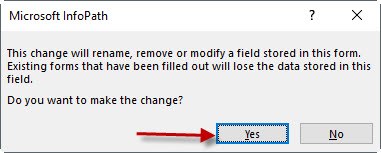
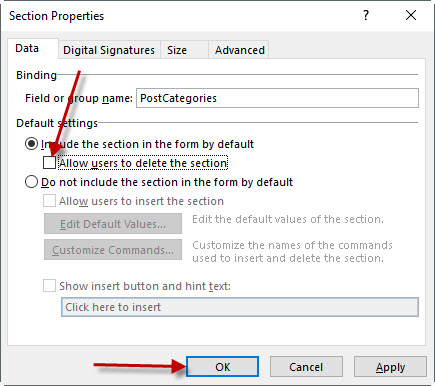
The two sections, PostCategories and News, should be showing that they are optional. This is evident by the Optional Section tab on the form. This needs to be changed. Select the section, right-mouse click on that selection and select Section Properties... from the context menu.
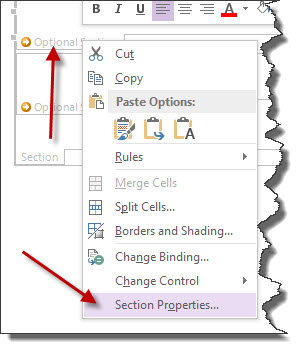
This opens the Section Properties dialog box. Remove the check mark on the Allow users to delete the section option. Then click on OK.
Using Text Controls
Text Box
Text Box
Used to enter plain text. When a field that is defined as string and is dragged onto a form, the default control that is built is a text box.
Using Rich Text Controls
A rich text box control can only be used for those fields that have a data type that supports this type of control. If the field is defined with a data type of Rich Text (XHTML), the rich text control can be used. If the data type is defined as string, a rich text control cannot be used.
If the field is defined as Repeating, a rich text control cannot be used.
Using Date Pickers
Used to provide dates to fields defined with a data type of date.
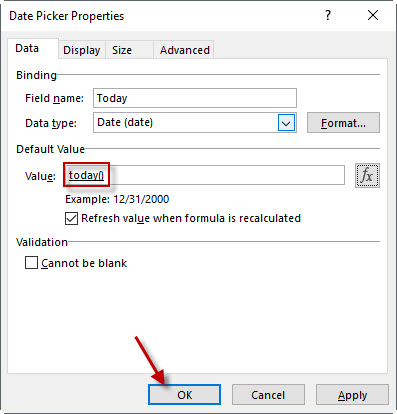
To set the default date to today's date, on the Data Picker Properties form, click on the fx button.

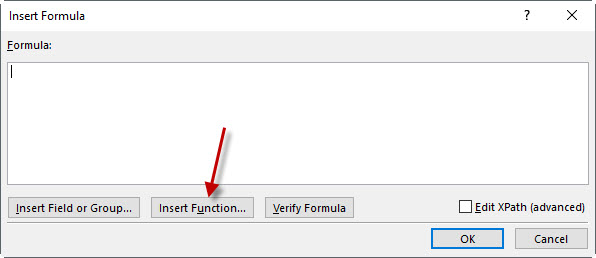
On the Insert Formula dialog, click on the Insert Function... button.
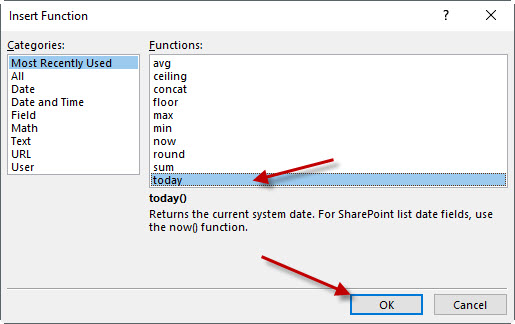
On the Insert Function dialog, click on the today function and click on the OK button. Note: The now function returns a value that is better suited for a SharePoint list. That is because SharePoints wants both dates and times.
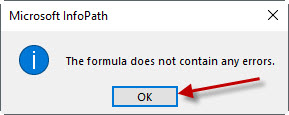
Back on the Insert Formula screen, it is always a good idea to click on the Verify Formula button.
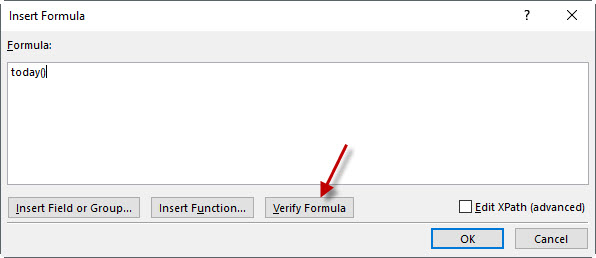
If everything is good, you should see a message indicating no errors. Click on the OK button.
You should be back on the Date Picker Properties form. Click the OK button.
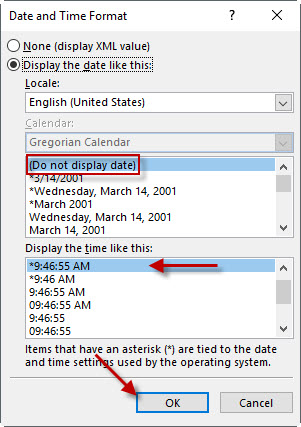
For a data field that is defined as DateTime, when the field is dragged onto the form, two controls are added. One for date and the other for time.
The Time control is a text box. When its properties are set, there is an option to display the time is particular format. For a time text box, do not display the date by selecting (Do not display date). For the time format, select a time format.
Using List Boxes
There are four different types of lists. They are:
- Drop-Down Lists
- List Boxes
- Combo Boxes
- Multiple Selection List
To enter the choices available on a list box, there are three ways to do this. The first is by typing in the choices. The second way is to get choices from fields in this form. The third is to get choices from an external data source. This method could read data from an Excel file or a SharePoint list.
Using Bulleted and Numbered List Controls
A list control allows a user to create n items in an unbulleted, unnumbered list. A list control creates a group in the field list. Each item in the list gets an individual field and a text box.
Using Check Boxes
The check box control control is used when you want to provide your user with exactly two choices; yes or no, true or false, 0 or 1, in or out, checked or unchecked.
A check box control is used for fields that are considered to be boolean fields.
To add the check box control, simply click, hold and drag the field to the table cell where the control is needed.

The label can be changed by simply highlighting the current label and type what is needed.

To verify the check box's properties, right-mouse click on the control and select Check Box Properties....
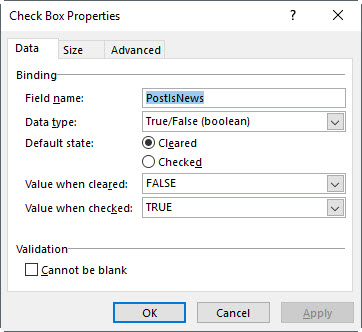
Using Option Buttons
The use of option button is an alternative to drop down lists.
Although not necessary, type the options into a cell in a table. These are the options that will be available for the option button control.

By doing this, we have a good idea of how many options we will have. InfoPath is NOT forgiving when it comes to changing the number of options in an option control after it has been defined. Insert an option button control in another table cell on the form.
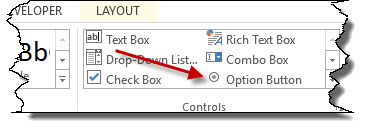
This action will open the Insert Option Buttons dialog. Change the number of option button to 4 and hit the OK button.

You now have your option buttons.
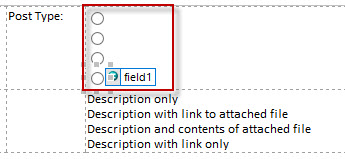
Notice that by adding an option control, there is a new field located in the field list. In this case, it is named field 1. The binding needs to be changed. In this case, it needs to be changed to PostType. To do this, right-mouse click on the option control and select Change Binding... from the context menu.
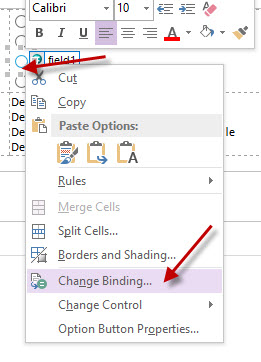
Select PostType from the list of fields or groups and click on the OK button.
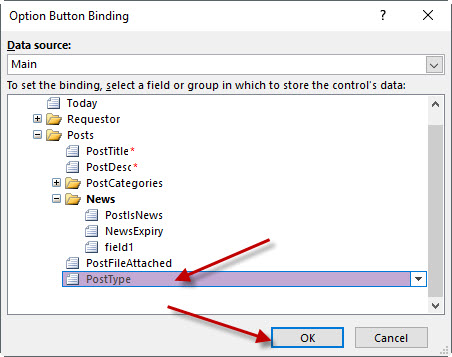
This must be done for every option in the group. Since there are four of them, this action will need to be done a total of four times.
To check to make sure all of the options have changed, click on the new field, field1, and if nothing is selected on the form, delete field1.
The text for the options is next. Since they already exist below, it is possible to highlight the text in the lower cell and move it to the corresponding option. You should now have your four option buttons and descriptions.
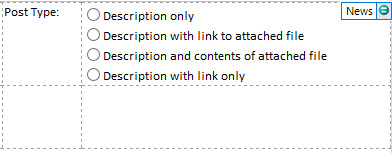
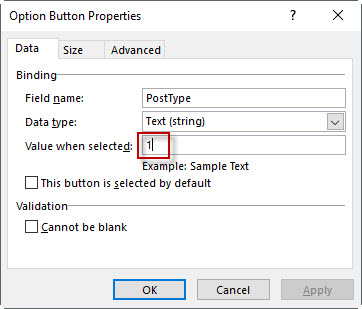
Currently, if one of these options are selected, then a numeric value is set. This is evident by looking at one of the option's properties. In this example, the first option set's the value to '1'.
To set the default value for the option buttons, select the option button that the default value should be and look at its properties. Ensure that the This button is selected by default is checked and hit the OK button.
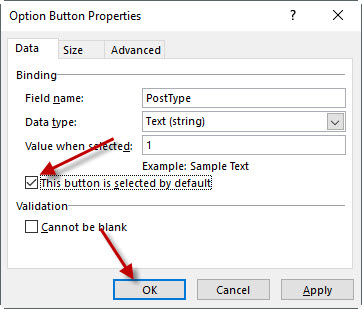
It is possible to not have any options set as the default, but this is unusual behavior.
Changing a Control's Type
It is possible to change a control from one type to another. To do this, right-mouse click the control that you would like to change. From the context menu, select Change Control. You are provided with a list of controls that this particular control can be changed into.
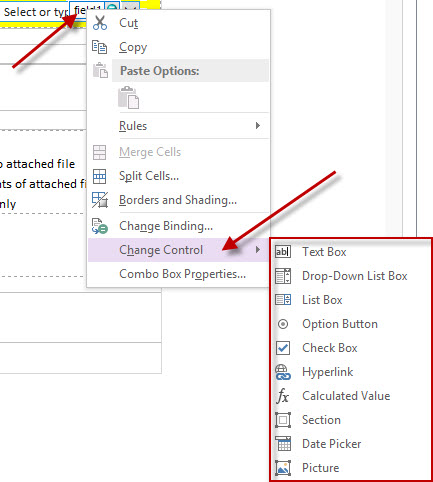
The types of controls that you can covert to depends on the data type of field. If the type of control is not present in the list of options, perhaps the field's data type needs to be changed also.
Setting Options and Formatting Controls
Formatting Labels
Formatting Controls
Using Rules to Catch Incorrect or Missing Data
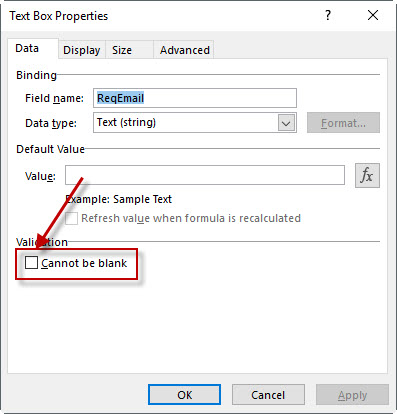
To set up a rule that verifies that a field is not blank, text box controls have a Validation rule that must be checked. When the Submit button is used, the validation rule is checked. If it fails the check, the data on the form is not submitted.
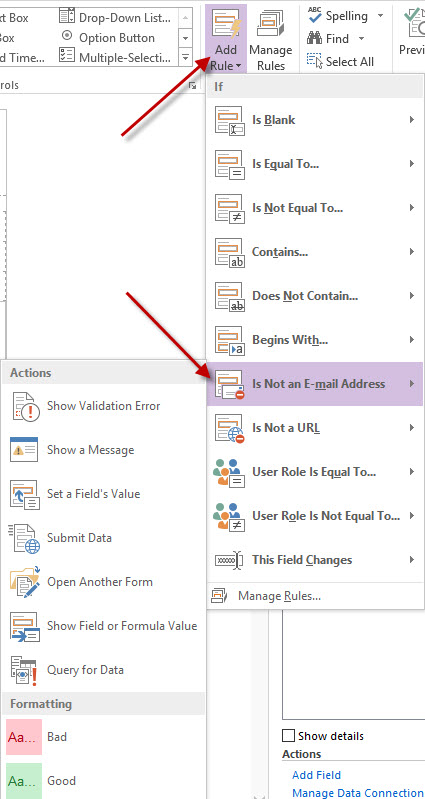
To validate an email address in a text box, ensure that the control is selected and on the toolbar, on the HOME tab, in the Rules section, click on Add Rule. There is a rule in the drop down that says Is Not an E-mail Address. And when that is selected, possible actions are displayed.
There are also rules for date fields. You can check to see if dates are in the future.
Using Rules for Conditional Formatting
It is possible to 'turn off' some controls when values are set in other controls. This can be done with a custom formatting rule.
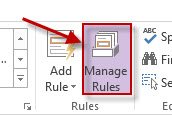
Click on the control that needs to formatted to select it. Once selected, on the HOME tab, in the Rules section, click on Manage Rules.
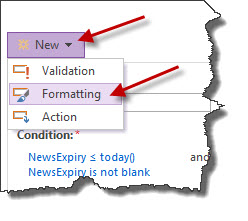
In the Rules pane, click on the New dropdown box and selecting Formatting.
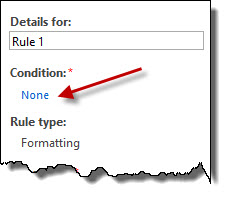
This will create a new rule named Rule 1. In the Condition section, click on the blue None.
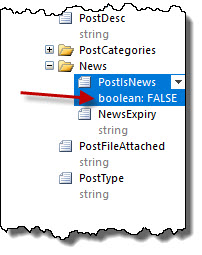
This will open a Condition dialog box. Click on the first drop down box, the one that has NewsExpiry in it, and select PostIsNews. Please note that the drop down lists all of the controls that are in the currently selected section. If a control from another section is required, then select Select a field or group....
Ensure that the second drop down has is equal to selected.
For the third dropdown box, select FALSE.
Click on OK.

This will close the Condition dialog. It now time to set the formatting that is to occur. Normally, in this situation, one would Hide this control for this condition. However, this control is a date picker. Because of this, the date picker control cannot be hidden. In this situation, the control will be 'turned off' or disabled. Click on Disable this control.
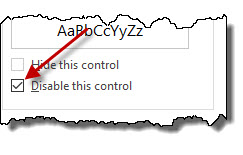
At this point, you can test this rule by clicking on the Preview button.

Give the rule a name. In the Details For text box, enter a string like Expiry Date not needed
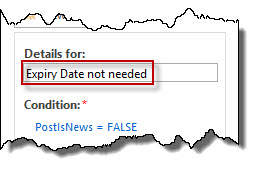
Please note that since this particular field is defined as a Date Time field and there is a text box for the date portion and a text box for the time portion. The same steps must be performed to disable the time portion of the field. Setting the date portion does not carry over to the time portion.
To perform the same actions using option buttons to set the properties of a text box control, the exact text of the option control value must be identified. To do this, determine the value of the option button. To determine this, right-mouse click on the option and examine the properties. In this example, the value is 4. Click on the Cancel button.
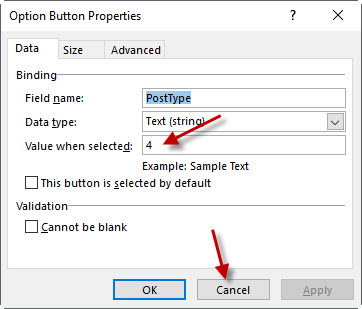
To add the rule, ensure your text box field is highlighted and click on the New rule drop down. Select the Formatting option.

On the new rule, click on the None link to open a Condition dialog box.

for the condition, set the first combo box to PostType. The second combo box is set to isnot equal to. For the third combo box, click on the drop down and select Type text... and enter the value 4. Click on the OK button to save it.

Back on the Rules pane, ensure the Hide this control is selected.
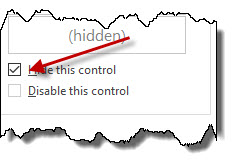
Give the rule a name.
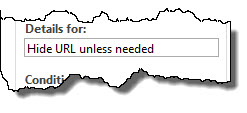
Using Tables and Sections for Repeating Data
Using Repeating Tables
Using Repeating Sections
Using Optional Sections
Using Choice Controls
Using Object Controls
Using the File Attachment Control
Using the Hyperlink Control
Calclulating a Value with Form Data
Using the Picture Control
Creating Browser Forms
Understanding Browser, or Thin-Client, Forms
Checking a Template for Use in a Browser
Finishing a Template
Checking Spelling
To perform a spell check of your form, click on the HOME tab. Then in the Editing group, click on Spelling. This will drop down a menu. Select Spelling....

The spell checker does not check the text that is a placeholder for a field.
Testing a Template
It is a good idea to release the form to some people that are willing to take the form for a drive in an attempt to find an error. To do this, put the form in Preview mode and try everything.
Testing
- Input- and object-control functionality
- Correct contents
- Correct behavior
- Container functionality
- Rules
- Advanced features
- Save and submit
- View
To generate a list of all rules on a form, use the Rule Inspector. The Rule Spector generates a summary of all of the rules on this form. To use the Rule Inspector, click on the DATA tab. Then in the Rules group, click on the Rule Inspector. This list can be printed out and handed to a tester.

Creating Views
Creating a View
A view is a single way to view the data in a template or form. A template can have multiple views. Each view has a unique way of showing the data.
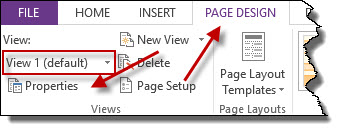
When InfoPath creates your form, it automatically creates a default view. It is known as View 1 (default).
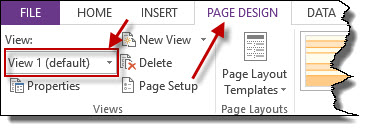
Typically, this view, View 1, of the form has everything on it. It is possible to change the name of this view. To do this, click on Properties.
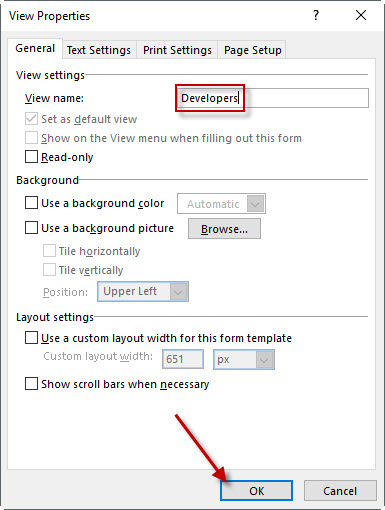
This will open the View Properties dialog box. Since this is our default, comprehensive view of the form, change the View name to Developers. As other views are created for this form, they will be variations of this Developers view. Click on the OK button.
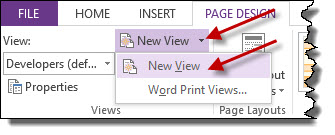
To create a new view, it is important to first click anywhere on your default view. The perform a Control-A to select everything on the form. Then perform a Control-C to copy everything. The click on the New View drop down and select New View.
In the Add View dialog, set the name to User Data Entry. Then click on the OK button.

In the new view, there is always a layout table. Click on the layout table box to select it and delete it by pressing the Del key. Then enter a Control-V to paste the default view into this view. This will give you an exact copy.
There may be a section that is not needed on the user data entry portion of the form. To get rid of the section, select it and the delete it.
When the form is saved, all of the views are saved with the form.
Creating a Print View
Setting View Properties
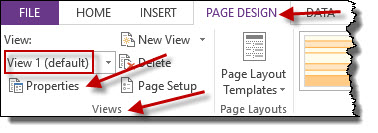
Along with everything else in Microsoft's world, views have properties. A view's properties can be accessed by clicking onthe PAGE DESIGN tab, and in the View group, select the view that need to have the properties accessed in the drop down box and the click on Properties.
Using Buttons to Switch Views
To add a command button to your form, first click in the table cell where you want to place your button. Then from the HOME tab, locate the Controls section, and if necessary, click on the drop down button, and then click on Button.
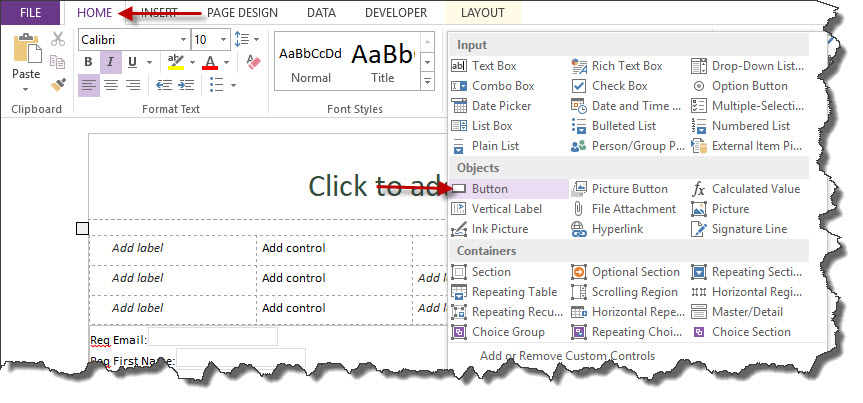
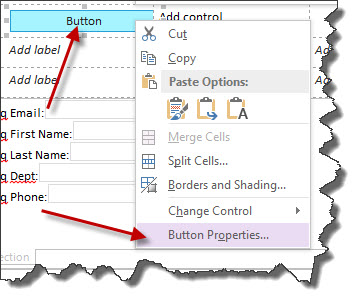
To edit the button's properties, right-click on the button and select Button Properties... from the context menu.
To set what happens when you click on a button, ensure that the button is selected. From the HOME tab, in the Rules group, click on Add Rule. Then click on When This Button Is Clicked and the select the action. For instance, the action could be one of these options:
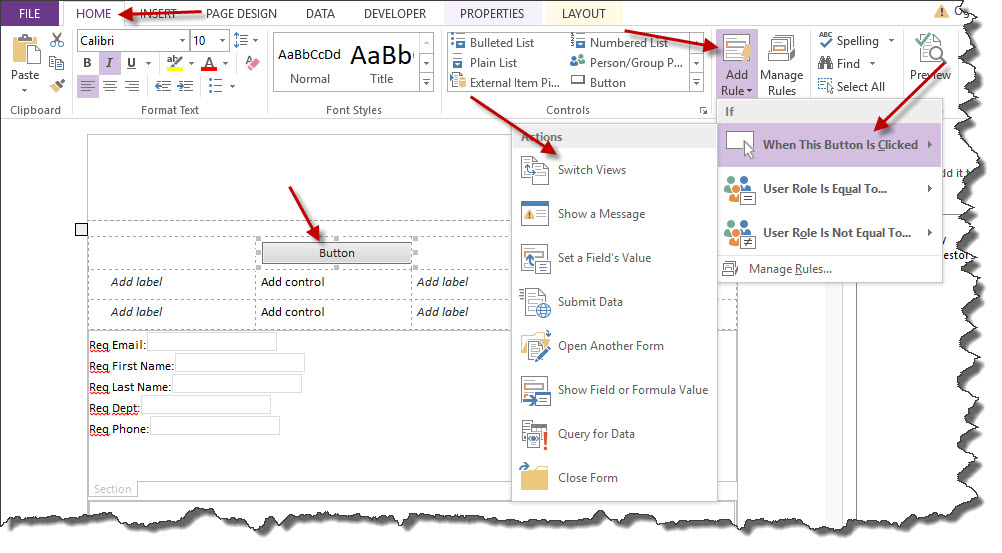
All of the rules can be managed by clicking on the Manage Rules button.

Publishing Options
Understanding Submit Options
There are two broad ways that a form can be submitted. They are:
- Submit to one location
- Submit to a SharePoint library
- Submit to a database using a web service
- Submit by email
- Submit to SharePoint using a data connection
- Submit to a SharePoint list
- Submit to two or more locations
- Use rules to submit the form
- Write one action rule for each submit action
To set a form's submit options, from the DATA tab, locate the Submit Form section. Here are the options for form submission.

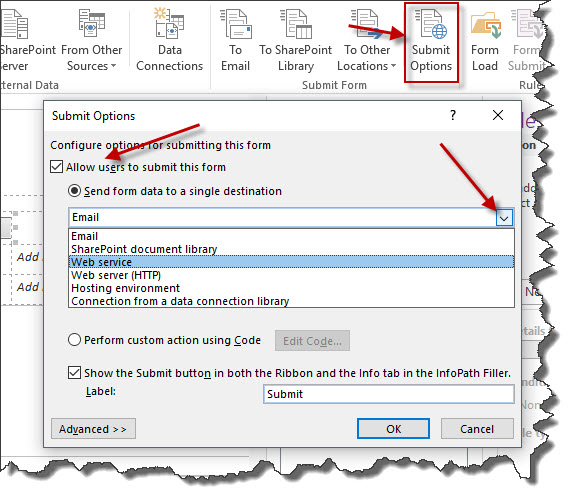
It is also possible to click on the Submit Options button and set the options on this dialog. NOTE: Notice that submitting to a SharePoint list is not an option. There is a different template or process for this.
Understanding Security and Publishing
Submitting Using Email
Publishing on a Network Share
Distributing Using Email
Using Quick Publish
Viewing the Files InfoPath Creates
Publishing a Template in SharePoint
Publishing InfoPath Templates in SharePoint
There are a couple of different options for publishing InfoPath templates in SharePoint libraries. These options are based on what our submit options are.
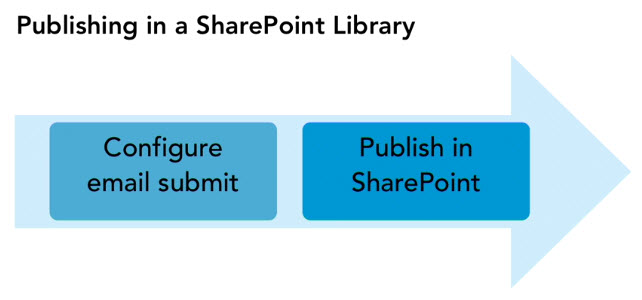
The first option is when a form that is located in a SharePoint Library but is used to send information via email when a user click on the submit button. For example, on a SharePoint site, there are several different forms sitting there. Each sits in its own library. The user can open one of those forms, fill it out and the data is sent via email through an Email Submit.
In this situation, a developer can develop a form in InfoPath, configure an email submit and then publish it to SharePoint.
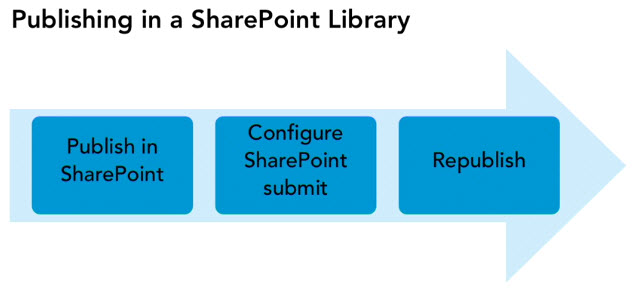
In a situation where we have a SharePoint Library that has its own form, and a user fills that form out and submits it right back into the same SharePoint Library, the process is different.
To start, the form is published to SharePoint. In doing so, the act of publishing will create the SharePoint Library. The library will not exist ahead of time. In situations where a form is published to a SharePoint Library, SharePoint does not like this. Do not create your libraries ahead of time. Let InfoPath work with SharePoint to create it for you.
After the form has been published and the SharePoint Library now exists, it is time to return to the InfoPath form and configure the submit afterwards. This is because the library we want to submit to will not exist until after it is created through the act of publishing.
Once the submit options are set, then it is time to republish the form to the same library again.
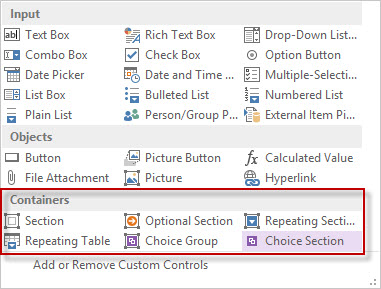
To publish to a SharePoint library, ensure that you are looking at your web browser version of the form. To verify this, from the HOME tab, click in the Controls group and look at the number of Containers. If there are six Containers, you are looking at the web version.
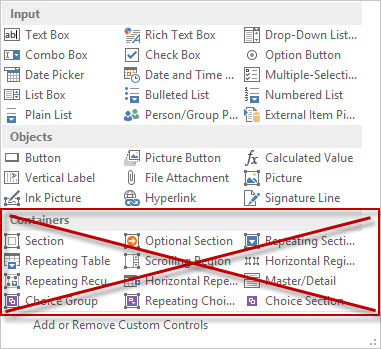
If you have more than six, it is not the web version as is seen below:
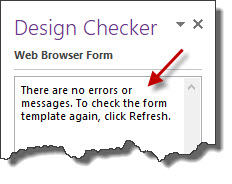
Time to run our Design Checker. Click on FILE, then click on Design Checker.

Verify there are no errors.
Time to publish the form to a SharePoint site. Click on FILE, then click on Publish your form.

Then click on Publish form to a SharePoint Library.

On the Publishing Wizard dialog, enter the URL of the SharePoint site. Ensure that you don't have a trailing slash (/) at the end. Then click on Next >.
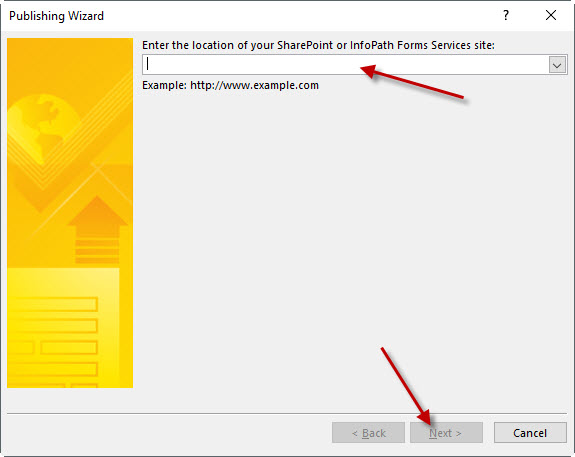
On the next form, ensure that the check box for Enable this form to be filled out by using a browser is set. Then click on Next >.
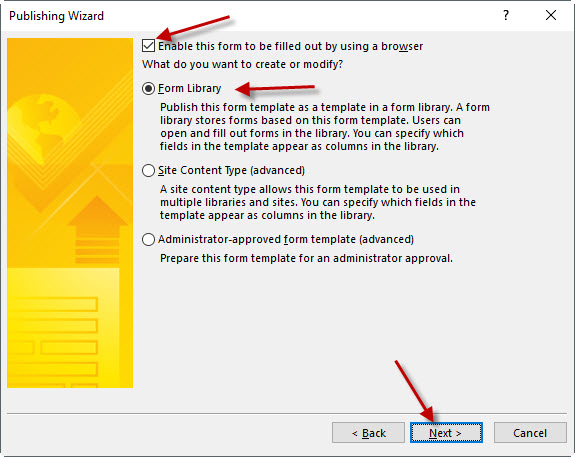
On the next form, ensure the option to Create a new form library is selected and click on the Next > button.
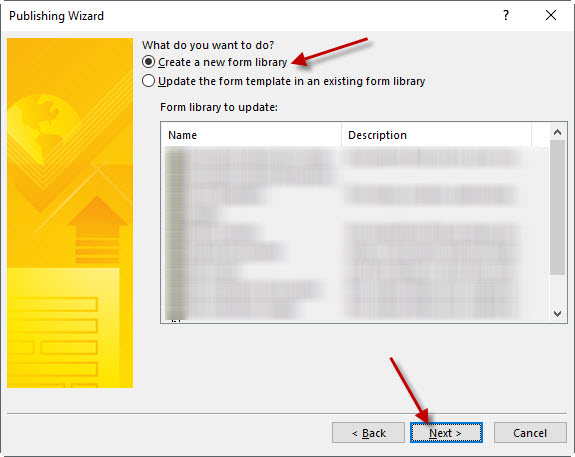
The next form is where the new name for the form library is entered. For the name that is specified, use a name that will be used in the URL of the site. This means picking a name that is short and with no spaces. The name that is shown in SharePoint can be edited to something more readable later.
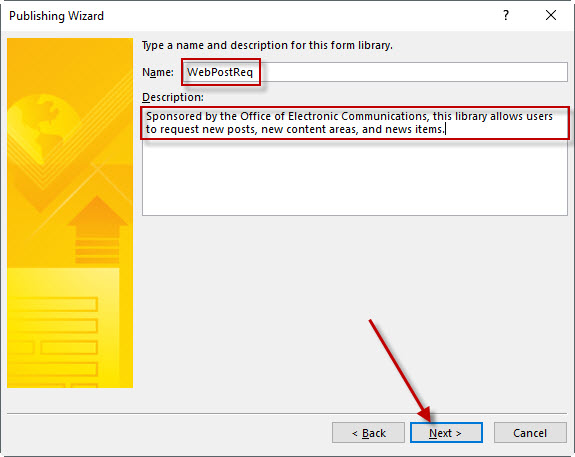
On the next form, define two columns to add to the SharePoint list. Click on the Add... button.
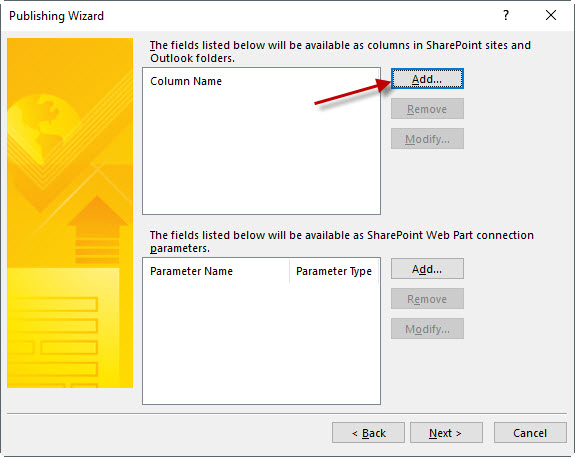
Add Today.

Add ReqLastName.

Then click on the Next > button.
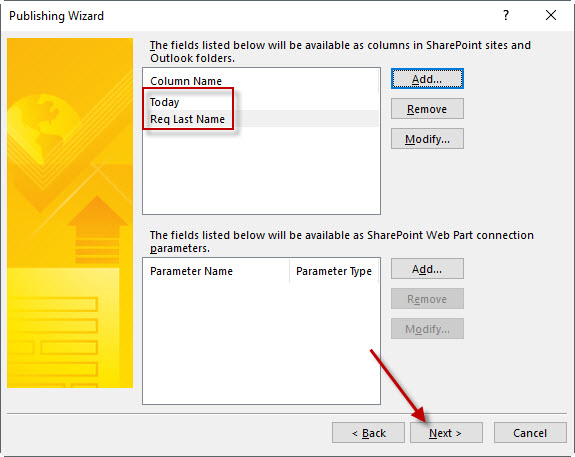
Then click on the Publish button.
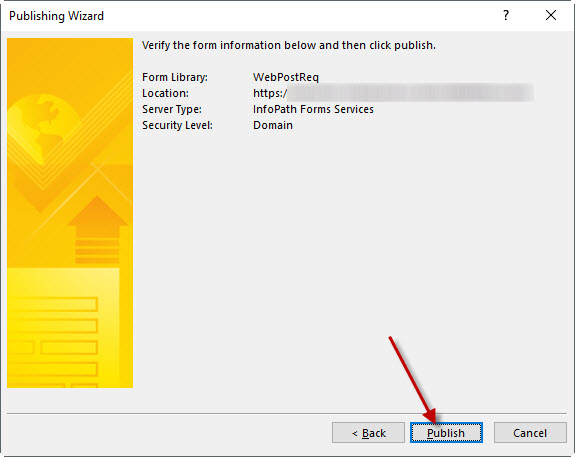
It is published now. Put a check mark in Open this form library... and click on the Close button.
This will end the dialogand it will also open the SharePoint site to the form that was just created.

At this point, you can change the name of the list by clicking on LIBRARY and then Library Settings.

To use the new form, click on FILES, then New Document.
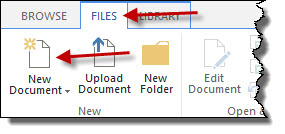
The new form will be shown. However, there is no Submit button to save the data. That part still needs to be added.
Submitting a Form to a SharePoint Library
In the previous video, it was demonstrated how to publish a form to SharePoint to create a library. Now that the library exists, the form can now be configured to submit to that SharePoint library.
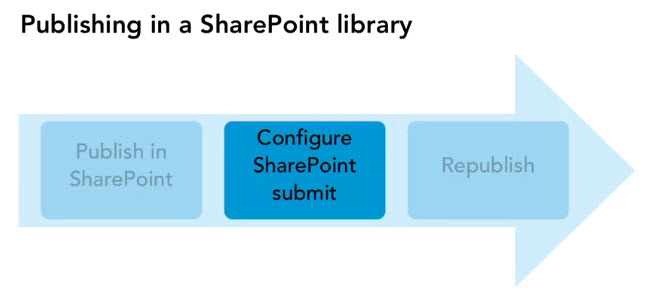
Remember that the form has been published. In InfoPath, have the form that was published open. Click on DATA and in the Submit Form section, click on To SharePoint Library.

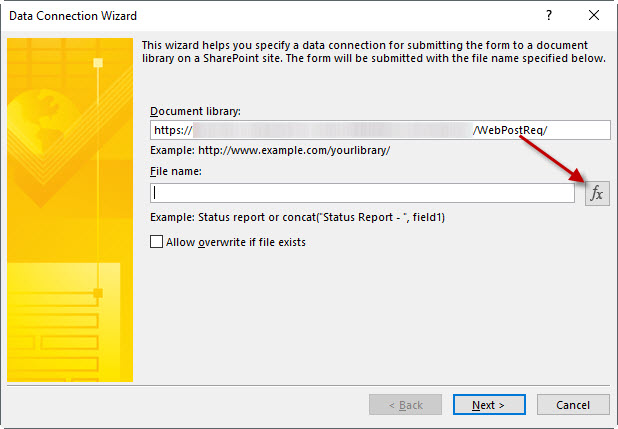
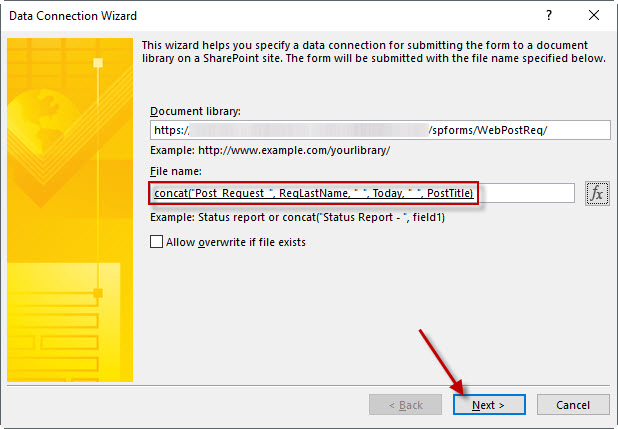
This will open the Data Connection Wizard. In the Document library text box, enter in the SharePoint site name along with the form library name. Ensure that the last character is a slash (/). Then click on the formula button (fx).
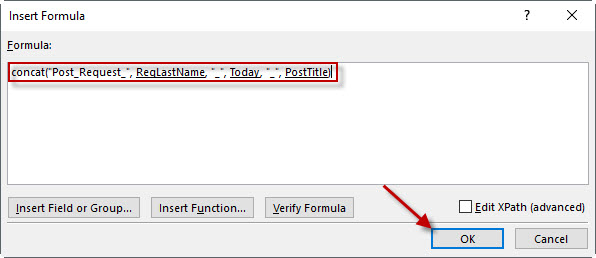
The goal in this dialog is to develop a naming convention for the files that will be created when the form is executed. These file names need to be unique. In this example, the following is used:
Back on the Data Connection Wizard, click on Next >.
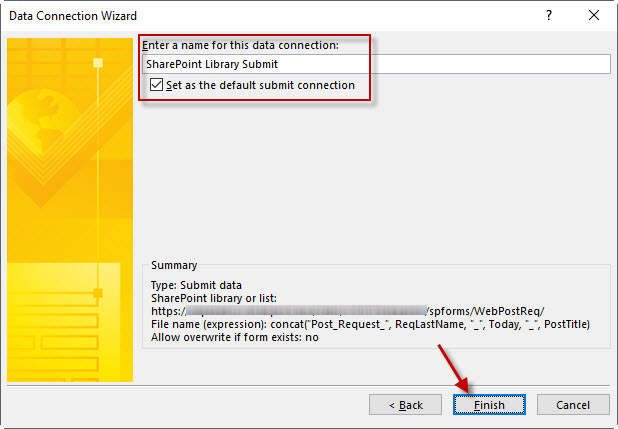
Leave the data connection as such and leave the checkbox for the default submit connection selected. Click on the Finish button.
Republish your form so the newly configured submit options are published.

Promoting Columns to SharePoint
Changing SharePoint Library Views for InfoPath Forms
It is possible to modify a Library's view so that certain columns have precedence.
After creating the library from the InfoPath form, go to the SharePoint list's settings.

Click on List name, description and navigation.
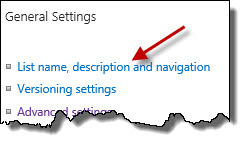
When the list was created in the example, it was created with the name of WebPostReq. Notice the camel casing and lack of spaces. Now change the name to a human readable value changing the name to Web Post Requests. Then click the Save button. The name is changed, but the URL uses the original value that is short and no spaces.
We are now back to the List Settings page, scroll down and look for the All Documents view and click on it.

In the Columns section, the order the columns are displayed can be set by changing the Position from Left value.
In the Sort area, the way the list is sorted is set here.
Click on the OK button to save the changes.
Modifying a Form Library Template
Publishing a Form to a SharePoint List
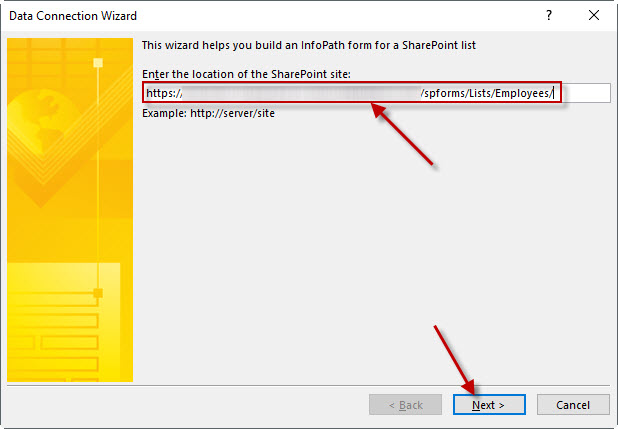
If you want to be able to create a form for a SharePoint List, the correct template must be selected. The first step is to capture the URL to your list. So if your list is called Employees, then the URL would most likely be http://YourSharePointSite/Lists/Employees/. Capture that name with the final slash.
Go back to InfoPath and select New and double-click on SharePoint List.
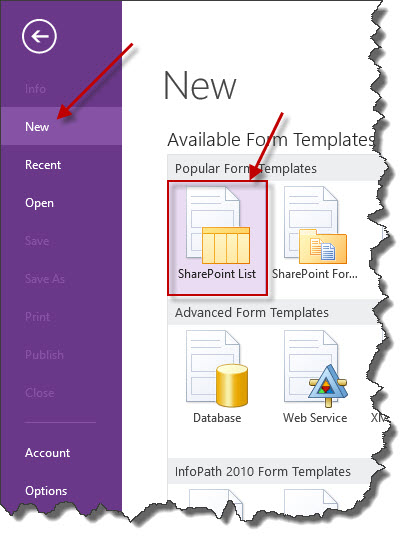
Paste the URL to the SharePoint list with the last slash present. Click on the Next > button.
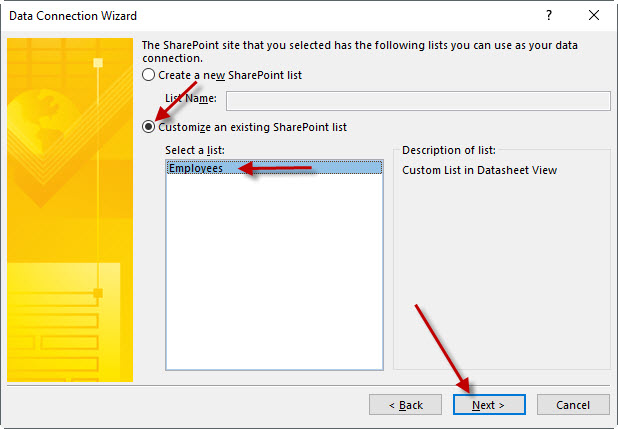
We want to customize an existing list. Click on Customize an existing SharePoint list and select the list name. In this case, the list name is Employees. Click on the Next > button.
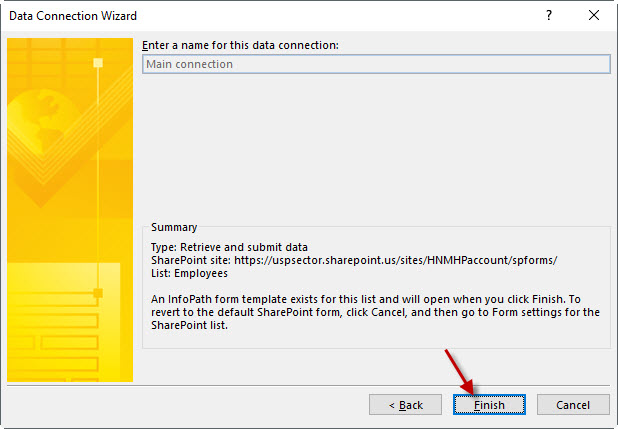
A data connection does not need to be configured. This is already done because the list already exists. Click on the Finish button.
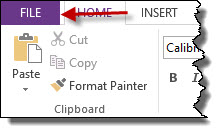
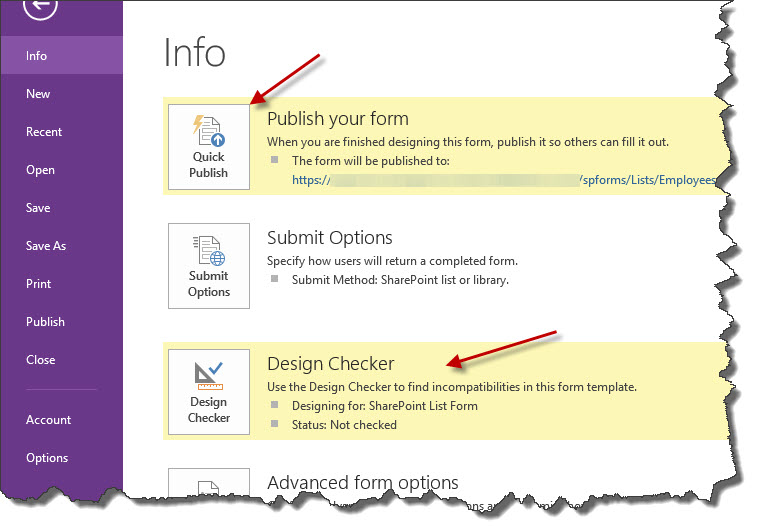
InfoPath then opens a form wtih all of your SharePoint fields present on the right side. The form can be modified to meet requirements. This is a default form that is created by SharePoint. Make any modifications to the form at this time. When you are done, click on the FILE tab.
Click on the Design Checker. When that is done, then click on Publish form form.
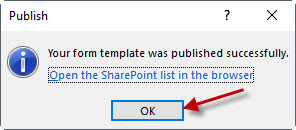
After a few moments, click on OK.
.ico)