Informatica Install - Linux
 Informatica Install - Linux
Informatica Install - Linux
- Plan The Domain
- Prepare Databases for the Informatica Domain
- Set Up Database User Accounts
- T-SQL for Setup
- Domain Configuration Repository Database Requirements
- Data Analyzer Repository Database Requirements
- Data Object Cache Database Requirements
- Workflow Database Requirements
- Jaspersoft Repository Database Requirements
- Metadata Manager Repository Database Requirements
- Model Repository Database Requirements
- PowerCenter Repository Database Requirements
- Profiling Warehouse Requirements
- Reference Data Warehouse Requirements
- Configure Native Connectivity on Service Machines
- Before You Install the Services on UNIX
- Review the Environment Variables
- Create a System User Account
- Set the File Descriptor Limit
- Run the Pre-Installation (i10Pi) System Check Tool
- Service Installation
- After You Install the Services
- Complete the Domain Configuration
- Prepare to Create the Application Services
- Create the Application Services
- Create the Application Services Overview
- Verify Application Service Prerequisites
- Application Service Dependencies
- Create and Configure the Model Repository Service
- Create and Configure the Analyst Service
- Create and Configure the Content Management Service
- Create and Configure the Search Service
- Create and Configure the PowerCenter Repository Service
- Create and Configure the PowerCenter Integration Service
- Create and Configure the Metadata Manager Service
- Create and Configure the Web Services Hub Service
- Create and Configure the Reporting Service
- Create and Configure the Reporting and Dashboards Service
In this installation, Informatica 10 will be installed on a VMware image that contains CentOS 7. The following tables summarize the objects and values that will be set.
Application Server
| Attribute | Value |
|---|---|
| Single or Mulitple Node Domain | Single | Multiple |
| Operating System | CentOS 7.2.1511 |
| Host Name | hdcentos |
| IP Address | 192.168.1.124 |
| Account (Infa Owner) | infauser |
| Password | |
| $INFA_HOME | /home/infauser |
| CURRENT_DIR | /home/infauser/tomcat/bin |
Databases
| Database Information | Description | Value |
|---|---|---|
| Domain configuration database type | Database type for the domain configuration repository. The domain configuration repository supports IBM DB2 UDB, Microsoft SQL Server, Oracle, or Sybase ASE. | Microsoft SQL Server |
| Domain configuration database host name | The name of the machine hosting the database. | REOSERVER |
Informatica Admin Console
| Attribute | Value |
|---|---|
| URL | http://hdcentos:6008/ |
| Administrator User | administrator |
| Password |
Port List
Dynamic Port Behavior
Certain Informatica application services use port numbers that are dynamically allocated upon service startup.
When the application services and processes start up, the Informatica Service Manager assigns port numbers from a range of pre-defined port numbers to the processes. The Service Manager starts with the minimum port number of the pre-defined range and incrementally works its way up the range to find the first available port. The Service Manager repeats this process for each of the application services as they start up.
You define the range of port numbers in the domain when you install Informatica. The port range starts with the minimum port number and ends with the maximum port number.
If you do not define the port range during the installation, the installer uses the following default minimum and maximum port numbers:
| Attribute | Value |
|---|---|
| Minimum Port Number | 6014 |
| Mamimum Port Number | 6114 |
The following table lists the ports used in Informatica 10.
| Process Name | Default Port Number(s) | Actual Port Number(s) | Open to Firewall | TCP/UDP |
|---|---|---|---|---|
| Domain (Startup) | 6005 | 6005 | Yes | TCP |
| Default Services Ports- configured while creating a node. Number of ports used depends on the number of services created | 6014 - 6114 | 6014 - 6114 | Yes | TCP |
| Service Manager (Usually Domain Port + 1) | 6006 | 6006 | No | |
| Informatica Administrator Startup | 6007 | 6007 | Yes | TCP |
| Domain Administrator | 6008 | 6008 | Yes | TCP |
| Informatica Administrator Shutdown | 6009 | 6009 | Yes | TCP |
| Default Services Ports (Configured while creating a node) (Number of ports used depends on the number of services created) | 6013 - 6113 | 6013 - 6113 | Yes | TCP |
| PowerCenter Debugger Port | 9229 | 9229 | Yes | TCP |
| Informatica Administrator HTTPS Port | 8443 | Not Used | Yes | TCP |
| Data Integration Service | 8095 | 8095 | Yes | TCP |
| Analyst Service | 8085 | 8085 | Yes | TCP |
| Metadata Manager | 10250 | 10250 | Yes | TCP |
| Metadata Manager Agent | 10251 | 10251 | Yes | TCP |
| Reporting Service | 16080 | 16080 | Yes | TCP |
| Search Service | 8084 | 8084 | Yes | TCP |
| Reporting and Dashboard Service | 10370 | 10370 | Yes | TCP |
| Web Services Hub | 7333 | 7333 | Yes | TCP |
| Web Services HTTPS Hub | Not Used | Yes | TCP |
Since this is a CentOS 7.x system, firewalld is the application used to monitor and maintain the firewalls. Get the current zone that being used:
firewall-cmd --list-all
public (default, active)
  interfaces: eno16777736
  sources:
  services: dhcpv6-client samba ssh
  ports:
  masquerade: no
  forward-ports:
  icmp-blocks:
  rich rules:
This output says the current zone being used is the public
zone. The (default, active) indicates that this is the default
zone and is currently active. Any firewall changes that need to be made for
Informatica need to be made in this zone.
The default services that are defined for firewalld are located in the /usr/lib/firewalld/services/ directory. The individual services are defined in xml files. If you want to create your own service, it needs to be placed in the /etc/firewalld/services/ directory.
By using the vi editor, create a file named InfaAdmin.xml and place the following xml code in that file.
<?xml version="1.0" encoding="utf-8"?>
<service>
  <short>Infa</short>
  <description>Informatica Services</description>
  <port protocol="tcp" port="6008"/>
  <port protocol="tcp" port="6014-6114"/>
  <port protocol="tcp" port="7333"/>
  <port protocol="tcp" port="8084"/>
  <port protocol="tcp" port="8085"/>
  <port protocol="tcp" port="8095"/>
  <port protocol="tcp" port="9229"/>
  <port protocol="tcp" port="10250"/>
  <port protocol="tcp" port="10251"/>
  <port protocol="tcp" port="10370"/>
  <port protocol="tcp" port="16080"/>
</service>
Use the following command to add the new service to the public zone:
firewall-cmd --zone=public --add-service=InfaAdmin --permanent
success
Using the --permanent option does not make the new service active. The service must be reloaded.
firewall-cmd --reload
Plan the Domain
Introduction to the Informatica Domain
An Informatica domain is a collection of nodes and services. A node is the logical representation of a machine in a domain. Services for the domain include the Service Manager that manages all domain operations and a set of application services that represent server-based functionality.
The domain requires a relational database to store configuration information and user account privileges and permissions. The first time that you install the Informatica services, you must create the domain configuration repository in a relational database.
You use Informatica clients to access underlying Informatica functionality in the domain. The clients make requests to the Service Manager or to application services.
Single or Multiple Node Domain
When you install the Informatica services on a machine, you create a node and a domain. You can install the Informatica services on multiple machines to create additional nodes that you join to the domain.
A single node installation consists of a domain with one node. The node hosts the domain. The Service Manager and all Informatica application services run on the node.
An installation on multiple nodes consists of a gateway node, which hosts the domain, and additional nodes that run Informatica application services. The Service Manager runs on all nodes in the domain.
Nodes
Each node in the domain runs the Service Manager that manages domain functions on that node. The Service Manager also supports the application services that run on the node.
The domain functions that a node performs and the services that a node runs depend on the following node configurations:
Node type
The node type determines whether the node can serve as a gateway or worker node and determines the domain functions that the node performs. The first time that you install the Informatica services, you create a gateway node and the Informatica domain. When you install the Informatica services on other machines, you create additional gateway nodes or worker nodes that you join to the domain.
One gateway node serves as the master gateway node for the domain. The master gateway node receives service requests from clients and routes them to the appropriate service and node. The Service Manager on the master gateway node performs all domain operations on the master gateway node. The Service Managers running on other gateway nodes perform limited domain operations on those nodes.
A worker node is any node not configured to serve as a gateway. A worker node can run application services, but it cannot serve as a gateway. The Service Manager performs limited domain operations on a worker node.
Node role
The node role defines the purpose of the node. A node with the service role can run application services. A node with the compute role can perform computations requested by remote application services. A node with both roles can run application services and locally perform computations for those services. By default, each gateway and worker node has both the service and compute roles enabled.
If a node is assigned to a Data Integration Service grid, you might want to update the node role. Enable only the service role to dedicate the node to running the Data Integration Service process. Enable only the compute role to dedicate the node to running Data Integration Service mappings.
Service Manager
The Service Manager in the Informatica domain supports the domain and the application services. The Service Manager runs on each node in the domain.
The Service Manager runs on all nodes in the domain to support following areas:
Domain
The Service Manager performs functions on each node to support the domain. Domain functions include authentication, authorization, and logging. The domain functions that the Service Manager performs on a node depend on the type and role of the node. For example, the Service Manager running on the master gateway node performs all domain functions on that node. The Service Manager running on any other type of node performs limited domain functions on that node.
Application Services
When a node has the service role, the Service Manager starts application services configured to run on that node. It starts and stops services and service processes based on requests from Informatica clients.
Application Services
Application services represent server-based functionality. Application services include services that can have multiple instances in the domain and system services that can have a single instance in the domain. System services are created for you when you create the domain. After you complete the installation, you create other application services based on the license key generated for your organization.
When you create an application service, you designate a node with the service role to run the service process. The service process is the run-time representation of a service running on a node. The service type determines how many service processes can run at a time.
If you have the high availability option, you can run an application service on multiple nodes. If you do not have the high availability option, configure each application service to run on one node.
Some application services require databases to store information processed by the application service. When you plan the Informatica domain, you also need to plan the databases required by each application service.
For more information about application services, see the Informatica Application Service Guide.
License Key
Informatica generates a license key based on the product and product options that your organization purchased. The license key controls the application services and the functionality that you can use.
When you install the Informatica services, you must enter the path and file name of the Informatica license key. The installer creates a license object in the domain based on the license key that you enter. When you create application services, you must assign the license object to each application service before you can run the service.
User Authentication
Informatica Administrator
Informatica Administrator (the Administrator tool) is the administration tool that you use to administer the Informatica domain and security. The Administrator tool is a thin or web client application.
Record the Informatica Domain and Node Information
When you install the Informatica services, you need to know information about the domain, nodes, application services, and databases that you plan to create. If you plan to install the Informatica services on a network that uses Kerberos authentication, you also need to know information about the Kerberos authentication server.
Use the tables in this section to record the information that you need.
Databases
When you plan the Informatica domain, you also need to plan the required relational databases. The domain requires a database to store configuration information and user account privileges and permissions. Some application services require databases to store information processed by the application service.
Prepare Databases for the Informatica Domain
Set Up Database User Accounts
Set up a database and user account for the domain configuration repository and for the repository databases associated with the applications services.
Use the following rules and guidelines when you set up the user accounts:
- The database user account must have permissions to create and drop tables, indexes, and views, and to select, insert, update, and delete data from tables.
- Use 7-bit ASCII to create the password for the account.
- To prevent database errors in one repository from affecting any other repository, create each repository in a separate database schema with a different database user account. Do not create a repository in the same database schema as the domain configuration repository or any other repository in the domain.
- If you create more than one domain, each domain configuration repository must have a separate user account.
T-SQL for Setup
For this installation, SQL Server 2012 Enterprise will be used to house the Informatica Repository.
To prepare for the repository, the following T-SQL script was used to define the necessary elements and objects:
/*****************************************************************************/
/* SetupDatabase.sql                                                         */
/*                                                                           */
/* Purpose:                                                                  */
/* The Microsoft T-SQL script will create all of the necessary object and    */
/* elements required to build an Informatica repository.  This script is     */
/* specific for Microsoft SQL Server 2012 and Informatica 10.0.              */
/*                                                                           */
/* Note:  Perform a change all on the string 'Password' to set the password  */
/* globally.                                                                 */
/*                                                                           */
/* Database Name            Database User                                    */
/* InfaDBDomainConfigRepo   InfaDBUserDomainConfigRepo                       */
/* InfaDBDataAnalyzerRepo   InfaDBUserDataAnalyzerRepo                       */
/* InfaDBDataObjCache       InfaDBUserDataObjCache                           */
/* InfaDBWorkflow           InfaDBUserWorkflow                               */
/* InfaDBJaspersoftRepo     InfaDBUserJaspersoftRepo                         */
/* InfaDBMetaMgrRepo        InfaDBUserMetaMgrRepo                            */
/* InfaDBModelRepo          InfaDBUserModelRepo                              */
/* InfaDBPwrCntrRepo        InfaDBUserPwrCntrRepo                            */
/* InfaDBProfWH             InfaDBUserProfWH                                 */
/* InfaDBRefDW              InfaDBUserRefDWDBUser                            */
/*****************************************************************************/
/* Date     Initials Description                                             */
/* -------- -------- ------------------------------------------------------- */
/* 20160612 Reo      Initial.                                                */
/* 20160625 Reo      Added four more databases into the mix.                 */
/* 20160709 Reo      Added DROP statements.                                  */
/*****************************************************************************/

USE [master];
GO

/*****************************************************************************/
/* These DROP statements are used to remove any previous instances of        */
/* databases and/or logins.  If the databases or logins do not already       */
/* exist, these lines can be safely removed.                                 */
/*****************************************************************************/
DROP DATABASE InfaDBDataAnalyzerRepo;
DROP DATABASE InfaDBDataObjCache;
DROP DATABASE InfaDBDomainConfigRepo;
DROP DATABASE InfaDBJaspersoftRepo;
DROP DATABASE InfaDBMetaMgrRepo;
DROP DATABASE InfaDBModelRepo;
DROP DATABASE InfaDBProfWH;
DROP DATABASE InfaDBPwrCntrRepo;
DROP DATABASE InfaDBRefDW;
DROP DATABASE InfaDBWorkflow;

DROP LOGIN InfaDBUserDataAnalyzerRepo;
DROP LOGIN InfaDBUserDataObjCache;
DROP LOGIN InfaDBUserDomainConfigRepo;
DROP LOGIN InfaDBUserJaspersoftRepo;
DROP LOGIN InfaDBUserMetaMgrRepo;
DROP LOGIN InfaDBUserModelRepo;
DROP LOGIN InfaDBUserProfWH;
DROP LOGIN InfaDBUserPwrCntrRepo;
DROP LOGIN InfaDBUserRefDW;
DROP LOGIN InfaDBUserWorkflow;

/*****************************************************************************/
/* Create the Informatica Repository database.                               */
/*****************************************************************************/
CREATE DATABASE [InfaDBDomainConfigRepo];
GO

/*****************************************************************************/
/* The following is a guideline that is specific to Microsoft SQL Server.    */
/* Set the read committed isolation level to READ_COMMITTED_SNAPSHOT to      */
/* minimize locking contention.                                              */
/*****************************************************************************/
ALTER DATABASE [InfaDBDomainConfigRepo]
SET READ_COMMITTED_SNAPSHOT ON

/*****************************************************************************/
/* SQL Login InfaDBUserDomainConfigRepo.                                     */
/*****************************************************************************/
CREATE LOGIN [InfaDBUserDomainConfigRepo]
WITH PASSWORD = 'Password',
DEFAULT_DATABASE = [InfaDBDomainConfigRepo];
GO

/*****************************************************************************/
/* Now that the Repository database has been built, set the owner of that    */
/* database to the Informatica SQL Login ID.                                 */
/*****************************************************************************/
USE InfaDBDomainConfigRepo
GO

EXEC sp_changedbowner 'InfaDBUserDomainConfigRepo'
GO

USE [master];
GO

/*****************************************************************************/
/* Create the Data Analyzer Repository database.                             */
/*****************************************************************************/
CREATE DATABASE [InfaDBDataAnalyzerRepo];
GO

CREATE LOGIN [InfaDBUserDataAnalyzerRepo]
WITH PASSWORD = 'Password',
DEFAULT_DATABASE = [InfaDBDataAnalyzerRepo];
GO

/*****************************************************************************/
/* Now that the Repository database has been built, set the owner of that    */
/* database to the correct SQL Login ID.                                     */
/*****************************************************************************/
USE InfaDBDataAnalyzerRepo
GO

EXEC sp_changedbowner 'InfaDBUserDataAnalyzerRepo'
GO

USE [master];
GO

/*****************************************************************************/
/* Set up a database and user for the Data Object Cache database.            */
/*****************************************************************************/
USE [master];
GO

CREATE DATABASE [InfaDBDataObjCache];
GO

CREATE LOGIN [InfaDBUserDataObjCache]
WITH PASSWORD = 'Password',
DEFAULT_DATABASE = [InfaDBDataObjCache];
GO

USE InfaDBDataObjCache
GO

EXEC sp_changedbowner 'InfaDBUserDataObjCache'
GO

/*****************************************************************************/
/* Set up a database and user for the Workflow database.                     */
/* When creating the Workflow database, do not use any collations that end   */
/* _SC (special characters).                                                 */
/*****************************************************************************/
USE [master];
GO

CREATE DATABASE [InfaDBWorkflow];
GO

CREATE LOGIN [InfaDBUserWorkflow]
WITH PASSWORD = 'Password',
DEFAULT_DATABASE = [InfaDBWorkflow];
GO

USE InfaDBWorkflow
GO

EXEC sp_changedbowner 'InfaDBUserWorkflow'
GO

/*****************************************************************************/
/* Set up a database and user for the Jaspersoft database.                   */
/*****************************************************************************/
USE [master];
GO

CREATE DATABASE [InfaDBJaspersoftRepo];
GO

CREATE LOGIN [InfaDBUserJaspersoftRepo]
WITH PASSWORD = 'Password',
DEFAULT_DATABASE = [InfaDBJaspersoftRepo];
GO

USE InfaDBJaspersoftRepo
GO

EXEC sp_changedbowner 'InfaDBUserJaspersoftRepo'
GO

/*****************************************************************************/
/* Set up a database and user for the Metadata Manager Repository database.  */
/*****************************************************************************/
USE [master];
GO

CREATE DATABASE [InfaDBMetaMgrRepo];
GO

CREATE LOGIN [InfaDBUserMetaMgrRepo]
WITH PASSWORD = 'Password',
DEFAULT_DATABASE = [InfaDBMetaMgrRepo];
GO

USE InfaDBMetaMgrRepo
GO

EXEC sp_changedbowner 'InfaDBUserMetaMgrRepo'
GO

/*****************************************************************************/
/* Set up a database and user for the Model Repository database.             */
/*****************************************************************************/
USE [master];
GO

CREATE DATABASE [InfaDBModelRepo];
GO

/*****************************************************************************/
/* The following is a guideline that is specific to Microsoft SQL Server.    */
/* Set the read committed isolation level to READ_COMMITTED_SNAPSHOT to      */
/* minimize locking contention.                                              */
/*****************************************************************************/
ALTER DATABASE [InfaDBModelRepo]
SET READ_COMMITTED_SNAPSHOT ON

CREATE LOGIN [InfaDBUserModelRepo]
WITH PASSWORD = 'Password',
DEFAULT_DATABASE = [InfaDBModelRepo];
GO

USE InfaDBModelRepo
GO

EXEC sp_changedbowner 'InfaDBUserModelRepo'
GO

/*****************************************************************************/
/* Set up a database and user for the PowerCenter Repository database.       */
/*****************************************************************************/
USE [master];
GO

CREATE DATABASE [InfaDBPwrCntrRepo];
GO

CREATE LOGIN [InfaDBUserPwrCntrRepo]
WITH PASSWORD = 'Password',
DEFAULT_DATABASE = [InfaDBPwrCntrRepo];
GO

USE InfaDBPwrCntrRepo
GO

EXEC sp_changedbowner 'InfaDBUserPwrCntrRepo'
GO

/*****************************************************************************/
/* Set up a database and user for the Profiling Warehouse database.          */
/*****************************************************************************/
USE [master];
GO

CREATE DATABASE [InfaDBProfWH];
GO

CREATE LOGIN [InfaDBUserProfWH]
WITH PASSWORD = 'Password',
DEFAULT_DATABASE = [InfaDBProfWH];
GO

USE InfaDBProfWH
GO

EXEC sp_changedbowner 'InfaDBUserProfWH'
GO
/*****************************************************************************/
/* Set up a database and user for the Reference Data Warehouse database.     */
/*****************************************************************************/
USE [master];
GO

CREATE DATABASE [InfaDBRefDW];
GO

CREATE LOGIN [InfaDBUserRefDW]
WITH PASSWORD = 'Password',
DEFAULT_DATABASE = [InfaDBRefDW];
GO

USE InfaDBRefDW
GO

EXEC sp_changedbowner 'InfaDBUserRefDW'
GO
Domain Configuration Repository Database Requirements
Informatica components store metadata in relational database repositories. The domain stores configuration and user information in a domain configuration repository.
You must set up a database and user account for the domain configuration repository before you run the installation. The database must be accessible to all gateway nodes in the Informatica domain.
When you install Informatica, you provide the database and user account information for the domain configuration repository. The Informatica installer uses JDBC to communicate with the domain configuration repository.
Microsoft SQL Server Database Requirements
Use the following guidelines when you set up the repository on Microsoft SQL Server:
- Set the read committed isolation level to
READ_COMMITTED_SNAPSHOTto minimize locking contention. To set the isolation level for the database, run the following command:
ALTER DATABASE DatabaseName SET READ_COMMITTED_SNAPSHOT ON
To verify that the isolation level for the database is correct, run the following command:
SELECT is_read_committed_snapshot_on FROM sys.databases WHERE name = DatabaseName - The database user account must have the
CONNECT,CREATE TABLE, andCREATE VIEWprivileges.
Data Analyzer Repository Database Requirements
The Data Analyzer repository stores metadata for schemas, metrics and attributes, queries, reports, user profiles, and other objects for the Reporting Service.
You must specify the Data Analyzer repository details when you create a Reporting Service. The Reporting Service provides the Data Analyzer repository with the metadata corresponding to the selected data source.
Allow 60 MB of disk space for the database.
Microsoft SQL Server Database Requirements
The only guidelines for SQL Server are for Microsoft SQL Server 2005.
Data Object Cache Database Requirements
The data object cache database stores cached logical data objects and virtual tables for the Data Integration Service. You specify the data object cache database connection when you create the Data Integration Service.
Allow 200 MB of disk space for the database.
Note: Ensure that you install the database client on the machine on which you want to run the Data Integration Service.
Microsoft SQL Server Database Requirements
Use the following guidelines when you set up the repository on Microsoft SQL Server:
- Verify that the database user account has
CONNECTandCREATE TABLEprivileges.
Workflow Database Requirements
The Data Integration Service stores run-time metadata for workflows in the workflow database. Before you create the workflow database, set up a database and database user account for the workflow database.
You specify the workflow database connection when you create the Data Integration Service.
Note: Ensure that you install the database client on the machine on which you want to run the Data Integration Service.
Microsoft SQL Server Database Requirements
Use the following guidelines when you set up the repository on Microsoft SQL Server:
- Do not specify a collation that ends with
_SC. The_SCspecifies a collation with supplementary characters and this seems to support UTF-16. If a _SC is specified, an error will be thrown at the time when the Workflow database contents are built. The error, WorchDB_10002, states that legacy LOB types do not support Unicode supplementary characters whose codepoints are U+10000 or greater. - Verify that the database user account has CONNECT and CREATE TABLE privileges.
- Enable JTA and XA datasource functionality on the database.
- Set the connection pooling parameters. The following table lists the
connection pooling parameters that you must set:
Parameter Value Maximum Connection Pool Size 128 Minimum Connection Pool Size 0 Maximum Idle Time 120 seconds
Jaspersoft Repository Database Requirements
The Jaspersoft repository stores reports, data sources, and metadata corresponding to the data source.
You must specify the Jaspersoft repository details when you create the Reporting and Dashboards Service.
Allow 10 MB of disk space for the database.
Metadata Manager Repository Database Requirements
Metadata Manager repository contains the Metadata Manager warehouse and models. The Metadata Manager warehouse is a centralized metadata warehouse that stores the metadata from metadata sources.
Specify the repository details when you create a Metadata Manager Service.
Allow 1 GB of disk space for the database.
Microsoft SQL Server Database Requirements
Use the following guidelines when you set up the repository on Microsoft SQL Server:
- The database user account that creates the repository must have
privileges to perform the following operations:
ALTER TABLE
CREATE CLUSTERED INDEX
CREATE INDEX
CREATE PROCEDURE
CREATE TABLE
CREATE VIEW
DROP PROCEDURE
DROP TABLE
INSERT INTO - If the repository must store metadata in a multibyte language, set the database collation to that multibyte language when you install Microsoft SQL Server. For example, if the repository must store metadata in Japanese, set the database collation to a Japanese collation when you install Microsoft SQL Server. This is a one-time configuration and cannot be changed.
Model Repository Database Requirements
Informatica services and clients store data and metadata in the Model repository. Before you create the Model Repository Service, set up a database and database user account for the Model repository.
Allow 200 MB of disk space.
Microsoft SQL Server Database Requirements
Use the following guidelines when you set up the repository on Microsoft SQL Server:
- Set the read committed isolation level to READ_COMMITTED_SNAPSHOT to
minimize locking contention. To set the isolation level for the database,
run the following command:
ALTER DATABASE DatabaseName SET READ_COMMITTED_SNAPSHOT ON
To verify that the isolation level for the database is correct, run the following command:SELECT is_read_committed_snapshot_on FROM sys.databases WHERE name = DatabaseName - The database user account must have the
CONNECT,CREATE TABLE, andCREATE VIEWprivileges.
PowerCenter Repository Database Requirements
A PowerCenter repository is a collection of database tables containing metadata. A PowerCenter Repository Service manages the repository and performs all metadata transactions between the repository database and repository clients.
The PowerCenter repository supports the following database types:
- IBM DB2 UDB
- Microsoft SQL Server
- Oracle
- Sybase ASE
Allow 35 MB of disk space for the database.
Note: Ensure that you install the database client on the machine on which you want to run the PowerCenter Repository Service.
For more information about configuring the database, see the documentation for your database system.
Microsoft SQL Server Database Requirements
Use the following guidelines when you set up the repository on Microsoft SQL Server:
- Set the database server page size to 8K or higher. This is a one-time configuration and cannot be changed afterwards.
- Verify that the database user account has the
CONNECT,CREATE TABLE, andCREATE VIEWprivileges.
Profiling Warehouse Requirements
The profiling warehouse database stores profiling and scorecard results. You specify the profiling warehouse connection when you create the Data Integration Service.
Microsoft SQL Server Database Requirements
Use the following guidelines when you set up the repository on Microsoft SQL Server:
- The database user account must have the
CONNECT,CREATE TABLE,CREATE VIEW, andCREATE FUNCTIONprivileges.
Reference Data Warehouse Requirements
The reference data warehouse stores the data values for reference table objects that you define in a Model repository. You configure a Content Management Service to identify the reference data warehouse and the Model repository.
You associate a reference data warehouse with a single Model repository. You can select a common reference data warehouse on multiple Content Management Services if the Content Management Services identify a common Model repository. The reference data warehouse must support mixed-case column names.
Allow 200 MB of disk space for the database.
Note: Ensure that you install the database client on the machine on which you want to run the Content Management Service.
Microsoft SQL Server Database Requirements
Use the following guidelines when you set up the repository on Microsoft SQL Server:
- Verify that the database user account has
CONNECTandCREATE TABLEprivileges.
Configure Native Connectivity on Service Machines
To establish native connectivity between an application service and a database, install the database client software for the database that you want to access.
Native drivers are packaged with the database server and client software. Configure connectivity on the machines that need to access the databases. To ensure compatibility between the application service and the database, install a client software that is compatible with the database version and use the appropriate database client libraries.
Install Database Client Software
You must install the database clients on the required machines based on the types of databases that the application services access.
To ensure compatibility between the application service and the database, use the appropriate database client libraries and install a client software that is compatible with the database version.
Install the following database client software based on the type of database that the application service accesses:
Microsoft SQL Server 2012 Native Client
Download the client from the following Microsoft website. This link will take you to the Microsoft SQL Server 2012 Feature Pack download page.
Before You Install the Services on UNIX
Review the Environment Variables
Configure the environment variables to work with the Informatica installation. The following table describes environment variables to review on Windows:
| Variables | Description |
|---|---|
| IATEMPDIR | Location of the temporary files created during installation.
Informatica requires 1 GB disk space for temporary files. Configure the environment variable if you do not want to create temporary files in the /tmp directory.
|
| INFA_JDK_HOME | Location of the folder containing the supported Java Development Kit
(JDK). Set the INFA_JDK_HOME environment variable if you are
installing Informatica on AIX, HP-UX, or zLinux.In the configuration file for your shell, for example the .bashrc file, set the INFA_JDK_HOME environment
variable to the directory that contains the JDK. Verify that the login
shell can access the INFA_JDK_HOME environment variable.
|
| JRE_HOME | If you install the Informatica services on a Linux machine, clear the
JRE_HOME environment variable before you start the
installation.unset JRE_HOME |
| LANG and LC_ALL | Change the locale to set the appropriate character encoding for the terminal session. For this installation, use: en_US.iso88591. Possible values include:
locale -a
|
| DISPLAY | Unset the DISPLAY environment before you run the installer.
Installation might fail if the DISPLAY environment variable
has some value. |
| LD_PRELOAD | On HP-UX, the environment variable selects the Data Transformation libjvm shared object of the JRE. Unset the LD_PRELOAD environment variable, if you are
upgrading Informatica on HP-UX. |
PATH |
The installer appends file paths required by Informatica to the
PATH environment variable. Verify that the length of the PATH environment variable does not exceed the system
limits.
|
Create a System User Account
Create a user account specifically to run the Informatica daemon.
Verify that the user account you use to install Informatica has write permission on the installation directory.
To create the user account, log into the system as root.
useradd infauser
mkdir -p /home/infauser/.ssh
passwd infauser
visudo
Add a line after the following text:
## Allow root to run any command anywhere
The line to add:
infauser ALL=(ALL) ALL
Save and exit.
Installation Files on Host
On the VMware hosting machine, which happens to be Windows 7, create a
directory off the C: drive to place the Informatica
tar installation file.
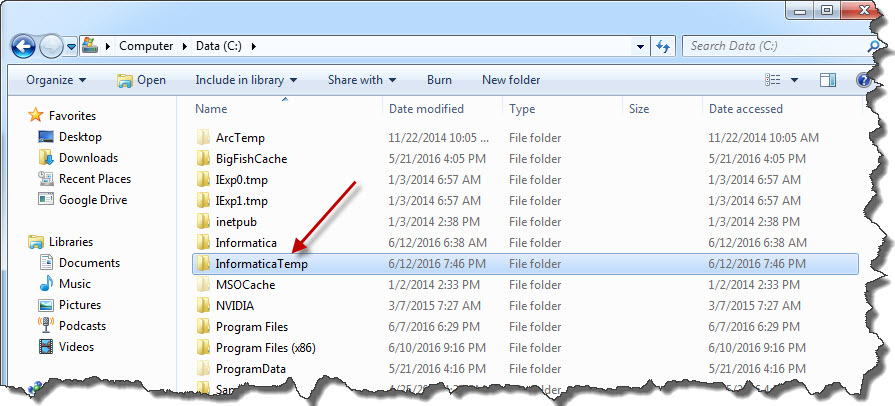
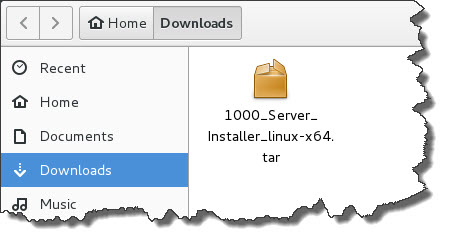
For this installation, since this is a Linux installation, the
1000_Server_Installer_linux-x64.tar is copied to this location.
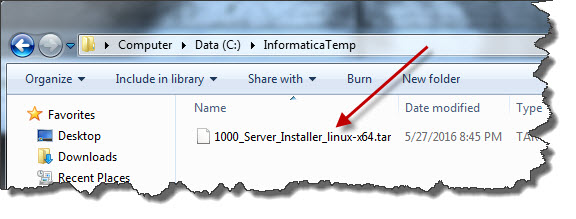
Ensure that the license key is located here too.
Guest System Memory
Ensure that you have at least 4 GB memory dedicated to the VM guest system before staring the image.
Boot the Guest
The Linux guest system can now be started.
Edit .bash_profile
Add the following code to the .bash_profile file.
#
# The following locale environment variables are set for Informatica.
# Possible values include:
#   C
#   en_US
#   en_US.iso88591 - Considered to by Latin1.
#   en_US.iso885915 - 8-bit single-byte coded graphic character sets.
#   en_US.utf8 - Variable-length encoding, used to encode all code points.
#
export LANG=en_US
export LC_ALL=en_US
Do not forget to source the .bash_profile file
since it has been edited.
source .bash_profile
Set the File Descriptor Limits
Verify that the operating system meets the file descriptor requirement.
Informatica service processes can use a large number of files. Set the file descriptor limit per process to 16,000 or higher. The recommended limit is 32,000 file descriptors per process.
To verify the file descriptor limit, run the following command:
C Shell
limit
Bash Shell
ulimit -a
To set the file descriptor limit, run the following command:
C Shell
limit -h filesize <value>
Bash Shell
ulimit -n <value>
To determine the current value that is set to the setting File Descriptor Limits, enter the following command:
sysctl fs.file-max
This value must be greater than 16,000. It is recommended that it be set to
32,000. If the required value is not set, it can be set in the
/etc/sysctl.conf file so that after a reboot, the setting will
remain as it is.
vi /etc/sysctl.conf
Append a config directive as follows:
# System default settings live in /usr/lib/sysctl.d/00-system.conf.
# To override those settings, enter new settings here, or in an /etc/sysctl.d/<n
ame>.conf file
#
# For more information, see sysctl.conf(5) and sysctl.d(5).

fs.file-max = 32000
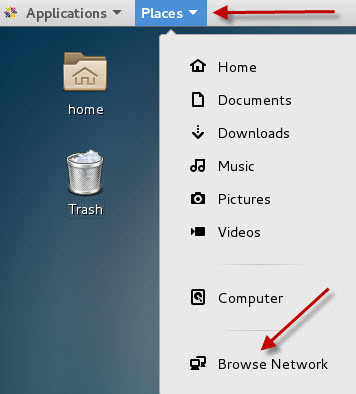
Next, log into the Linux image. Log into the root user. Once
the system is ready, click on Places | Browse Network.
This will open the Network dialog. Double-click on the Windows Network.
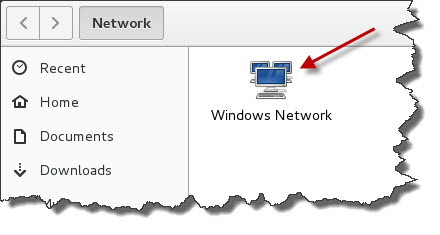
This will open the Windows Network dialog. Double-click on the WORKGROUP.
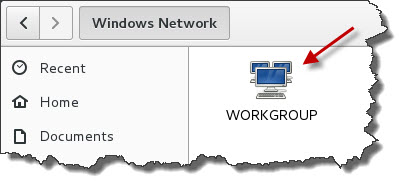
This will open a dialog that contains images of all devices that are
currently sharing. Click on REOCOOLERMSTR since that is where the
tar file is located.

Navigate to the directory where the tar file is located. Copy
the tar file to the Downloads directory. Grab a
copy of the license file also.
Extract the Installer Files
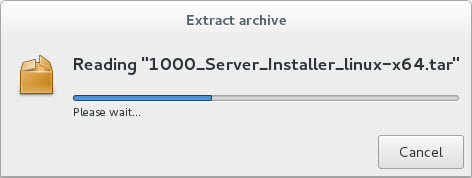
Right-mouse click on the tar file and select extract here.

Verify the License Key
Before you install the software, verify that you have the license key
available. Copy the license key file to a directory accessible to the user
account that installs the product. Rename the license file to
license.key.
If your license.key file is located in the
Downloads directory, move it to your $HOME
directory. The installation process looks there by default.
mv $HOME/Downloads/license.key $HOME
Run the Pre-Installation (i10Pi) System Check Tool
Run the Pre-installation (i10Pi) System Check Tool to verify whether the machine meets the system requirements for installation or upgrade.
Ensure that you verified the system requirements and prepared the domain configuration repository database.
Ensure that you are logged into the Linux machine with a system user
account (infauser). Close all other applications. On a shell
command line, run the install.sh.
cd /home/infauser/Downloads/1000_Server_Installer_linux-x64/
./install.sh
Here is the output:
OS detected is Linux
unjar task is in progress.............
unjar of ESD completed.....

\******************************************************************************
\* Welcome to the Informatica 10.0.0 Server Installer.                        *
\******************************************************************************

Before you continue, read the following documents:
* Informatica 10.0.0 Installation Guide and Release Notes.
* B2B Data Transformation 10.0.0 Installation, Configuration Guide and
  Release Notes.

You can find the 10.0.0 documentation in the Product Documentation section at
http://mysupport.informatica.com.

Configure the LANG and LC_ALL variables to generate appropriate code pages and
create and connect to repositories and Repository Services.
Do you want to continue? (Y/N)
To continue, hit the 'y' key and the Enter key.
Installer requires Linux version 2.6.32-431 or later versions of the 2.6.32
series or version 3.10.0-0 or later versions of the 3.10.0 series.
Current operating system Linux version 3.10.0-327.
Current operating system meets minimum requirements.

Select to install or upgrade:

  1. Install or upgrade Informatica.
   Select this option if the machine does not have Informatica services
   installed or if it has Informatica 9.6.1 or an earlier version installed.

  2. Install or upgrade Data Transformation Engine Only.
   Select this option to install or upgrade only Data Transformation Engine.

Enter the choice (1 or 2):
To continue, hit the '1' key.
-----------------------------------------------------------
Checking for existing 10.0.0 product installation.
To verify whether the machine meets the system requirements for the Informatica
installation or upgrade, run the Pre-Installation (i10PreInstallChecker) System
Check Tool before you start the installation or upgrade process. It is
recommended that you verify the minimum system requirements.

Select one of the following options:
1. Run the Pre-Installation (i10PreInstallChecker) System Check Tool
2. Run the Informatica Kerberos SPN Format Generator
3. Run the Informatica services installation
Select the option to proceed : (Default : 3)
To continue, hit the '1' key.
Preparing to install...
Extracting the JRE from the installer archive...
Unpacking the JRE...
Extracting the installation resources from the installer archive...
Configuring the installer for this system's environment...

********************************************************************************
Welcome - Step 1 of 4
********************************************************************************
[ Type 'back' to go to the previous panel or 'help' to check the help contents
for this panel or 'quit' to cancel the installation at any time. ]

Informatica Pre-Installation (i10PreInstallChecker) System Check Tool

The Pre-Installation (i10PreInstallChecker) System Check Tool verifies the
minimum system and database requirements for the Informatica services
installation or upgrade.

Copyright (c) 1993-2015 Informatica LLC. All Rights Reserved.
See patents at https://www.informatica.com/legal/patents.html
Press <Enter> to continue ...
To continue, hit the 'Enter' key.
********************************************************************************
System Information - Step 2 of 4
********************************************************************************
[ Type 'back' to go to the previous panel or 'help' to check the help contents
for this panel or 'quit' to cancel the installation at any time. ]

Informatica installation directory: (default :- /home/infauser) :
To continue, hit the 'Enter' key.
Informatica starting port number: (default :- 6005) :
To continue, hit the 'Enter' key.
********************************************************************************
Database and JDBC Connection Information - Step 3 of 4
********************************************************************************
[ Type 'back' to go to the previous panel or 'help' to check the help contents
for this panel or 'quit' to cancel the installation at any time. ]

Configure the database for the domain configuration repository:

Database type:
    * 1->Oracle
      2->SQLServer
      3->DB2
      4->Sybase
(Default: 1):
To continue, hit the '2' key for SQL Server.
Database user ID: (default :- admin) :
Type InfaDBUserDomainConfigRepo and hit enter.
User password: :
Type in the password and hit enter.
  Specify Schema Name
    * 1->No
      2->Yes
(Default: 1):
Hit the 'Enter' key to accept the default value. Note:
Because no schema name is provided, Informatica will default to a schema name
of dbo.
  Secure database
      1->Yes
    * 2->No
(Default: 2):
To continue, hit the 'Enter' key.
Configure the database connection
    * 1->JDBC URL
      2->Custom JDBC Connection String
(Default: 1):
To continue, hit the 'Enter' key.
Database address: (default :- host_name:port_no) :
Type REOSERVER:1433 and hit enter.
Database service name: (default :- DatabaseName) :
Type InfaDBDomainConfigRepo and hit enter.
Configure JDBC parameters
    * 1->Yes
      2->No
(Default: 1):
To continue, hit the 'Enter' key.
JDBC parameters (default :- SnapshotSerializable=true) :
To continue, hit the 'Enter' key.
********************************************************************************
System Check Summary - Step 4 of 4
********************************************************************************
[ Type 'back' to go to the previous panel or 'help' to check the help contents
for this panel or 'quit' to cancel the installation at any time. ]

Informatica Pre-Installation (i10PreInstallChecker) System Check Tool Results
[Pass] Disk Space: Available disk space is 31,232 MB. Sufficient for the
       Informatica installation.
[Pass] Processors: Available number of processors is 4. Sufficient for the
       Informatica installation.
[Pass] Physical Memory: Available physical memory is 7,995 MB. Sufficient for
       the Informatica installation.
[Pass] Temporary Space: Available temporary disk space is 31,050 MB. Sufficient
       for the Informatica installation.
[Pass] Ports: Port range is 6005 - 6009.  All port numbers within the port
       range are available for the Informatica installation.
[Pass] Locale Environment Variable: The LANG environment variable is set to
       language en_US.  The LC_ALL environment variable is set to language
       en_US.  Sufficient for the Informatica installation.
[Pass] JRE_HOME Environment Variable: The JRE_HOME environment variable does
       not contain a value. Sufficient for the Informatica installation.
[Pass] File Descriptor Limits: The file descriptor limits per process is 32000.
       Sufficient for the Informatica installation.
[Pass] CREATE VIEW Privilege: The database user account has the CREATE VIEW
       privilege. The installer successfully created a database view.
[Pass] DROP VIEW Privilege: The database user account has the DROP VIEW
       privilege. The installer successfully dropped a database view.
[Pass] DROP TABLE Privilege: The database user account has the DROP TABLE
       privilege. The installer successfully dropped a database table.
[Pass] SQL Server READ COMMITTED Isolation Level: The SQL Server READ COMMITTED
       isolation level for the database is set to ON. Sufficient for the
       Informatica installation.
[Pass] SQL Server Case Sensitivity: The SQL Server instance is not
       case-sensitive. Sufficient for the Informatica installation.
[Information] Informatica Installation Directory: /home/infauser
[Information] Informatica Starting Port Number: 6005
[Information] Database Type: SQLServer
[Information] Database User ID: InfaDBUserDomainConfigRepo
[Information] Database Host Name: REOSERVER
[Information] Database Port Number: 1433
[Information] Database Service Name: InfaDBDomainConfigRepo
[Information] Operating System: Operating system is Linux. Operating system
              version is 3.10.0-327.13.1.el7.x86_64.
[Information] RAM: The memory module size is 7,995 MB.

Press Enter to quit the pre-installation system check...
1. Run the Informatica Kerberos SPN Format Generator
2. Run the Informatica services installation
Select the option to proceed : (Default : 2)
Everything looks good. We may proceed with the Service Installation.
Service Installation
Informatica Services Installation
Installing the Informatica Services in Graphical Mode
You can install the Informatica services in graphical mode on Windows.
Installing the Informatica Services in Console Mode
You can install the Informatica services in console mode on UNIX.
When you run the installer in console mode, the words Quit and Back are reserved words. Do not use them as input text.
When you run the Pre-Installation (i10Pi) System Check Tool before you perform the installation, the installer sets the values for certain fields, such as the database connection and domain port numbers, based on the information you entered during the system check.
As mentioned before, this installation is on a Linux image. Since this the first time, a domain will need to be created. And since we are installing, we will also install a node. This node will become a gateway node in the domain.
We will not select the Enable Secure Communication option. Normally, when this is set up, secure communications exist between the services with the domain.
This installation will be performed in Console Mode.
Create a Domain
Log in to the machine with a system user account. I will be using my
root account. Enter the two commands to initiate the domain
installation.
cd /infauser/Downloads/1000_Server_Installer_linux-x64/
./install.sh
OS detected is Linux

\***************************************************************************
\* Welcome to the Informatica 10.0.0 Server Installer.                     *
\***************************************************************************

Before you continue, read the following documents:
* Informatica 10.0.0 Installation Guide and Release Notes.
* B2B Data Transformation 10.0.0 Installation, Configuration Guide and Release N
otes.

You can find the 10.0.0 documentation in the Product Documentation section at
http://mysupport.informatica.com.

Configure the LANG and LC_ALL variables to generate appropriate code pages and
create and connect to repositories and Repository Services.
Do you want to continue? (Y/N)
To continue, hit the 'Y' key.
Installer requires Linux version 2.6.32-431 or later versions of the 2.6.32
series or version 3.10.0-0 or later versions of the 3.10.0 series.
Current operating system Linux version 3.10.0-327.
Current operating system meets minimum requirements.

Select to install or upgrade:

  1. Install or upgrade Informatica.
   Select this option if the machine does not have Informatica services
   installed or if it has Informatica 9.6.1 or an earlier version installed.

  2. Install or upgrade Data Transformation Engine Only.
   Select this option to install or upgrade only Data Transformation Engine.

Enter the choice(1 or 2):
To continue, hit the '1' key.
-----------------------------------------------------------
Checking for existing 10.0.0 product installation.
To verify whether the machine meets the system requirements for the Informatica
installation or upgrade, run the Pre-Installation (i10PreInstallChecker) System
Check Tool before you start the installation or upgrade process. It is recommend
ed that you verify the minimum system requirements.


Select one of the following options:
1. Run the Pre-Installation (i10PreInstallChecker) System Check Tool
2. Run the Informatica Kerberos SPN Format Generator
3. Run the Informatica services installation
Select the option to proceed : (Default : 3)
To continue, hit the '3' key.
Preparing to install...
Extracting the JRE from the installer archive...
Unpacking the JRE...
Extracting the installation resources from the installer archive...
Configuring the installer for this system's environment...

********************************************************************************
Installation Type - Step 1 of 8
********************************************************************************
[ Type 'back' to go to the previous panel or 'help' to check the help contents f
or this panel or 'quit' to cancel the installation at any time. ]

Copyright (c) 1993-2015 Informatica LLC. All Rights Reserved.
See patents at https://www.informatica.com/legal/patents.html

Select to install or upgrade:
    * 1->Install Informatica 10.0.0.
Select this option to perform a full installation of Informatica 10.0.0.
      2->Upgrade to Informatica 10.0.0.
Select this option to upgrade previous versions of Informatica products to Infor
matica 10.0.0.
(Default: 1):
To continue, hit the '1' key.
Enable Kerberos network authentication
    * 1->No
      2->Yes
(Default: 1):
To continue, hit the '1' key.
WHEN YOU SELECT AGREE AND INSTALL INFORMATICA PLATFORM, YOU AGREE TO BE BOUND BY
THE PRODUCT USAGE TOOLKIT END USER LICENSE AGREEMENT, WHICH IS AVAILABLE AT:
http://www.informatica.com/us/eula/en-support-eula.aspx. AS FURTHER DESCRIBED IN
THE EULA, YOUR USE OF THE INFORMATICA PLATFORM WILL ENABLE THE PRODUCT USAGE
TOOLKIT TO COLLECT CERTAIN PRODUCT USAGE AND FAILURE INFORMATION. YOU MAY
DISABLE THIS FEATURE AT ANY TIME. FOR MORE INFORMATION ON HOW TO DISABLE THIS
FEATURE REFER THE INFORMATICA ADMINISTRATOR GUIDE.

I agree to terms and conditions
    * 1->No
      2->Yes
(Default: 1):
To continue, hit the '2' key.
********************************************************************************
Installation Prerequisites - Step 2 of 8
********************************************************************************
[ Type 'back' to go to the previous panel or 'help' to check the help contents
for this panel or 'quit' to cancel the installation at any time. ]

Verify the installation prerequisites and complete the pre-installation tasks
before you continue.

Disk Space Requirement: 10 GB

Memory Requirement (RAM): 6 GB

Database Requirements
- Verify the Oracle, IBM DB2, Microsoft SQL Server, or Sybase ASE database
  version.
- Verify the database user account. The account must have permissions to
  create and drop tables and views, and insert, update, and delete data.

Pre-installation Tasks
- Obtain the Informatica license key.
- Verify the minimum system requirements.
- Set the environment variables.
- Verify the port availability.
- Set up the keystore file.
- On UNIX, set the file descriptor limit.
- On UNIX, configure POSIX asynchronous I/O.
- Download and extract the Informatica installer files.
- Run the Informatica Pre-Installation (i10PreInstallChecker) System Check Tool.
- If you are enabling Kerberos network authentication, run the Informatica
  Kerberos SPN Format Generator.
Press <Enter> to continue ...
To continue, hit the 'Enter' key.
********************************************************************************
License and Installation Directory - Step 3 of 8
********************************************************************************
[ Type 'back' to go to the previous panel or 'help' to check the help contents
for this panel or 'quit' to cancel the installation at any time. ]

Enter the license key file (default :- /home/infauser/license.key) :
To continue, hit the 'Enter' key.
Enter the installation directory (default :- /home/infauser) :
To continue, hit the 'Enter' key.
********************************************************************************
Pre-Installation Summary - Step 4 of 8
********************************************************************************
[ Type 'back' to go to the previous panel or 'help' to check the help contents
for this panel or 'quit' to cancel the installation at any time. ]

Product Name	 : 	Informatica 10.0.0 Services
Installation Type	 : 	New Installation
Installation Directory	 : 	/home/infauser
Disk Space Requirements
Required Disk Space	 : 	8,214 MB
Available Disk Space	 : 	27,665 MB

Press <Enter> to continue ...
To continue, hit the 'Enter' key.
********************************************************************************
Installing - Step 5 of 8
********************************************************************************

Installing... 5%
Installing... 10%
Installing... 15%
Installing... 20%
Installing... 25%
Installing... 35%
Installing... 40%
Installing... 45%
Installing... 50%
Installing... 55%
Installing... 60%
Installing... 65%
Installing... 70%
Installing... 75%
Installing... 80%
Installing... 85%
Installing... 90%
Installing... 95%
Installing...100%

********************************************************************************
Domain Selection - Step 5A of 8
********************************************************************************
[ Type 'back' to go to the previous panel or 'help' to check the help contents
for this panel or 'quit' to cancel the installation at any time. ]

    * 1->Create a domain
      2->Join a domain
(Default: 1):
To continue, hit the '1' key.
Enable secure communication for the domain
    * 1->No
      2->Yes
(Default: 1):
To continue, hit the '1' key.
    * 1->Enable HTTPS for Informatica Administrator
      2->Disable HTTPS
(Default: 1):
To continue, hit the '2' key.
********************************************************************************
Domain Configuration Repository - Step 5B of 8
********************************************************************************
[ Type 'back' to go to the previous panel or 'help' to check the help contents
for this panel or 'quit' to cancel the installation at any time. ]

Configure the database for the domain configuration repository:

Database type:
      1->Oracle
    * 2->SQLServer
      3->DB2
      4->Sybase
(Default: 2):
To continue, hit the 'Enter' key.
Database user ID: (default :- InfaDBUserDomainConfigRepo) :
To continue, hit the 'Enter' key.
User password: :
To continue, enter the password and the Enter key.
  Specify Schema Name
    * 1->No
      2->Yes
(Default: 1):
To continue, hit the 'Enter' key.
Configure the database connection
      1->JDBC URL
    * 2->Custom JDBC Connection String
(Default: 2):
To continue, hit the '1' key.
Database address: (default :- REOSERVER:1433) :
To continue, hit the 'Enter' key.
Database service name: (default :- InfaDBDomainConfigRepo) :
To continue, hit the 'Enter' key.
Configure JDBC parameters
    * 1->Yes
      2->No
(Default: 1):
To continue, hit the 'Enter' key.
JDBC parameters (default :- SnapshotSerializable=true) :
To continue, hit the 'Enter' key.
********************************************************************************
Domain Security - Encryption Key - Step 5C of 8
********************************************************************************
[ Type 'back' to go to the previous panel or 'help' to check the help contents
for this panel or 'quit' to cancel the installation at any time. ]

Keyword: :
To continue, enter the word 'Apollo12' and hit the
'Enter' key.
Encryption key directory: (default :- /home/infauser/isp/config/keys) :
To continue, hit the 'Enter' key.
Information !!! The encryption key will be generated in
/home/infauser/isp/config/keys with the file name siteKey. You must keep the
name of the domain, the keyword for the encryption key, and the encryption
key file in a secure location.  The domain name, keyword, and encryption key
are required when you change the encryption key for the domain or move a
repository to another domain.

Select a Choice
    * 1->OK
(Default: 1):
To continue, hit the 'Enter' key.
********************************************************************************
Domain and Node Configuration - Step 6 of 8
********************************************************************************
[ Type 'back' to go to the previous panel or 'help' to check the help contents
for this panel or 'quit' to cancel the installation at any time. ]

Enter the following information for the Informatica domain.

Domain name: (default :- Domain) :
To continue, hit the 'Enter' key.
Node host name: (default :- hdcentos) :
To continue, hit the 'Enter' key.
Node name: (default :- node01) :
To continue, hit the 'Enter' key.
Node port number: (default :- 6005) :
To continue, hit the 'Enter' key.
Domain user name: (default :- Administrator) :
To continue, hit the 'Enter' key.
Domain password: (default :- ) :
To continue, enter a password for the domain and hit the
'Enter' key.
Confirm password: (default :- ) :
To continue, reenter a password for the domain and hit the
'Enter' key.
Display advanced port configuration page
    * 1->No
      2->Yes
(Default: 1):
To continue, hit the 'Enter' key.
Configure Model Repository Service and Data Integration Service
    * 1->Yes
      2->No
(Default: 1):
Hit the '2' key followed by the 'Enter' key.
Executing Command...
--
Defining domain...
-
Registering plugins...
-
Starting service...
-
Pinging domain...
-
Pinging domain...
-
Pinging domain...
-
Pinging domain...
-
Pinging Administrator...
-
Pinging Administrator...
-
Pinging Administrator...
-
Pinging Administrator...
-
Pinging Administrator...
-
Pinging Administrator...
-
Pinging Administrator...
-
*******************************************************************************
Post-Installation Summary - Step 8 of 8
*******************************************************************************
Installation Status SUCCESS

The Informatica 10.0.0 installation is complete.

The system services are disabled by default after the installation is complete.
You must configure the services and then enable them in the Administrator tool.

For more information, see the debug log file:
/home/infauser/Informatica_10.0.0_Services.log

Installation Type :New Installation

Informatica Administrator Home Page::
http://hdcentos:6008

Product Name:  Informatica 10.0.0 Services

Press <Enter> to continue ...
Hit the Enter key. It is done.
Troubleshooting the Services Installation
Installation Troubleshooting Overview
This chapter provides information about the Informatica installation process and the cause and resolution of errors that occur during installation. The examples included in this chapter describe general troubleshooting strategies and are not a comprehensive list of possible causes of installation issues.
Installation Log Files
You can use the following log files to troubleshoot an Informatica installation:
Installation log files
The installer produces log files during and after the installation. You can use these logs to get more information about the tasks completed by the installer and errors that occurred during installation. The installation log files include the following logs:
- Debug logs
- File installation log
Service Manager log files
Log files generated when the Service Manager starts on a node.
- Informatica_10.0.0_Services.log
- Informatica_10.0.0_Services_InstallLog.log
- logs
- node01
- services
- AdministratorConsole
- administrator.log
- catalina.2016-07-09.log
- host-manager.2016-07-09.log
- localhost.2016-07-09.log
- manager.2016-07-09.log
- passwordchange.log
- catalina.out
- exceptions.log
- infacmd_jsf.log
- ispLogs.log
- node.log
- node_jsf.log
- infasetup_jsf.log
- upgrade.log
- tomcat
- logs
- temp.log
Debug Log Files
The installer writes actions and errors to the debug log file. The name of the log file depends on the Informatica component you install.
File Installation Log File
The file installation log file contains information about the installed files.
Service Manager Log Files
The installer starts the Informatica service. The Informatica service starts the Service Manager for the node. The Service Manager generates log files that indicate the startup status of a node. Use these files to troubleshoot issues when the Informatica service fails to start and you cannot log in to Informatica Administrator. The Service Manager log files are created on each node.
The following table describes the files generated by the Service Manager:
| Property | Description |
|---|---|
| catalina.out | Log events from the Java Virtual Machine (JVM) that runs the Service Manager. For example, a port is available during installation, but is in use when the Service Manager starts. Use this log to get more information about which port was unavailable during startup of the Service Manager. The catalina.out file is in the following directory:<Informatica installation directory>/logs/<node name>/catalina.outcd $INFA_HOME/logs/node01 |
| node.log | Log events generated during the startup of the Service Manager on a
node. You can use this log to get more information about why the Service
Manager for a node failed to start. For example, if the Service Manager
cannot connect to the domain configuration database after 30 seconds,
the Service Manager fails to start. The node.log file is
in the /tomcat/logs directory. |
Note: The Service Manager also uses node.log to record
events when the Log Manager is unavailable. For example, if the machine
where the Service Manager runs does not have enough available disk space to
write log event files, the Log Manager is unavailable.
After You Install the Services
Edit .bash_profile
#
# Configure the amount of system memory used by Informatica.
#
export INFA_JAVA_OPTS="-Xmx1024m"
#
# Use INFA_HOME to designate the Informatica installation directory.
#
export INFA_HOME=/home/infauser
#
# The domains.infa file contains the connectivity information for the gateway
# nodes in a domain, including the domain names, domain host names and
# domain host port numbers.
#
export INFA_DOMAINS_FILE=$INFA_HOME/domains.infa
unset INFA_TRUSTSTORE
unset INFA_TRUSTSTORE_PASSWORD
#
# The following locale environment variables are set for Informatica.
# Possible values include:
#   Latin1 = ISO 8859-1 Western European
#   MS1252 = MS Windows Latin1 (ANSI), superset of Latin1
#   US-ASCII = 7-bit ASCII
#   UTF-8 = Unicode Transformation format, multibyte
#
#
export INFA_CODEPAGENAME=MS1252
#
# The following is required for ODBC and Informatica.
#
export ODBCHOME=$INFA_HOME/ODBC7.1
export ODBCINI=$INFA_HOME/ODBC7.1/odbc.ini
export LD_LIBRARY_PATH=$LD_LIBRARY_PATH:$ODBCHOME/lib
export PATH=$PATH:$ODBCHOME/bin
export ODBCINI=$HOME/ODBC7.1/odbc.ini
List of possible values for INFA_CODEPAGENAME.
Again, don't forget to source the .bash_profile
file since it was edited.
source .bash_profile
Complete the Domain Configuration
Complete the Domain Configuration Overview
After you install Informatica services and before you create the application services, complete the configuration for the domain services.
Domain configuration includes tasks such as verifying code pages, configuring the environment variables for the domain, and configuring the firewall.
Verify Locale Settings and Code Page Compatibility
The code pages for application services must be compatible with code pages in the domain.
Verify and configure the locale settings and code pages:
Verify that the domain configuration database is compatible with the code pages of the application services that you create in the domain.
The Service Manager synchronizes the list of users in the domain with the list of users and group in each application service. If a user name in the domain has characters that the code page of the application service does not recognize, characters do not convert correctly and inconsistencies occur.
Verify that the locale settings on machines that access the Administrator tool and the Informatica client tools is compatible with code pages of repositories in the domain.
If the locale setting is not compatible with the repository code page, you cannot create an application service.
On Windows, verify the locale settings in the regional options of Control Panel. For information, see the Windows documentation.
Configure Locale Environment Variables on UNIX
Configure Environment Variables
Informatica uses environment variables to store configuration information when it runs the application services and connects to the clients. Configure the environment variables to meet the Informatica requirements.
Incorrectly configured environment variables can cause the Informatica domain or nodes to fail to start or can cause connection problems between the Informatica clients and the domain.
To configure environment variables on UNIX, log in with the system user account you used to install Informatica.
Configure Informatica Environment Variables
You can configure Informatica environment variables to store memory, domain, and location settings.
Edit the ~/.bash_profile file to set your environment variables.
The following is a summary list of the values set for this installation:
export INFA_JAVA_OPTS="-Xmx1024m"
export INFA_HOME="/home/infauser"
export INFA_DOMAINS_FILE="$INFA_HOME/domains.infa"
unset INFA_TRUSTSTORE
unset INFA_TRUSTSTORE_PASSWORD
Save your file and exit from your editor. Do not forget to reread your file with:
. ~/.bash_profile
The following sections discuss, in more detail, the individual environment variables.
INFA_JAVA_OPTS
By default, Informatica uses a maximum of 512 MB of system memory.
You can use the INFA_JAVA_OPTS environment variable to
configure the amount of system memory used by Informatica. Our system is
for only one user, so configure 1 GB of system memory for the Informatica
daemon use the following command:
export INFA_JAVA_OPTS="-Xmx1024m"
INFA_HOME
Use INFA_HOME to designate the Informatica installation
directory. If you modify the Informatica directory structure, you need to
set the environment variable to the location of the Informatica installation
directory or the directory where the installed Informatica files are located.
export INFA_HOME="/home/infauser"
INFA_DOMAINS_FILE
The installer creates a domains.infa file in the Informatica
installation directory. The domains.infa file contains the
connectivity information for the gateway nodes in a domain, including the
domain names, domain host names, and domain host port numbers.
Set the value of the INFA_DOMAINS_FILE variable to the path and
file name of the domains.infa file.
Configure the INFA_DOMAINS_FILE variable on the machine where
you install the Informatica services. If your domains.infa
file is in the /root directory, you can use:
export INFA_DOMAINS_FILE="$INFA_HOME/domains.infa"
You can set the value without using the INFA_HOME environment
variable. First, locate the domains.infa file with the
following find command:
find / -name "domains.infa"
This returned the following location:
/home/infauser/domains.infa
Now set the environment variable:
export INFA_DOMAINS_FILE="/home/infauser/domains.infa"
INFA_TRUSTSTORE
If you enable secure communication for the domain, set the
INFA_TRUSTSTORE variable with the directory that contains the
truststore files for the SSL certificates. The directory must contain
truststore files named infa_truststore.jks and
infa_truststore.pem.
You must set the INFA_TRUSTSTORE variable if you use the default
SSL certificate provided by Informatica or a certificate that you provide.
For this installation, since secure communications were not enabled, this environment variable will not be set.
unset INFA_TRUSTSTORE
INFA_TRUSTSTORE_PASSWORD
If you enable secure communication for the domain and you specify the SSL
certificate to use, set the INFA_TRUSTSTORE_PASSWORD variable
with the password for the infa_truststore.jks that contains
the SSL certificate. The password must be encrypted. Use the command line
program pmpasswd to encrypt the password.
For this installation, since secure communications were not enabled, this environment variable will not be set.
unset INFA_TRUSTSTORE_PASSWORD
Configure Library Path Environment Variables on UNIX
Configure library path environment variables on the machines that run the Data Integration Service, PowerCenter Integration Service, and PowerCenter Repository Service processes. The variable name and requirements depend on the platform and database.
Linux
Configure the LD_LIBRARY_PATH environment variable.
In Linux, the environment variable LD_LIBRARY_PATH is a
colon-separated set of directories where libraries should be searched for
first, before the standard set of directories; this is useful when debugging
a new library or using a nonstandard library for special purposes.
Configure the LD_LIBRARY_PATH environment variable by utilizing the following table for the different databases:
| Database | Value |
|---|---|
| Oracle | <DatabasePath>/lib |
| IBM DB2 | <DatabasePath>/lib |
| Sybase ASE | "${SYBASE_OCS}/lib:${SYBASE_ASE}/lib:${LD_LIBRARY_PATH}" |
| Informix | <DatabasePath>/lib |
| Teradata | <DatabasePath>/lib |
| ODBC | <CLOSEDODBCHOME>/lib |
To set this environment variable, use:
export ODBC_HOME="$INFA_HOME/ODBC7.1"
export LD_LIBRARY_PATH="$LD_LIBRARY_PATH:$ODBC_HOME/bin"
To view these environment variable to ensure they were set correctly:
echo $ODBC_HOME
echo $LD_LIBRARY_PATH
Prepare ODBC DSN Entries (odbc.ini)
Enter the following command to edit the odbc.ini file:
mv $INFA_HOME/ODBC7.1/odbc.ini $INFA_HOME/ODBC7.1/odbc.bak
vi $INFA_HOME/ODBC7.1/odbc.ini
[ODBC Data Sources]
DSNInfaDBPwrCntrRepo=DataDirect 7.1 SQL Server Wire Protocol

[DSNInfaDBPwrCntrRepo]
AlternateServers=
AlwaysReportTriggerResults=0
AnsiNPW=1
ApplicationName=
ApplicationUsingThreads=1
ConnectionReset=0
Database=InfaDBPwrCntrRepo
GSSClient=native
Language=
LogonID=
MaxPoolSize=100
MinPoolSize=0
PacketSize=-1
Password=
Pooling=0
QueryTimeout=0
TrustStore=
TrustStorePassword=
ValidateServerCertificate=1
WorkStationID=
XML Describe Type=-10

[Default]
Driver=/home/infauser/ODBC7.1/lib/DWsqls27.so
Description=DataDirect 7.1 SQL Server Wire Protocol
Server=REOSERVER
Port=1433
Prepare to Create the Application Services
Prepare to Create the Application Services Overview
Before you create an application service, verify the setup and configuration on the node.
Log in to the Administrator tool and create connections to the databases that the application services access through native connectivity.
Create Directories for the Analyst Service
Before you create the Analyst Service, you must create directories for the Analyst tool to store temporary files.
Create the following directories on the node that runs the Analyst Service:
mkdir $INFA_HOME/FlatFileCache
mkdir $INFA_HOME/BusinessGlossary
mkdir $INFA_HOME/AssetAttachments
Flat file cache directory
Create a directory for the flat file cache where the Analyst tool stores uploaded flat files. The Data Integration Service must also be able to access this directory. If the Analyst Service and the Data Integration Service run on different nodes, configure the flat file directory to use a shared directory. If the Data Integration Service runs on primary and back-up nodes or on a grid, each Data Integration Service process must be able to access the files in the shared directory.
mkdir $INFA_HOME/FlatFileCache
When you import a reference table or flat file source, the Analyst tool uses the files from this directory to create a reference table or flat file data object.
Temporary export file directoryCreate a directory to store the temporary business glossary files that the business glossary export process creates. Create the directory on the node that runs the Analyst Service.
For example, you can create a directory named "exportfiledirectory" in the following location:
mkdir $INFA_HOME/BusinessGlossaryAsset attachments directory
Create a directory to store the files that content managers add as attachments to Glossary assets. Create the directory on the node that runs the Analyst Service.
For example, you can create a directory named "attachmentdirectory" in the following location:
mkdir $INFA_HOME/AssetAttachments
Log In to Informatica Administrator
Start the Informatica service:
cd $INFA_HOME/server/tomcat/bin/
./infaservice.sh startup
The following output will be displayed:
Starting Informatica services on node 'node01'
Using CURRENT_DIR:     /home/infauser/tomcat/bin
Using INFA_HOME:       /home/infauser
Using System log directory :   /home/infauser/logs/node01
Now use a browser and open http://hdcentos:6008/administrator. The ID is 'Administrator' and the password is the normal password.
You must have a user account to log in to the Informatica Administrator web application.
Log into the Linux server. Open a browser. Since the Administrator tool is not configured to use a secure connect, enter the following URL:
http://hdcentos:6008/administrator
The host name and port in the URL represent the host name and port number of the master gateway node. Enter the Username Administrator with the normal password. Click on the Log In button.
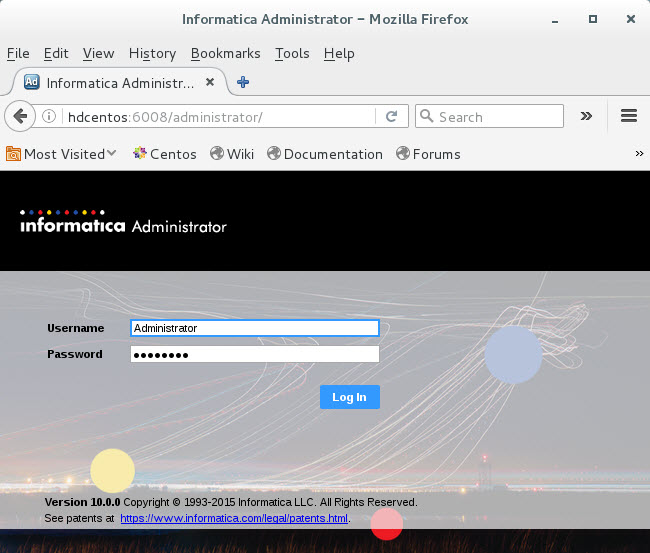
The following page is shown.
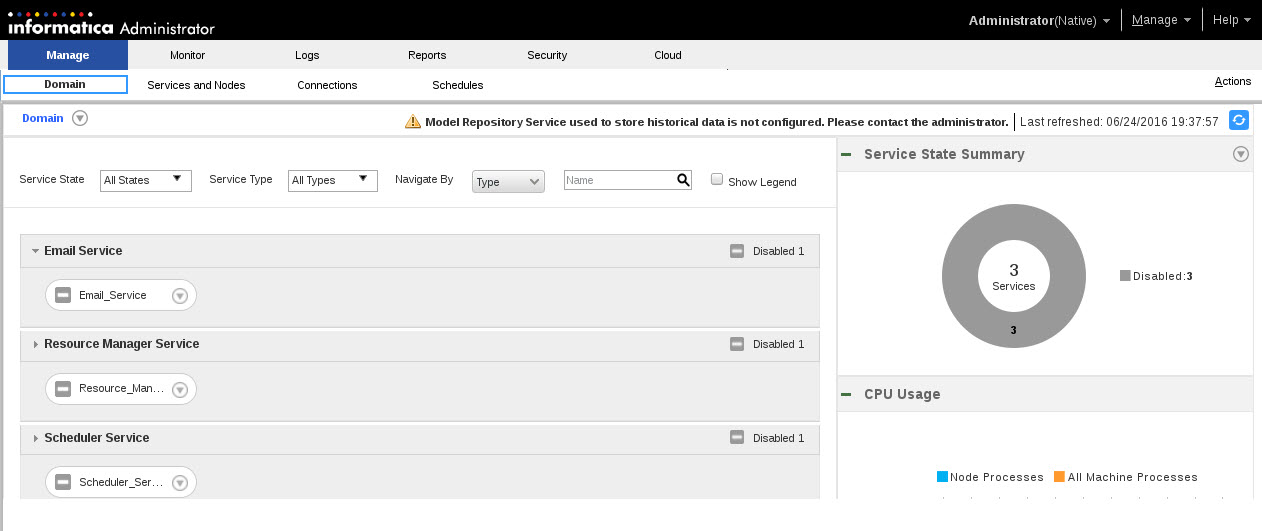
Create Connections
In the Administrator tool, create connections to the database that the application services use. You need to specify the connection details while you configure the application service.
When you create the database connection, specify the database connection properties and test the connection.
The following table describes the database connections that you must create before you create the associated application services:
| Database Connection | Description |
|---|---|
| Data object cache database | To access the data object cache, create the data object cache connection for the Data Integration Service. |
| Workflow database | To store run-time metadata for workflows, create the workflow database connection for the Data Integration Service. |
| Profiling warehouse database | To create and run profiles and scorecards, create the profiling warehouse database connection for the Data Integration Service. To create and run profiles and scorecards, select this instance of the Data Integration Service when you configure the run-time properties of the Analyst Service. |
| Reference data warehouse | To store reference table data, create the reference data warehouse connection for the Content Management Service. |
Microsoft SQL Server Connection Properties
Use a Microsoft SQL Server connection to access tables in a Microsoft SQL Server database. The following table describes the Microsoft SQL Server connection properties:
| Property | Description |
|---|---|
| User name | Database user name. |
| Password | Password for the user name. |
| Use Trusted Connection | Optional. When enabled, the Data Integration Service uses Windows authentication to access the Microsoft SQL Server database. The user name that starts the Data Integration Service must be a valid Windows user with access to the Microsoft SQL Server database. |
| Connection String for metadata access | Connection string to import physical data objects. Use the following connection string: jdbc:informatica:sqlserver://<host>:<port>;databaseName=<dbname> |
| Connection String for data access | Connection string to preview data and run mappings. Enter: <ServerName>@<DBName> |
| Domain Name | Optional. Name of the domain where Microsoft SQL Server is running. |
| Packet Size | Required. Optimize the ODBC connection to Microsoft SQL Server. Increase the packet size to increase performance. Default is 0. |
| Code Page | Database code page. |
| Owner Name | Name of the schema owner. Specify for connections to the profiling warehouse database or data object cache database. |
| Schema Name | Name of the schema in the database. Specify for connections to the profiling warehouse or data object cache database. You must specify the schema name for the profiling warehouse if the schema name is different from the database user name. You must specify the schema name for the data object cache database if the schema name is different from the database user name and you manage the cache with an external tool. |
| Environment SQL | Optional. Enter SQL commands to set the database environment when you connect to the database. The Data Integration Service executes the connection environment SQL each time it connects to the database. |
| Transaction SQL | Optional. Enter SQL commands to set the database environment when you connect to the database. The Data Integration Service executes the transaction environment SQL at the beginning of each transaction. |
| Retry Period | This property is reserved for future use. |
| SQL Identifier Character | The type of character used to identify special characters and reserved SQL keywords, such as WHERE. The Data Integration Service places the selected character around special characters and reserved SQL keywords. The Data Integration Service also uses this character for the Support Mixed-case Identifiers property. |
| Support Mixed-case Identifiers | When enabled, the Data Integration Service places identifier characters around table, view, schema, synonym, and column names when generating and executing SQL against these objects in the connection. Use if the objects have |
Note: When you use a Microsoft SQL Server connection to access tables in a Microsoft SQL Server database, the Developer tool does not display the synonyms for the tables.
Creating a Connection
In the Administrator tool, you can create relational database, social media, and file systems connections.
In the Administrator tool, click the Manage tab. Click the Connections view.
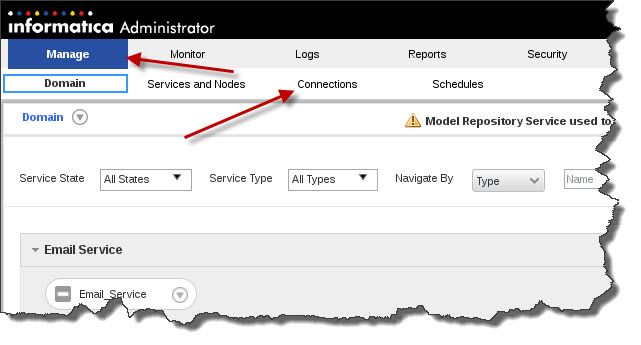
In the Navigator, select the domain. In the Navigator, click Actions > New > Connection.
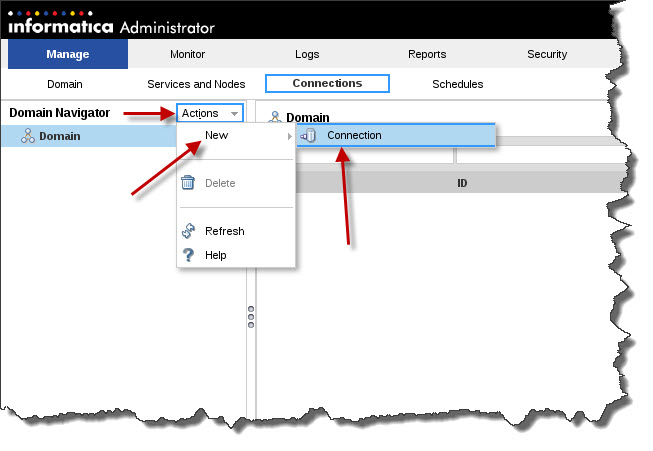
The New Connection dialog box appears. In the New Connection dialog box, select the connection type, and then click OK.
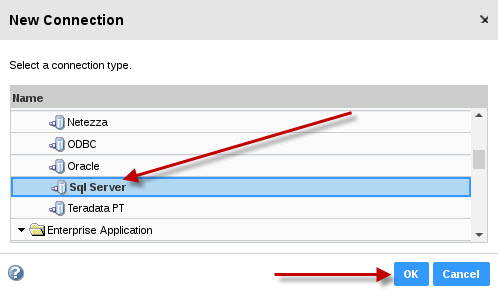
The New Connection wizard appears. Enter the connection properties. The connection properties that you enter depend on the connection type. Click Next to go to the next page of the New Connection wizard.
When you finish entering connection properties, you can click Test Connection to test the connection to the database. Click Finish.
Data Object Cache Connection
The following images represent my definitions for this connection.
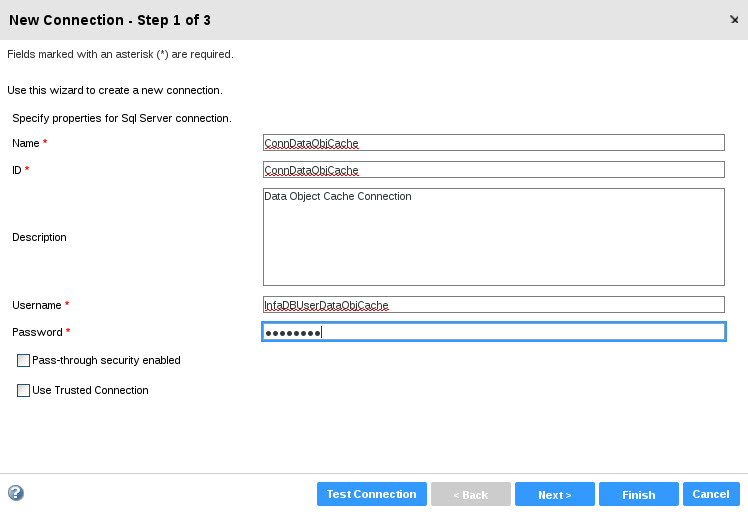
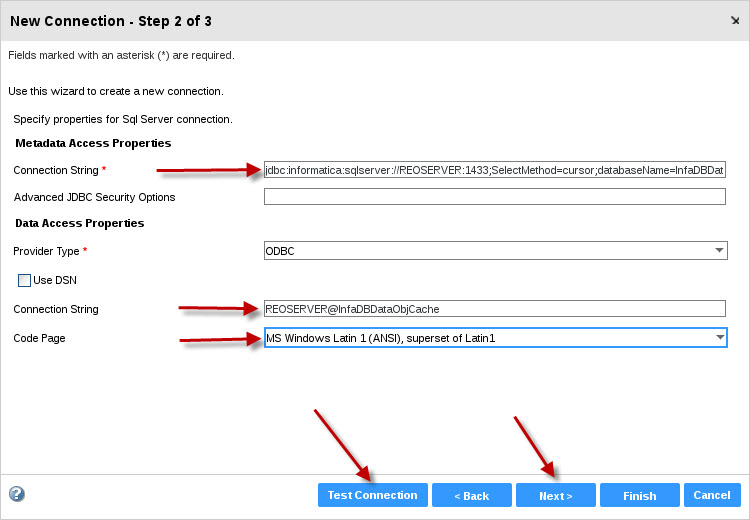
Connection String: jdbc:informatica:sqlserver://REOSERVER:1433;SelectMethod=cursor;databaseName=InfaDBDataObjCache
Connection String: REOSERVER@InfaDBDataObjCache
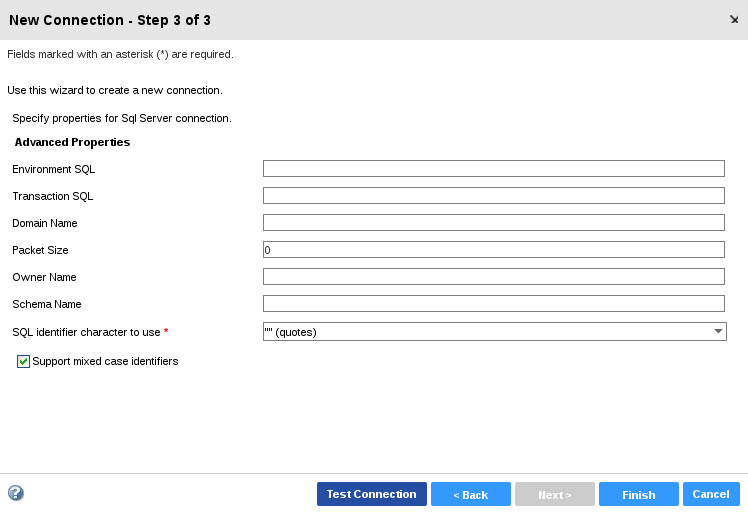
Workflow Database Connection
The following images represent my definitions for this connection.
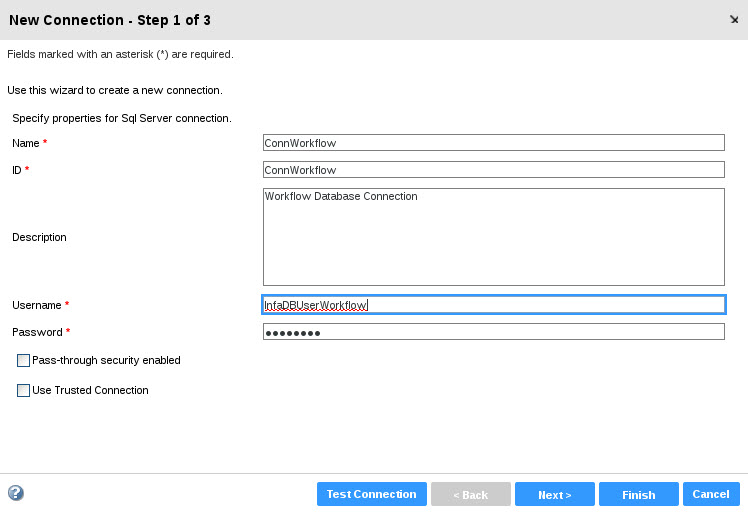
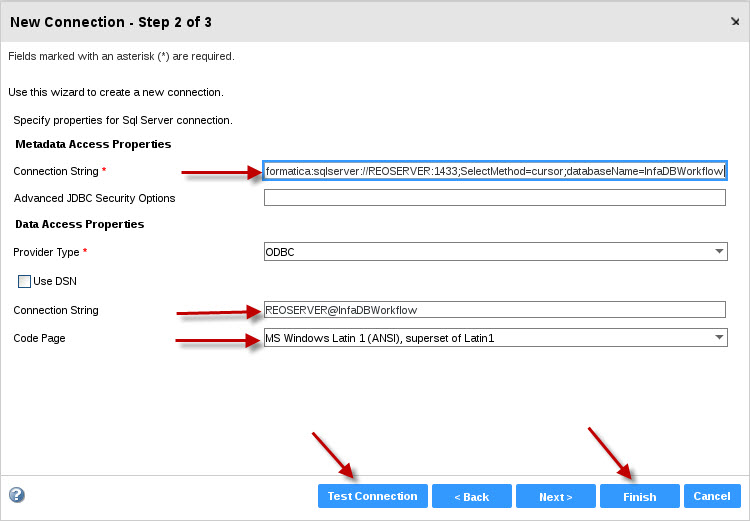
Connection String: jdbc:informatica:sqlserver://REOSERVER:1433;SelectMethod=cursor;databaseName=InfaDBWorkflow
Connection String: REOSERVER@InfaDBWorkflow
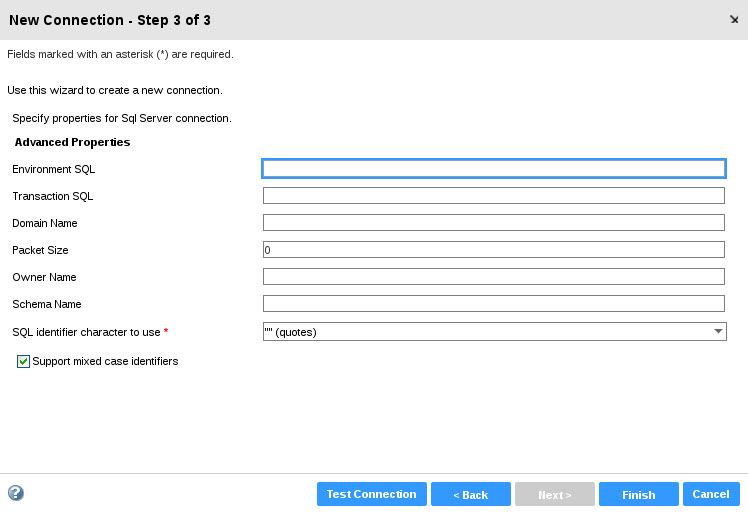
Profiling Warehouse Connection
The following images represent my definitions for this connection.
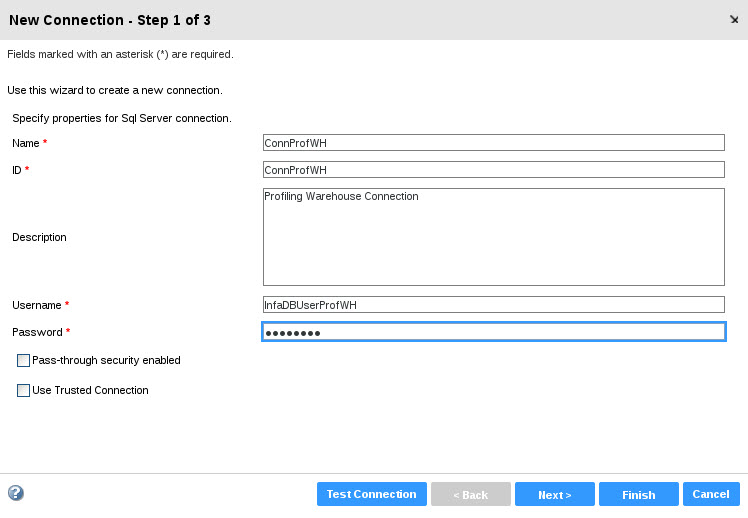
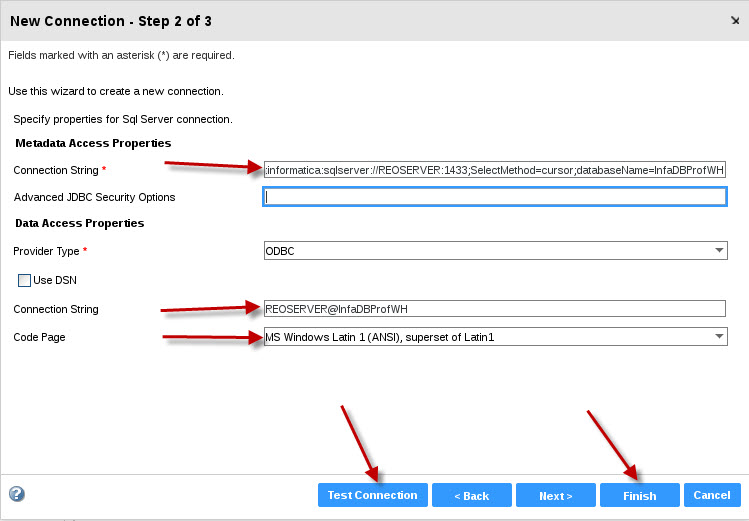
Connection String: jdbc:informatica:sqlserver://REOSERVER:1433;SelectMethod=cursor;databaseName=InfaDBProfWH
Connection String: REOSERVER@InfaDBProfWH
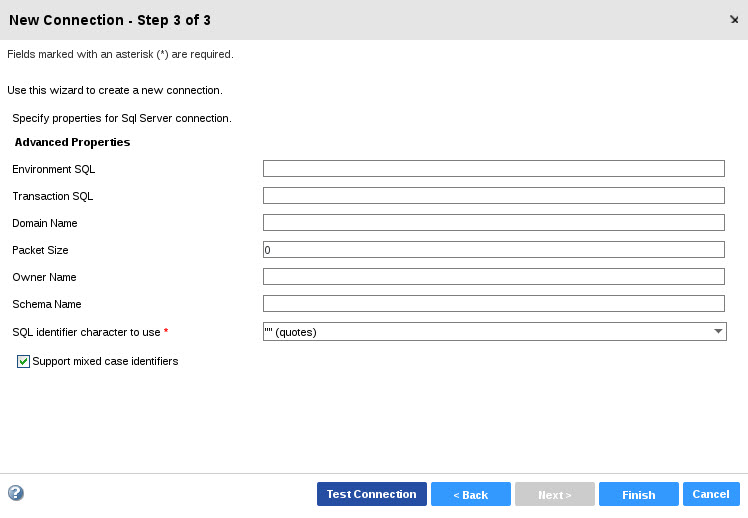
Reference Data Warehouse Connection
The following images represent my definitions for this connection.
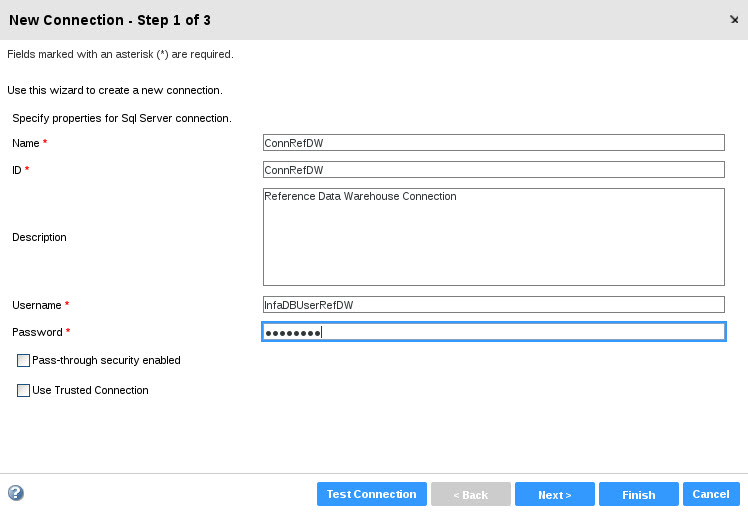
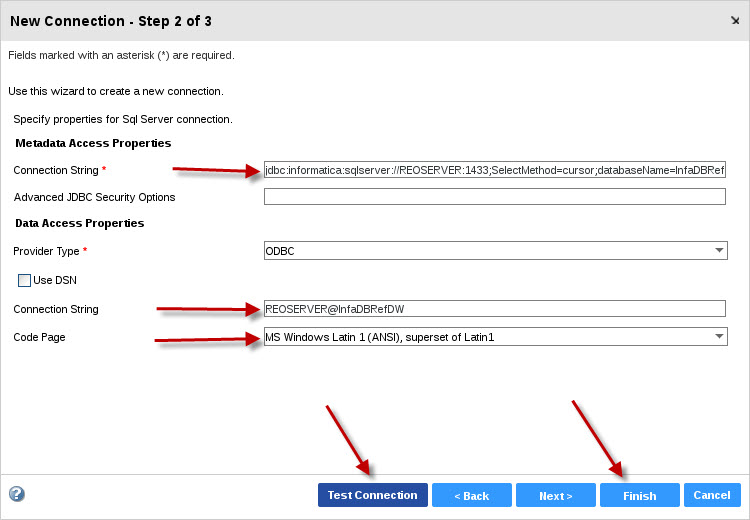
Connection String: jdbc:informatica:sqlserver://REOSERVER:1433;SelectMethod=cursor;databaseName=InfaDBRefDW
Connection String: REOSERVER@InfaDBRefDW
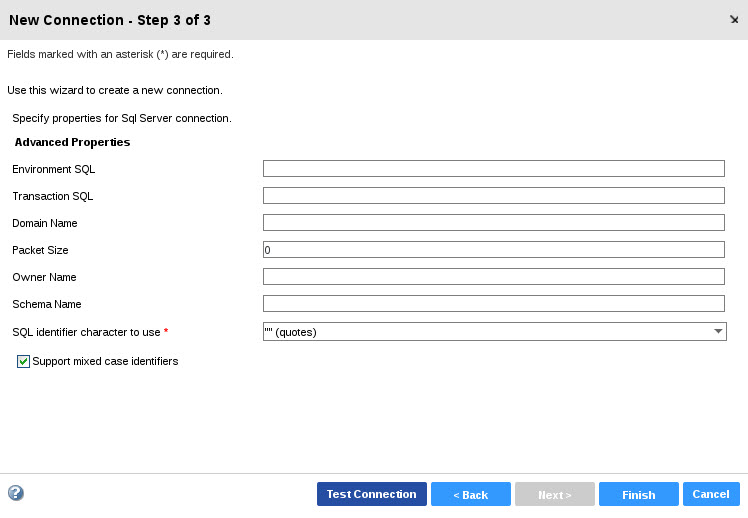
Create the Application Services
Create the Application Services Overview
Use the Administrator tool to create the application services in the required order.
Some application services depend on other application services. When you create these dependent application services, you must provide the name of other running application services. Review the application service dependencies to determine the order that you must create the services. For example, you must create a Model Repository Service and a Data Integration Service before you create an Analyst Service.
Before you create the application services, verify that you have completed the prerequisite tasks required by the installation and configuration process.
After you create each application service, review the next tasks that you need to complete.
Create and Configure the Model Repository Service
The Model Repository Service is an application service that manages the Model repository. The Model repository stores metadata created by Informatica clients and application services in a relational database to enable collaboration among the clients and services.
When you access a Model repository object from the Developer tool, the Analyst tool, the Administrator tool, or the Data Integration Service, the client or service sends a request to the Model Repository Service. The Model Repository Service process fetches, inserts, and updates the metadata in the Model repository database tables.
Create the Model Repository Service
Use the service creation wizard in the Administrator tool to create the service. In the Administrator tool, click the Manage tab. Click on the Services and Nodes View. Click Actions > New > Model Repository Service.
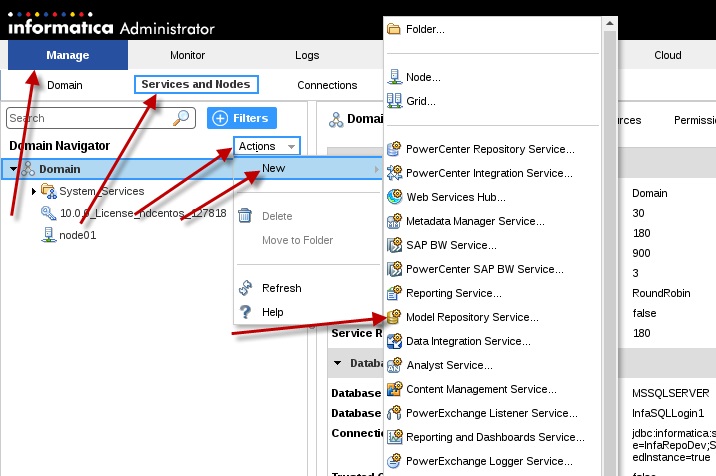
The New Model Repository Service dialog box appears. On the New Model Repository Service - Step 1 of 2 page, enter the following properties:
| Property | Description |
|---|---|
| Name | Name of the service. The name is not case sensitive and must be unique within the domain. It cannot exceed 128 characters or begin with @. It also cannot contain spaces or the following special characters: ` ~ % ^ * + = { } \ ; : ' " / ? . , < > | ! ( ) ] [ |
| Description | Description of the service. The description cannot exceed 765 characters. |
| Location | Domain and folder where the service is created. Click Browse to choose a different folder. You can move the service after you create it. |
| License | License object that allows use of the service. |
| Node | Node on which the service runs. |
| Backup Nodes | If your license includes high availability, nodes on which the service can run if the primary node is unavailable. |
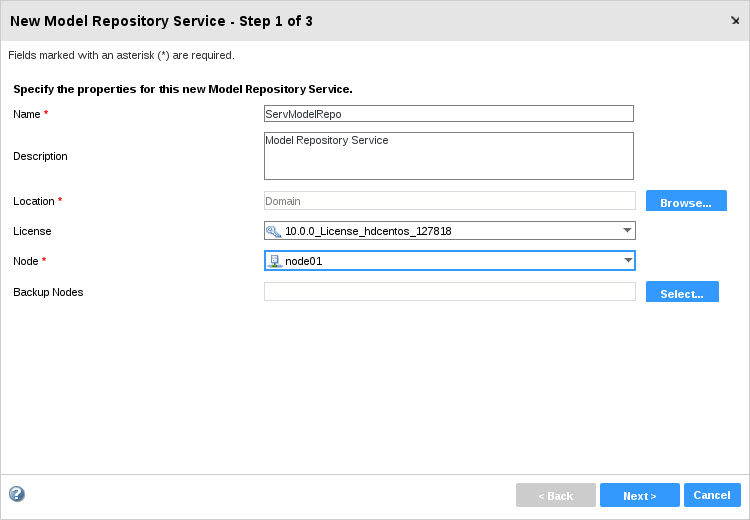
Click Next.
The New Model Repository Service - Step 2 of 2 page appears.
Enter the following properties for the Model repository database:
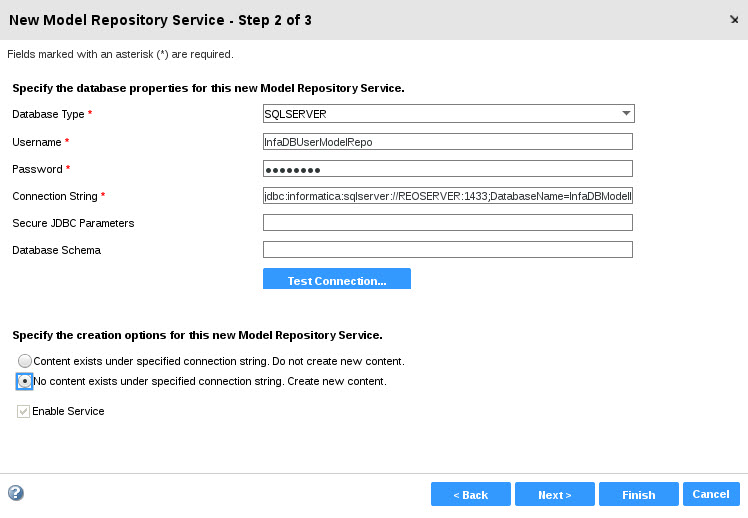
Connection String: jdbc:informatica:sqlserver://REOSERVER:1433;DatabaseName=InfaDBModelRepo;SnapshotSerializable=true
Click Finish. The domain creates the Model Repository Service, creates content for the Model repository in the specified database, and enables the service. After you create the service through the wizard, you can edit the properties or configure other properties.
Create the Model Repository User
If the domain does not use Kerberos authentication, the domain uses a user account to authenticate other application services that make requests to the Model Repository Service. You must create a user account and assign the user the Administrator role for the Model Repository Service.
When you create an application service that depends on the Model Repository Service, you provide the name of the Model Repository Service and of this Model repository user.

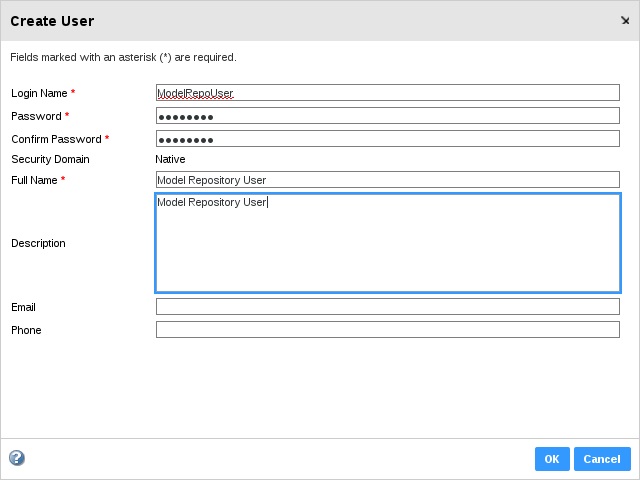
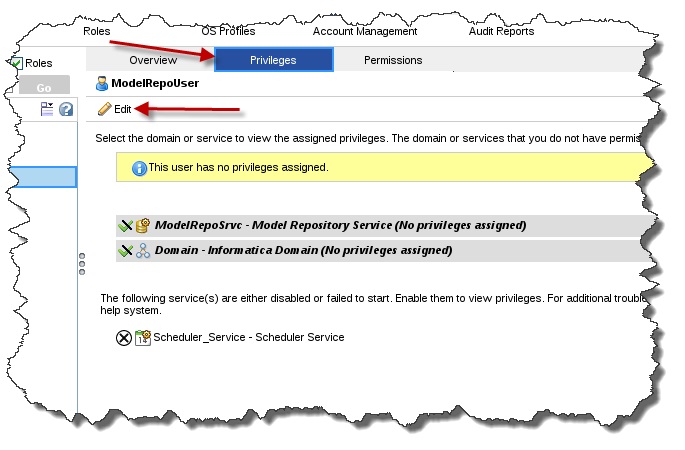
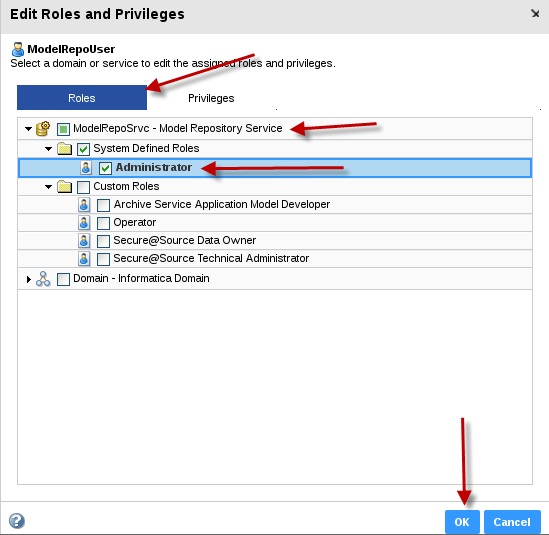
Create and Configure the Data Integration Service
The Data Integration Service is an application service that performs data integration jobs for the Analyst tool, the Developer tool, and external clients.
When you preview or run data profiles, SQL data services, and mappings in the Analyst tool or the Developer tool, the client tool sends requests to the Data Integration Service to perform the data integration jobs. When you run SQL data services, mappings, and workflows from the command line program or an external client, the command sends the request to the Data Integration Service.
Create the Data Integration Service
Use the service creation wizard in the Administrator tool to create the service.
Before you create the Data Integration Service, verify that you have created and enabled the Model Repository Service. If the domain does not use Kerberos authentication, verify that you have created a Model repository user that the Data Integration Service can use to access the Model Repository Service.
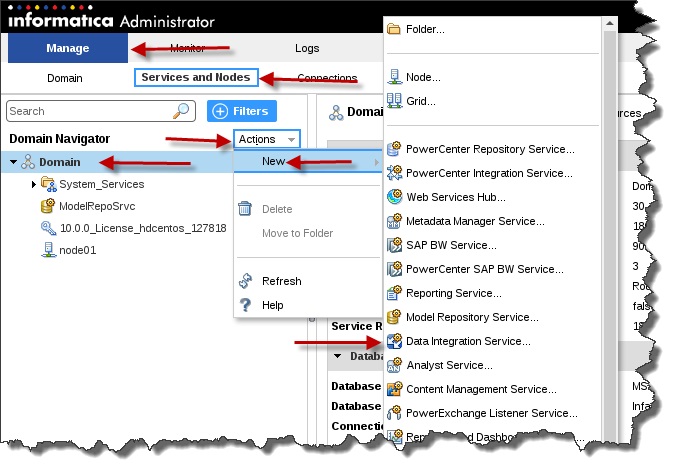
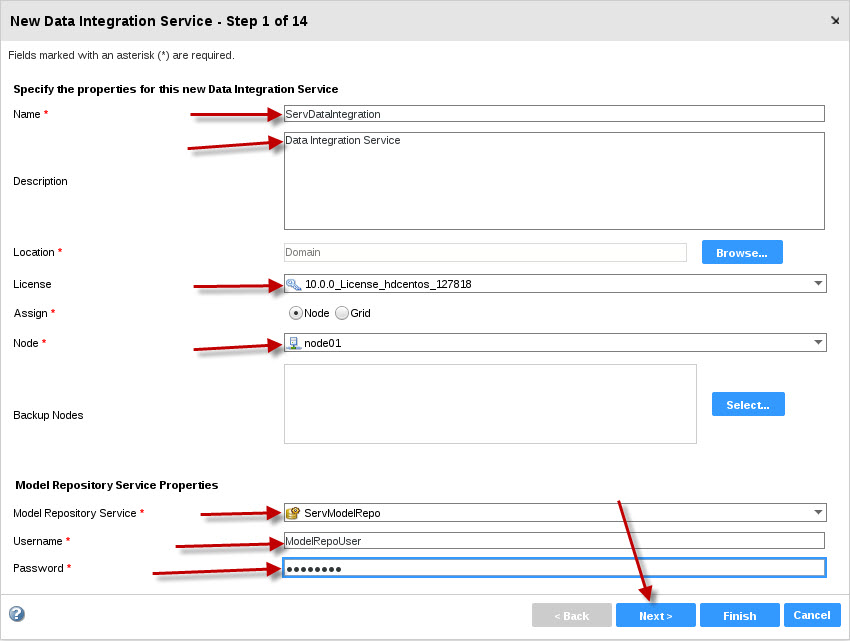
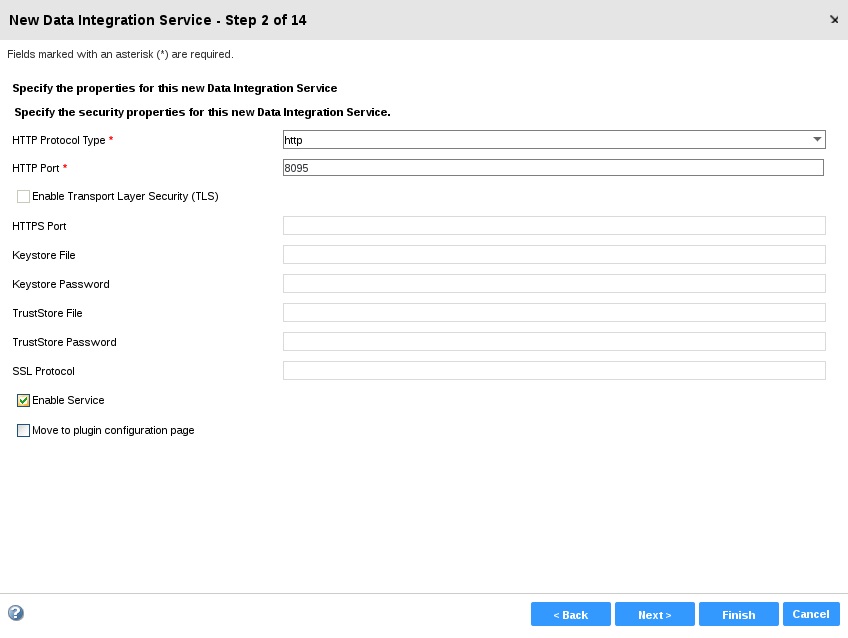
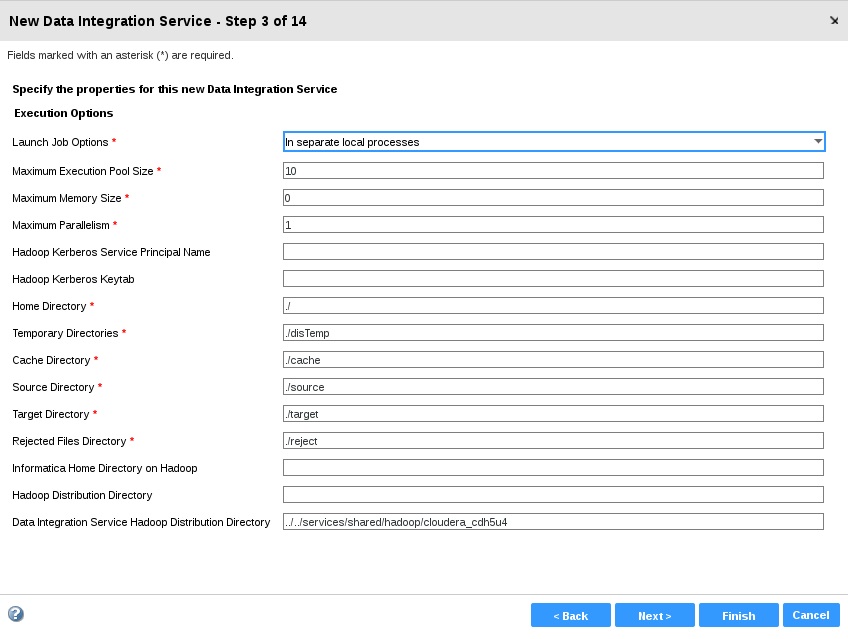
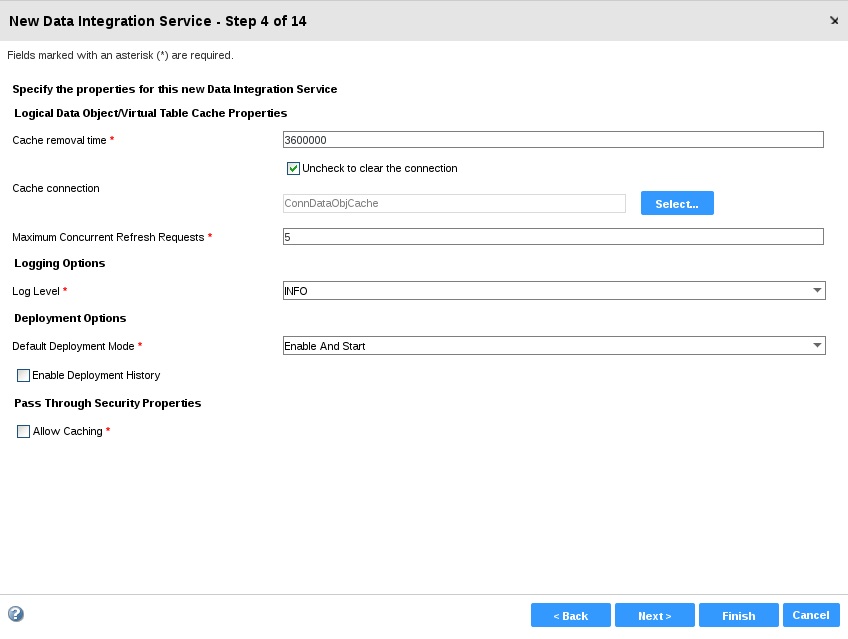
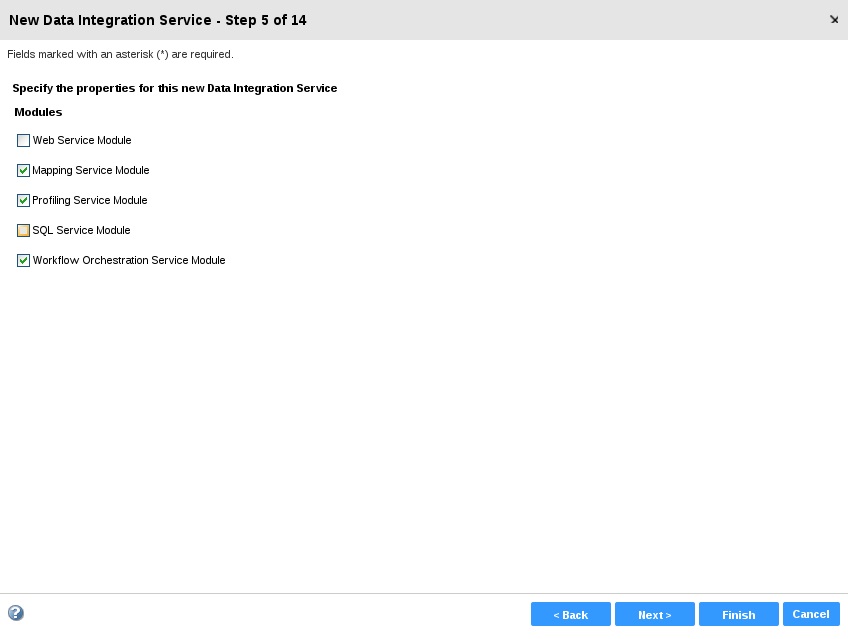
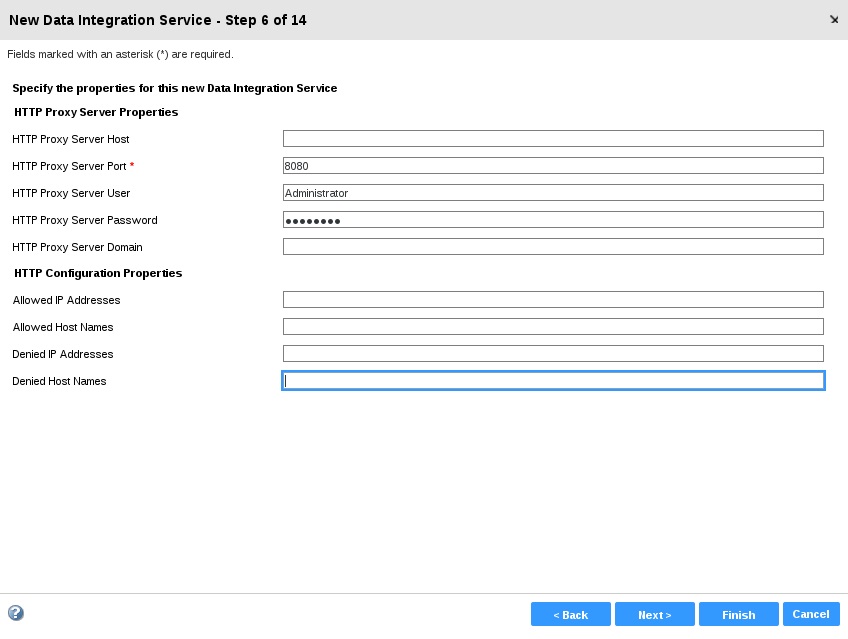
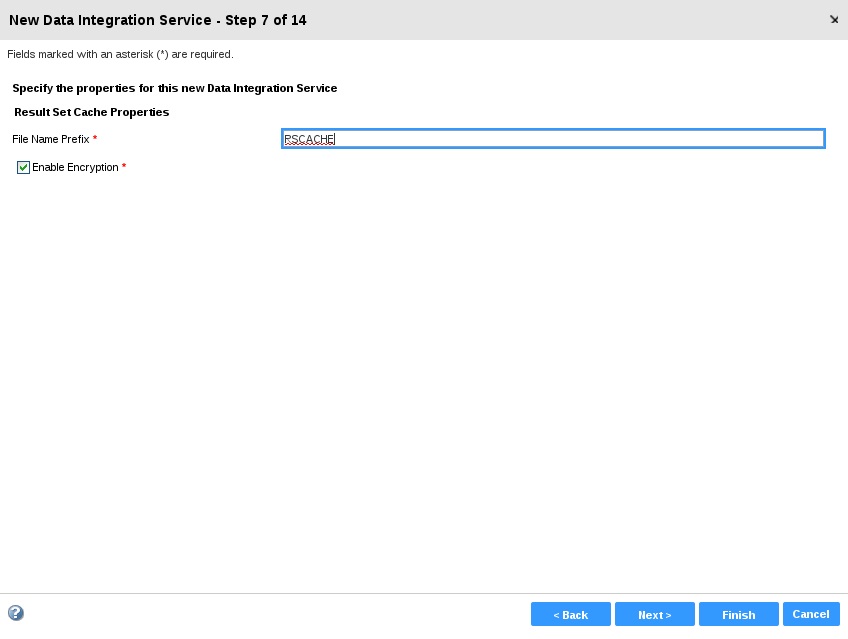
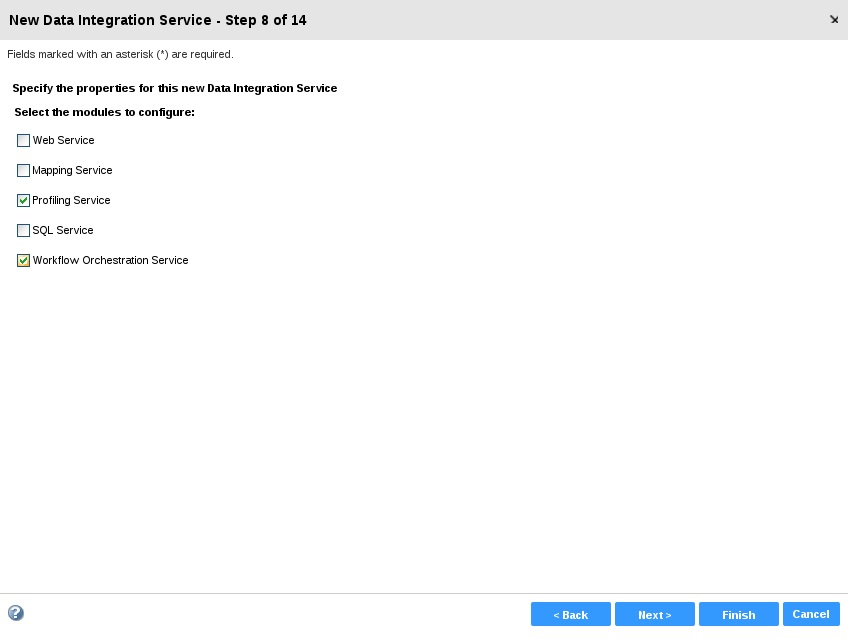
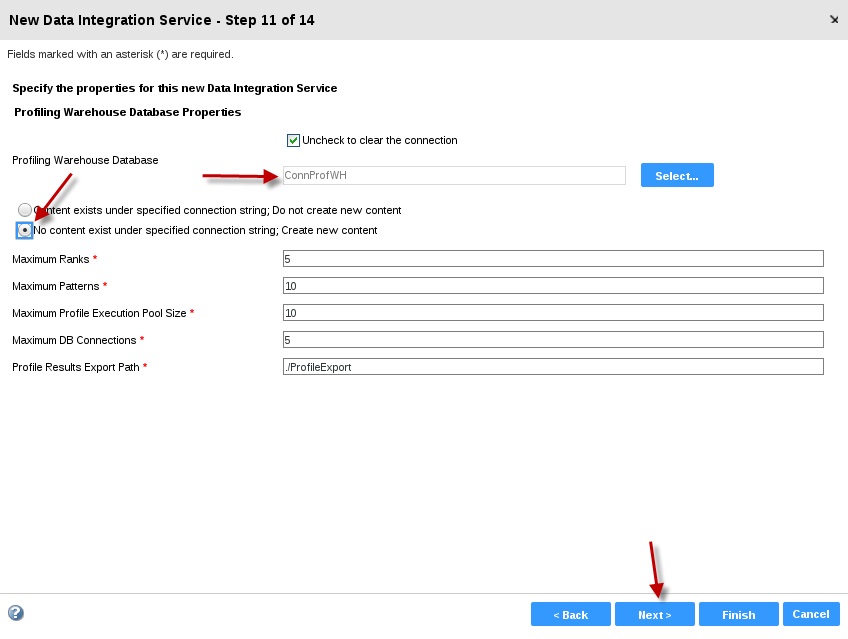
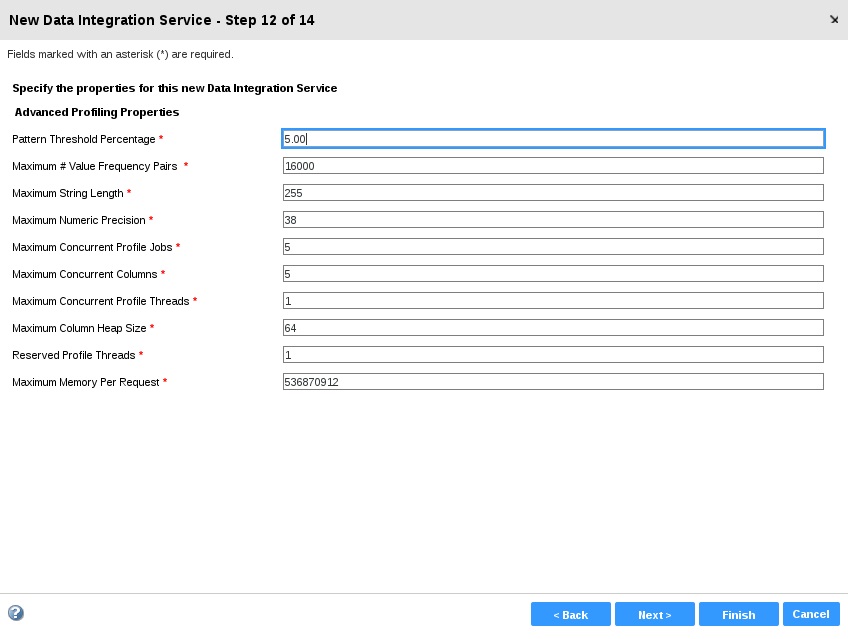
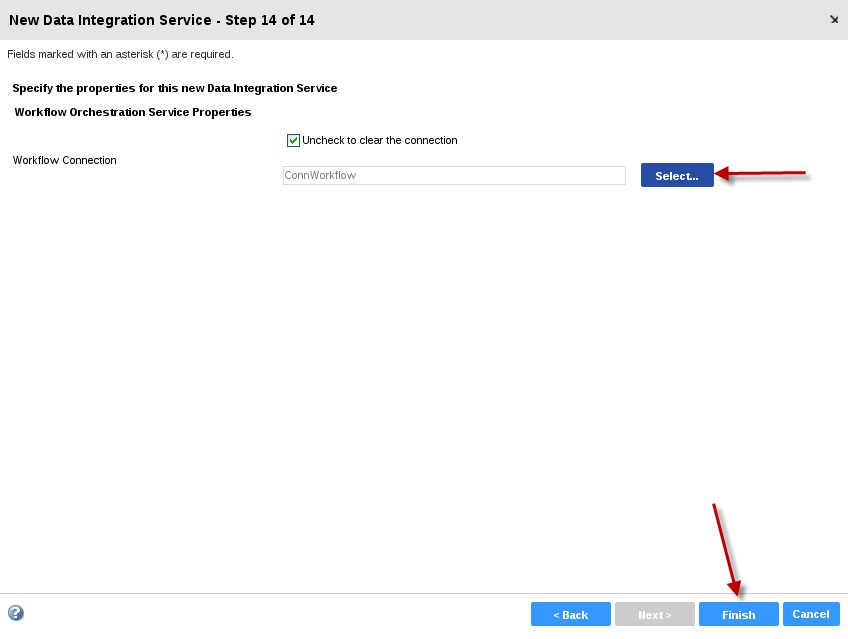
Click Finish. The domain creates and enables the Data Integration Service. After you create the service through the wizard, you can edit the properties or configure other properties.
After You Create the Data Integration Service
After you create the Data Integration Service, perform the following tasks:
- Create the Workflow Service database contents
- Verify the host file configuration on UNIX
- Create other application services
Create the Workflow Service Database Contents
When the Data Integration service starts for the first time, you will see a messages that states: Workflow Service database contents do not exist.
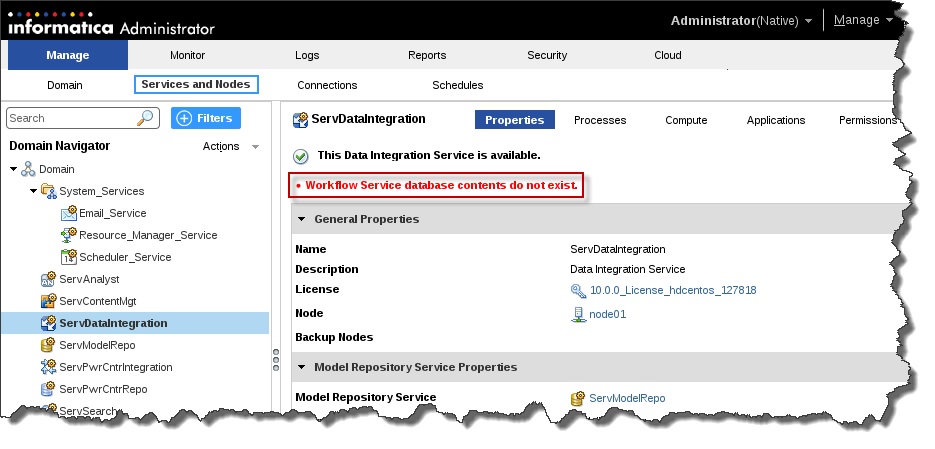
When this occurs, do the following:
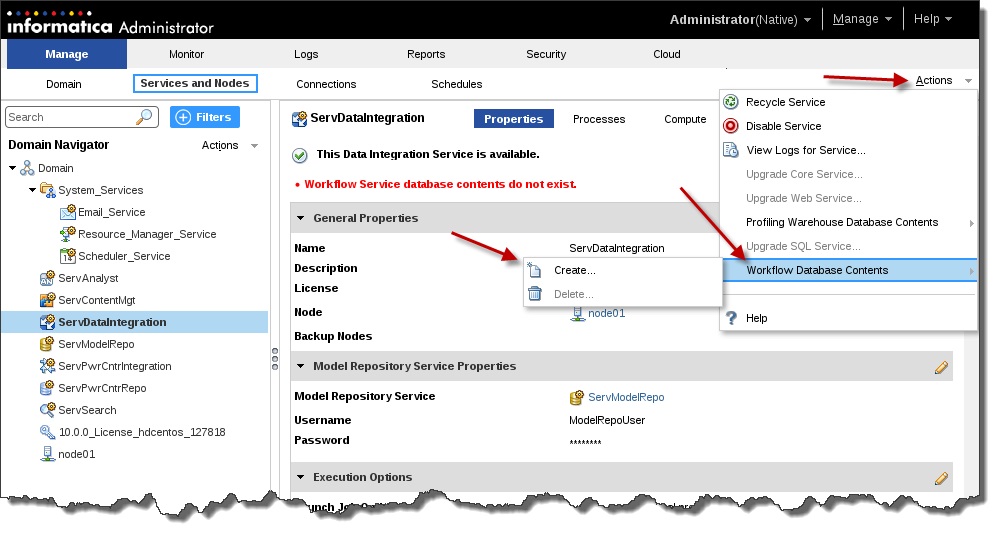
Verify the host file Configuration on UNIX
If you configured the Data Integration Service on UNIX to launch jobs as separate processes, verify that the host file on the node that runs the service contains a localhost entry. Otherwise, jobs fail when the Launch Jobs as Separate Processes property for the Data Integration Service is enabled.
Note: Windows does not require a localhost entry in the host file.
Create Other Services
After you create the Data Integration Service, create the application services that depend on the Data Integration Service.
Create the dependent services in the following order:
- Analyst Service
- Content Management Service
- Search Service
Create and Configure the Analyst Service
The Analyst Service is an application service that runs the Analyst tool in the Informatica domain. The Analyst Service manages the connections between service components and the users that have access to the Analyst tool.
When you run profiles, scorecards, or mapping specifications in the Analyst tool, the Analyst Service connects to the Data Integration Service to perform the data integration jobs. When you work on Human tasks in the Analyst tool, the Analyst Service connects to the Data Integration Service to retrieve the task metadata from the workflow database.
When you view, create, or delete a Model repository object in the Analyst tool, the Analyst Service connects to the Model Repository Service to access the metadata. When you view data lineage analysis on scorecards in the Analyst tool, the Analyst Service sends the request to the Metadata Manager Service to run data lineage.
Create the Analyst Service
Use the service creation wizard in the Administrator tool to create the service.
Before you create the Analyst Service, verify that you have created and enabled the following services:
- Model Repository Service
- Data Integration Service
In the Administrator tool, click the Manage tab. Click Actions > New > Analyst Service. The New Analyst Service dialog box appears. On the New Analyst Service - Step 1 of 6 page, enter the following properties:
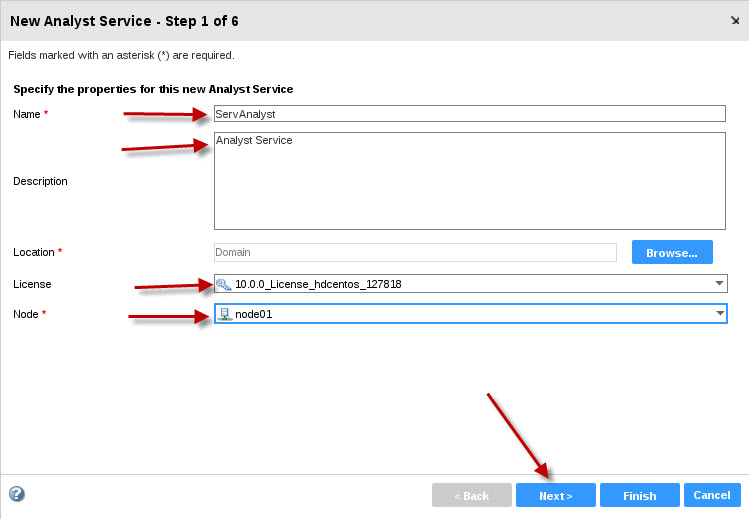
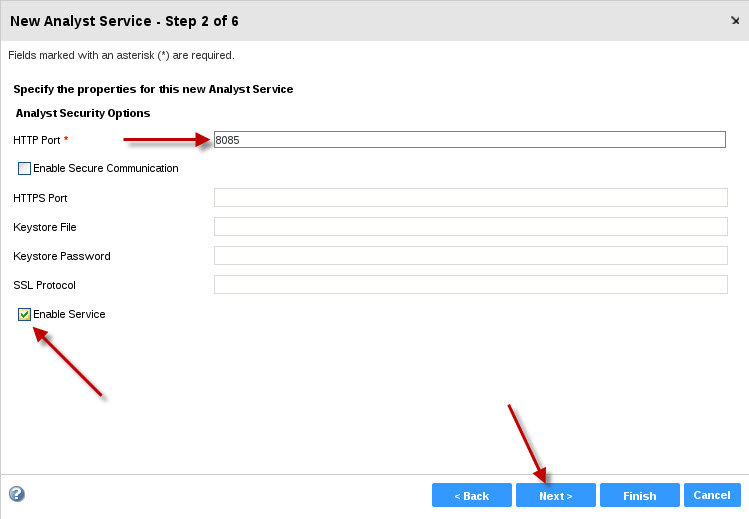
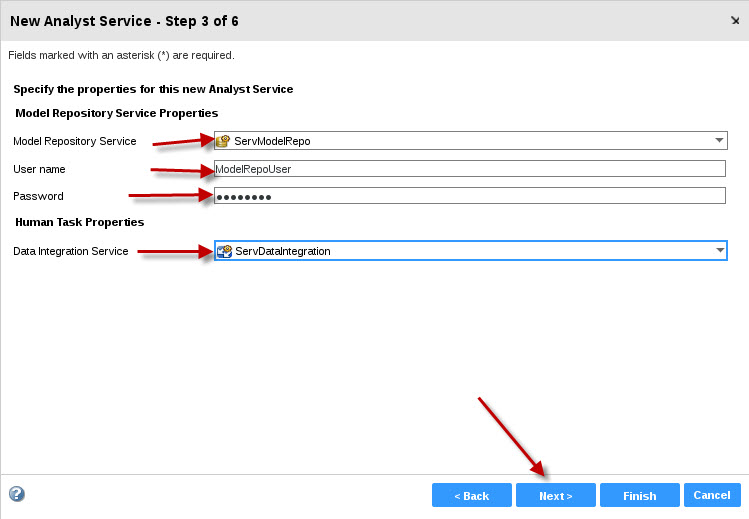
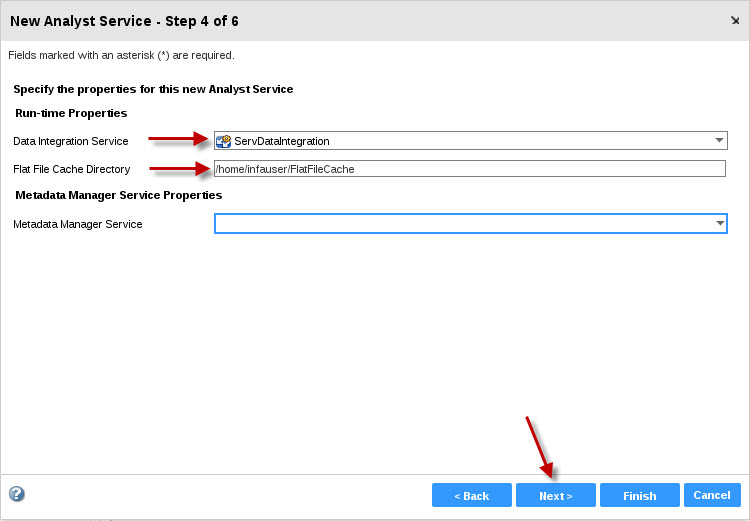
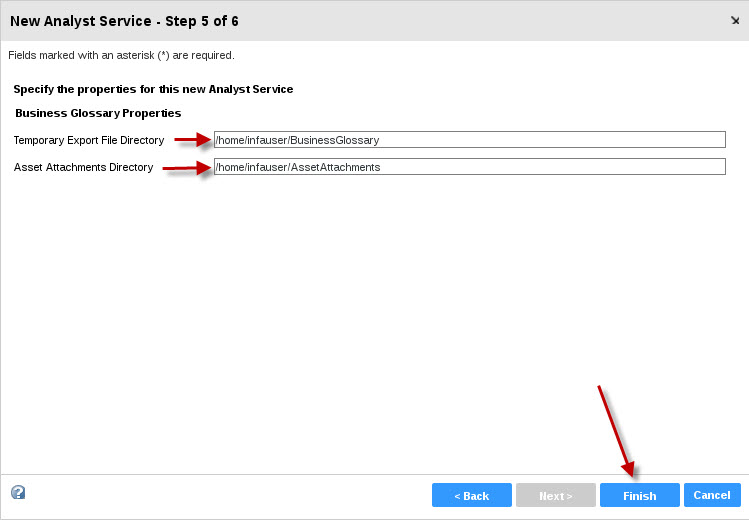
After You Create the Analyst Service
After you create the Analyst Service, create the Search Service that depends on the Analyst Service.
Create and Configure the Content Management Service
The Content Management Service is an application service that manages reference data. A reference data object contains a set of data values that you can search while performing data quality operations on source data. The Content Management Service also compiles rule specifications into mapplets. A rule specification object describes the data requirements of a business rule in logical terms.
The Content Management Service uses the Data Integration Service to run mappings to transfer data between reference tables and external data sources. The Content Management Service also provides transformations, mapping specifications, and rule specifications with the following types of reference data:
- Address reference data
- Identify populations
- Probabilistic models and classifier models
- Reference tables
Create the Content Management Service
Use the service creation wizard in the Administrator tool to create the service.
Before you create the Content Management Service, verify that you have created and enabled the following services:
- Model Repository Service
If the domain does not use Kerberos authentication, verify that you have created a Model repository user that the Content Management Service can use to access the Model Repository Service. - Data Integration Service
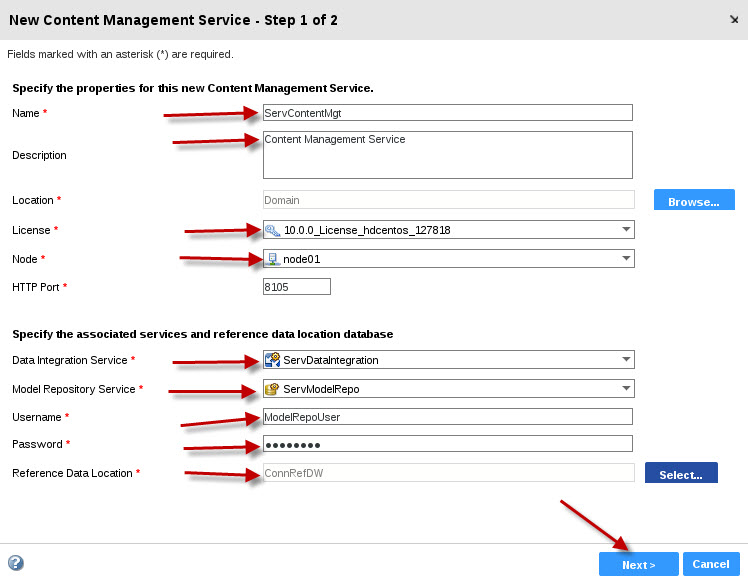
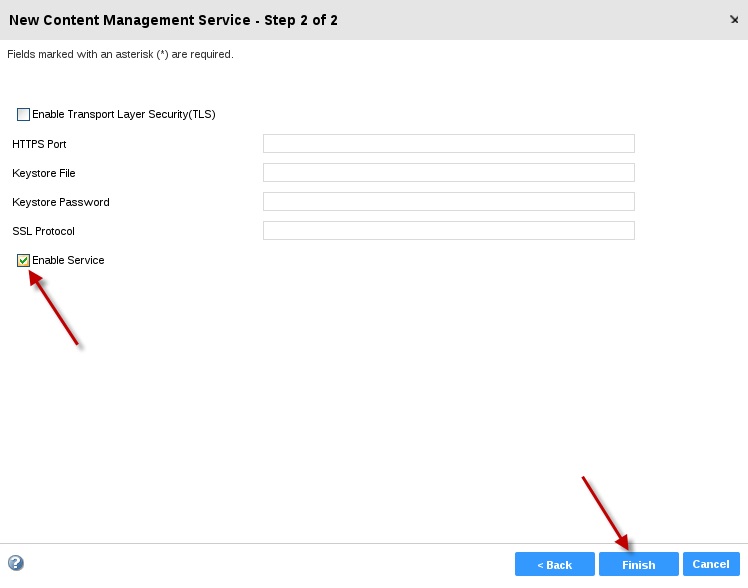
The domain creates and enables the Content Management Service.
After you create the service through the wizard, you can edit the properties or configure other properties.
After the Content Management Service is enabled, there may be a message
that says Audit Tables do not exist.
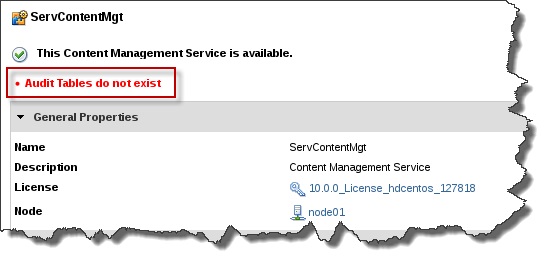
The Audit Tables must be created.
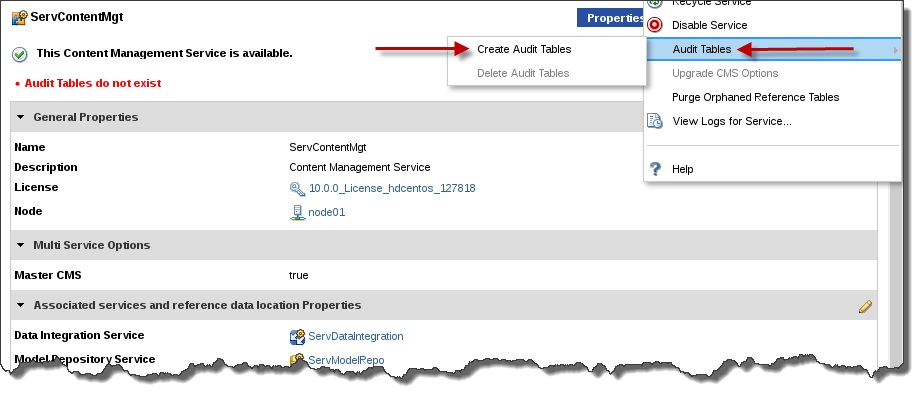
Create and Configure the Search Service
The Search Service is an application service that manages search in the Analyst tool and Business Glossary Desktop.
By default, the Search Service returns search results from a Model repository, such as data objects, mapping specifications, profiles, reference tables, rules, scorecards, and business glossary terms. The search results can also include column profile results and domain discovery results from a profiling warehouse.
Create the Search Service
Use the service creation wizard in the Administrator tool to create the service.
Before you create the Search Service, verify that you have created and enabled the following services:
- Model Repository Service
If the domain does not use Kerberos authentication, verify that you have created a Model repository user that the Search Service can use to access the Model Repository Service. - Data Integration Service
- Analyst Service
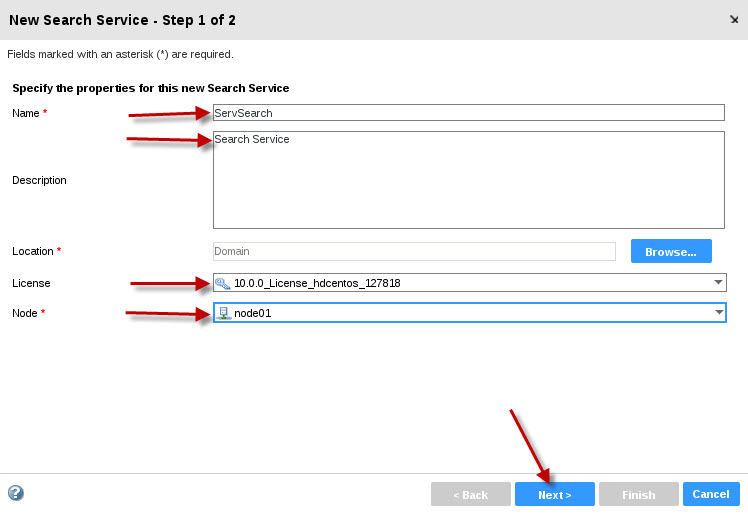
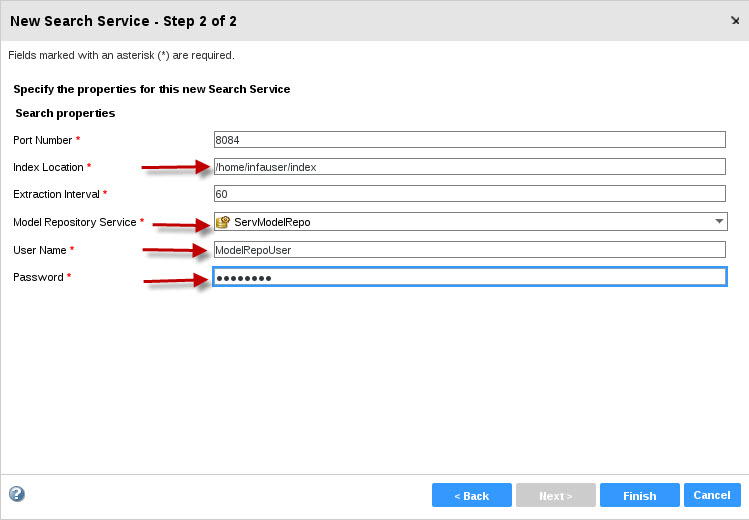
Click Finish. The domain creates the Search Service. The domain does not enable the Search Service during the creation process. You must enable the Search Service before users can perform searches in the Analyst tool and Business Glossary Desktop.
To enable the Search Service, select the service in the Navigator, and then click Actions > Enable Service.
The Model Repository Service, Data Integration Service, and Analyst Service must be running to enable the Search Service.

After checking the logs, a message appeared that said:
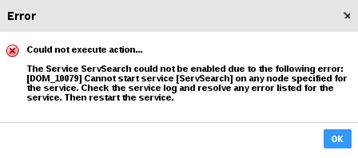
After looking deeper into the issue:

The following document was found on the Informatica website: Link. After following the instructions by granting the appropriate access, logging out, shutting down the service, starting the service and logging back in, the issue was fixed.
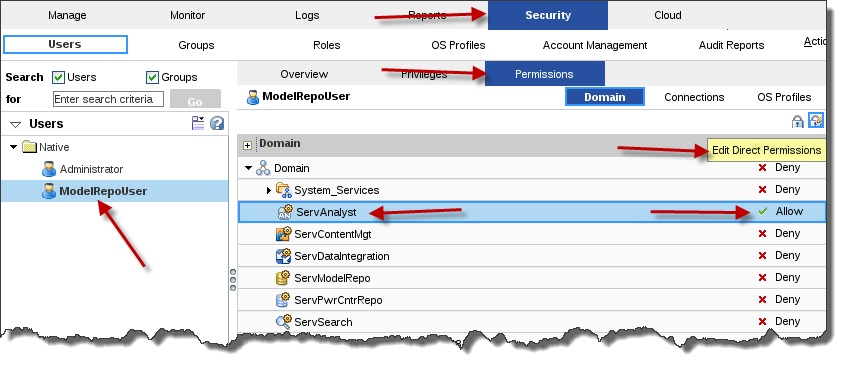
Create and Configure the PowerCenter Repository Service
The PowerCenter Repository Service is an application service that manages the PowerCenter repository. The PowerCenter repository stores metadata created by the PowerCenter Client and application services in a relational database.
When you access a PowerCenter repository object from the PowerCenter Client or the PowerCenter Integration Service, the client or service sends a request to the PowerCenter Repository Service. The PowerCenter Repository Service process fetches, inserts, and updates metadata in the PowerCenter repository database tables.
Create the PowerCenter Repository Service
Use the service creation wizard in the Administrator tool to create the service.
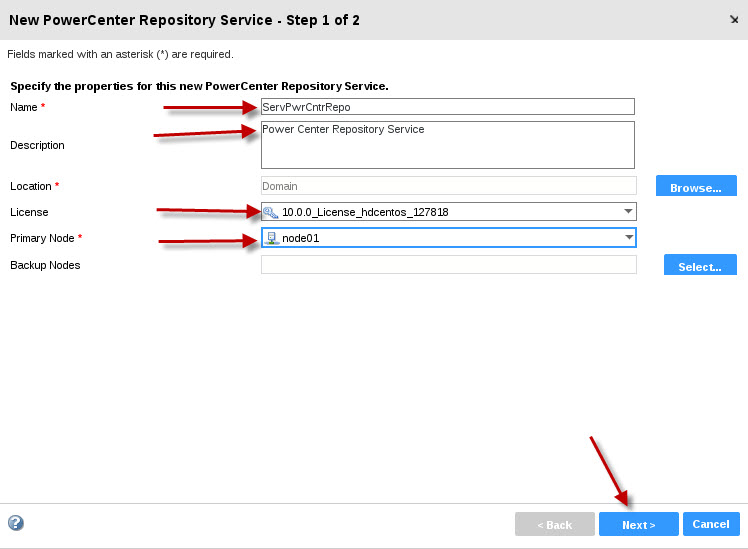
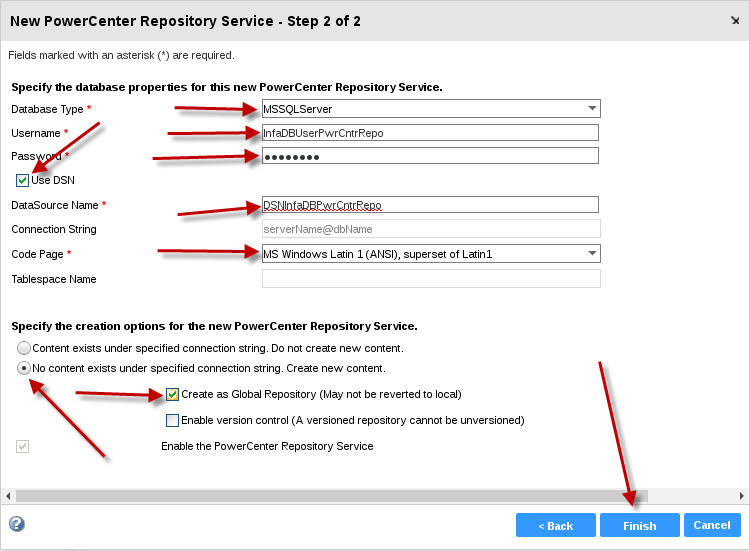
Click Finish. The domain creates the PowerCenter Repository Service, starts the service, and creates content for the PowerCenter repository.
After you create the service through the wizard, you can edit the properties or configure other properties.
After You Create the PowerCenter Repository Service
After you create the PowerCenter Repository Service, perform the following tasks:
- Configure the PowerCenter Repository Service to run in the Normal mode.
- Create the PowerCenter repository user if the domain does not use Kerberos authentication.
- Create other application services.
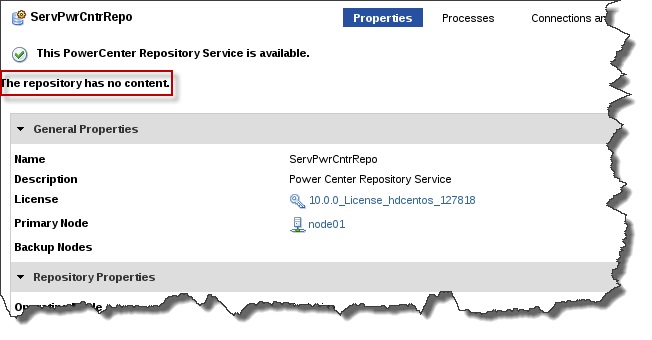
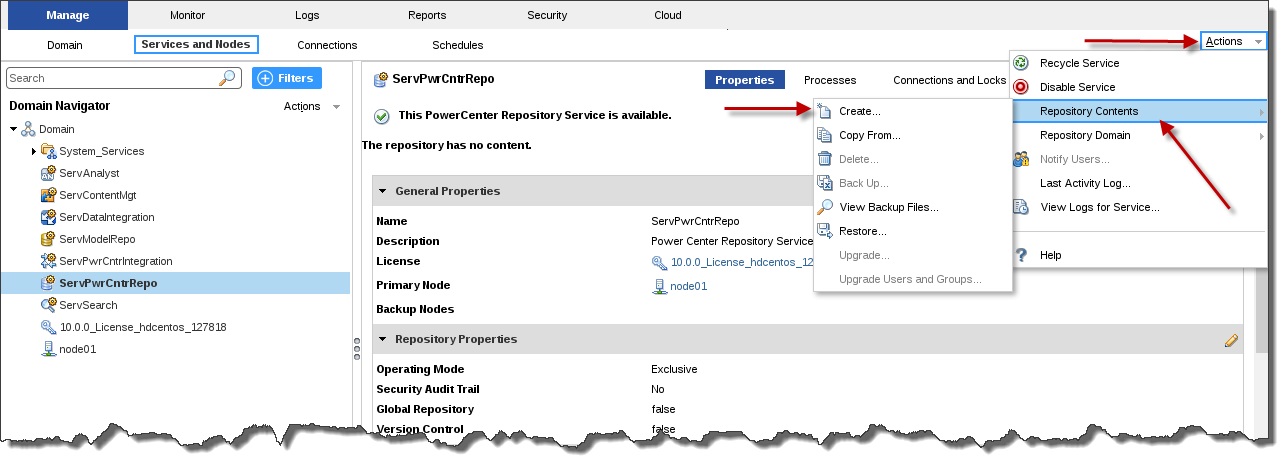

Run the PowerCenter Repository Service in Normal Mode
After you create the PowerCenter Repository Service, it starts in exclusive mode and access is restricted to the administrator. Edit the service properties to run the service in normal operating mode to provide access to other users.
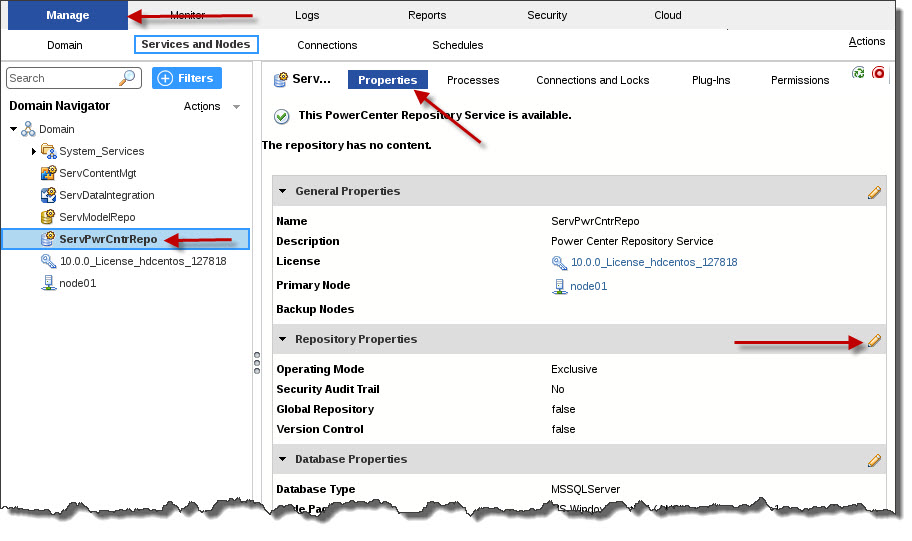
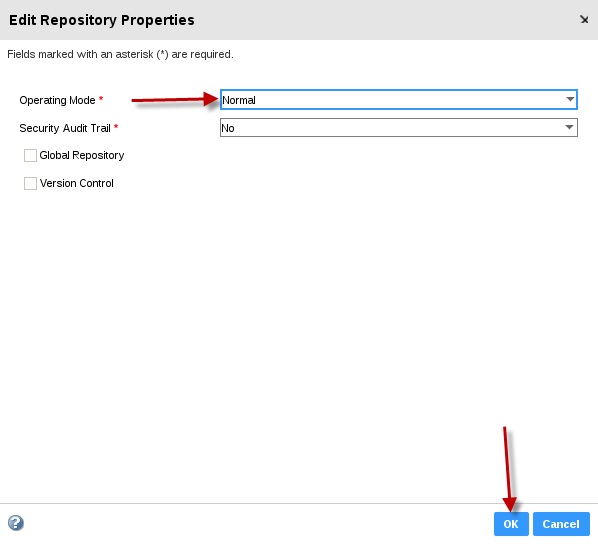
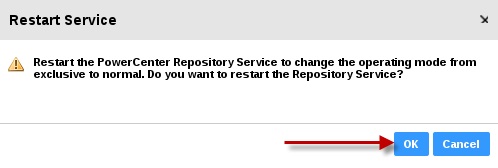
Create the PowerCenter Repository User
If the domain does not use Kerberos authentication, the domain uses a user account to authenticate other application services that make requests to the PowerCenter Repository Service. You must create a user account and assign the user the Administrator role for the PowerCenter Repository Service.
When you create an application service that depends on the PowerCenter Repository Service, you provide the name of the PowerCenter Repository Service and of this PowerCenter repository user.
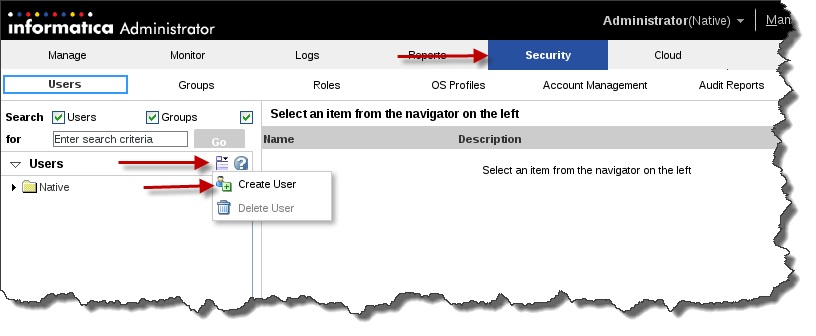
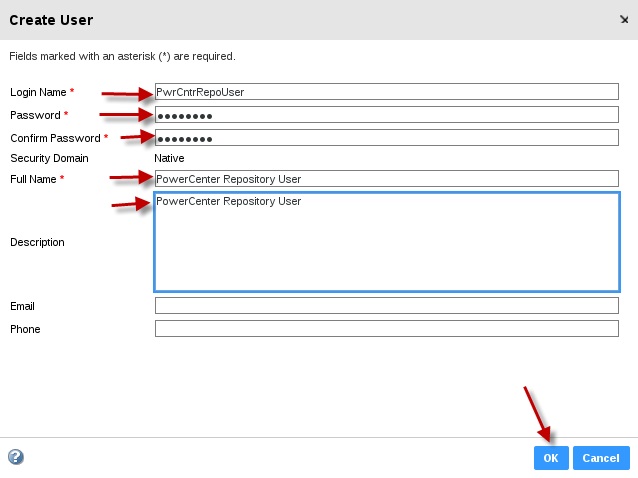
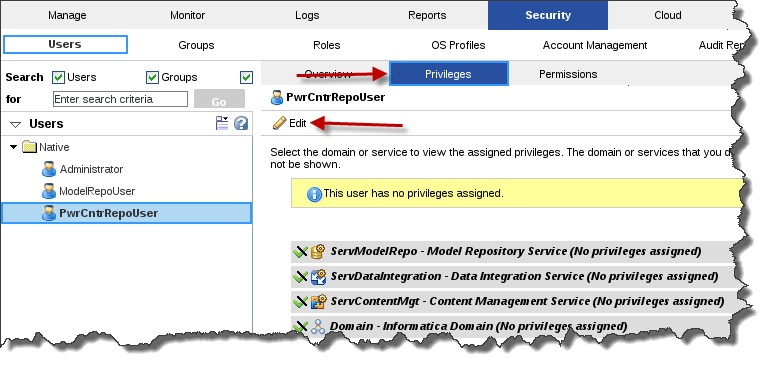
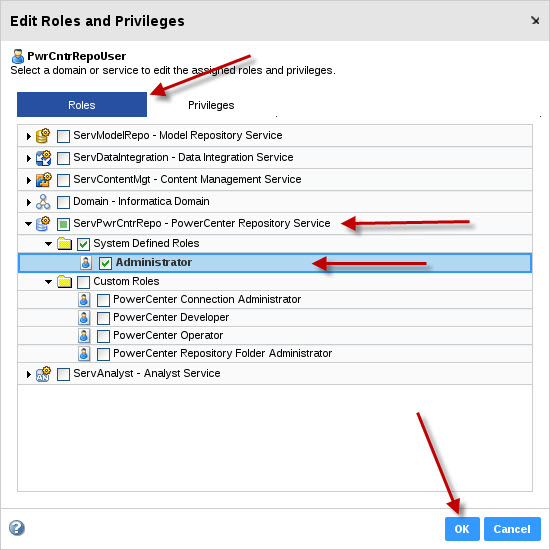
Create Other Services
After you create the PowerCenter Repository Service, create the application services that depend on the PowerCenter Repository Service.
You can create the following application services:
- PowerCenter Integration Service
- Metadata Manager Service
- Web Services Hub Service
- Reporting Service
- Reporting and Dashboards Service
Create and Configure the PowerCenter Integration Service
The PowerCenter Integration Service is an application service that runs workflows and sessions for the PowerCenter Client.
When you run a workflow in the PowerCenter Client, the client sends the requests to the PowerCenter Integration Service. The PowerCenter Integration Service connects to the PowerCenter Repository Service to fetch metadata from the PowerCenter repository, and then runs and monitors the sessions and workflows.
Create the PowerCenter Integration Service
Use the service creation wizard in the Administrator tool to create the service.
Before you create the PowerCenter Integration Service, verify that you created and enabled the PowerCenter Repository Service. If the domain does not use Kerberos authentication, verify that you created a PowerCenter repository user that the PowerCenter Integration Service can use to access the PowerCenter Repository Service.
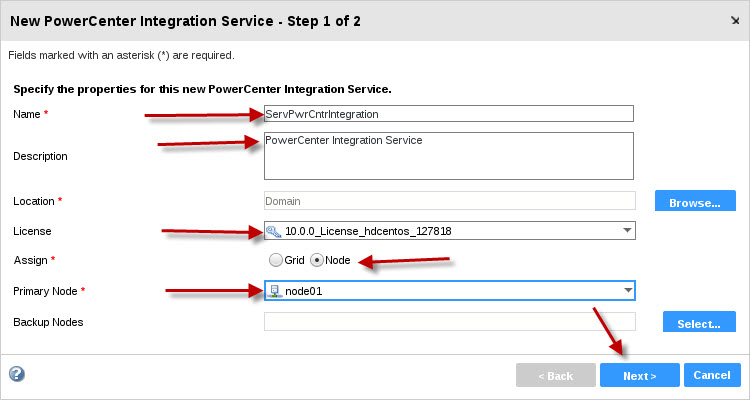
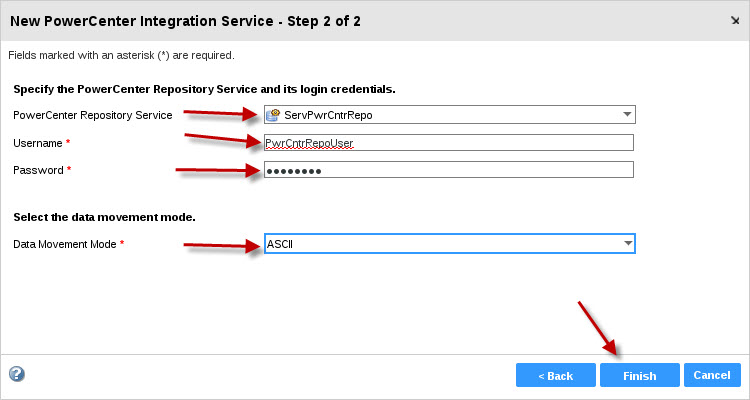
Select the data movement mode that determines how the PowerCenter Integration Service handles character data. Choose ASCII or Unicode. The default is ASCII.
In ASCII mode, the PowerCenter Integration Service recognizes 7-bit ASCII and EBCDIC characters and stores each character in a single byte. In Unicode mode, the PowerCenter Integration Service recognizes multibyte character sets as defined by the supported code pages. Use Unicode mode when the sources or targets use 8-bit or multibyte character sets and contain character data.
Click Finish.
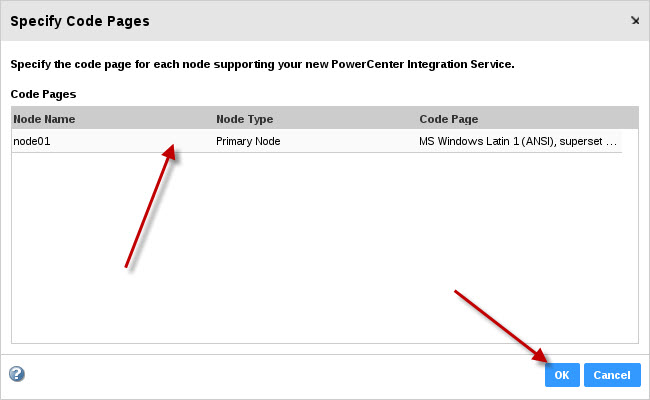
On the Specify Code Pages dialog box, assign a code page for the PowerCenter Integration Service.
The code page for the PowerCenter Integration Service must be compatible with the code page of the associated repository. Click OK.
The domain creates the PowerCenter Integration Service. The domain does not enable the PowerCenter Integration Service during the service creation process.
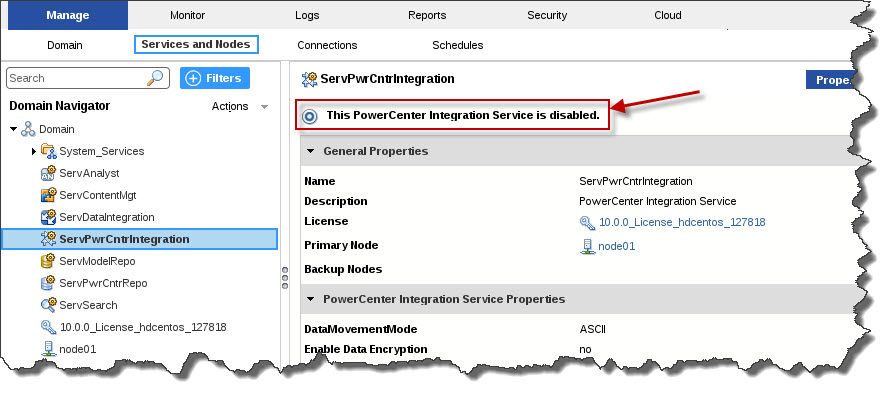
To enable the PowerCenter Integration Service, select the service in the Navigator, and click Actions > Enable Service. The PowerCenter Repository Service must be running to enable the PowerCenter Integration Service.

After you create the service through the wizard, you can edit the properties or configure other properties.
Create and Configure the Metadata Manager Service
The Metadata Manager Service is an application service that runs the Metadata Manager web client in the Informatica domain. The Metadata Manager Service manages the connections between service components and the users that have access to Metadata Manager.
When you load metadata into the Metadata Manager warehouse, the Metadata Manager Service connects to the PowerCenter Integration Service. The PowerCenter Integration Service runs workflows in the PowerCenter repository to read from metadata sources and load metadata into the Metadata Manager warehouse. When you use Metadata Manager to browse and analyze metadata, the Metadata Manager Service accesses the metadata from the Metadata Manager repository.
Create the Metadata Manager Service
Use the service creation wizard in the Administrator tool to create the service.
Before you create the Metadata Manager Service, verify that you created and enabled the following services:
- PowerCenter Repository Service
If the domain does not use Kerberos authentication, verify that you created a PowerCenter repository user that the Metadata Manager Service can use to access the PowerCenter Repository Service. - PowerCenter Integration Service
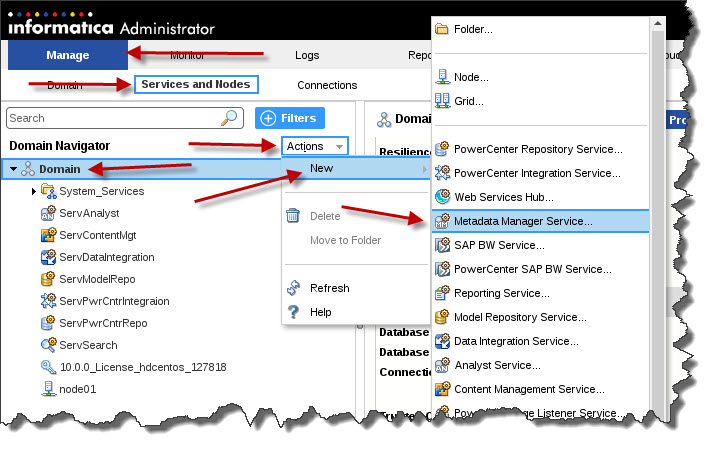
On the New Metadata Manager Service - Step 1 of 3 page, enter the following properties:
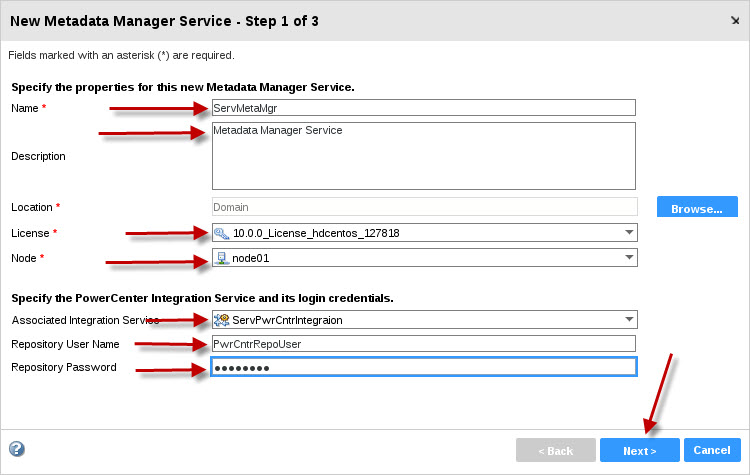
Click Next.
The New Metadata Manager Service - Step 2 of 3 page appears.

Click Next.
The New Metadata Manager Service - Step 3 of 3 page appears.
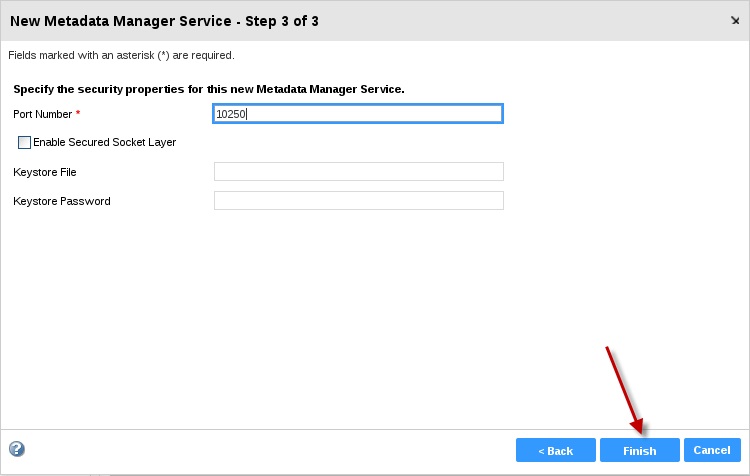
Click Finish.
The domain creates the Metadata Manager Service. Next, create the repository contents.
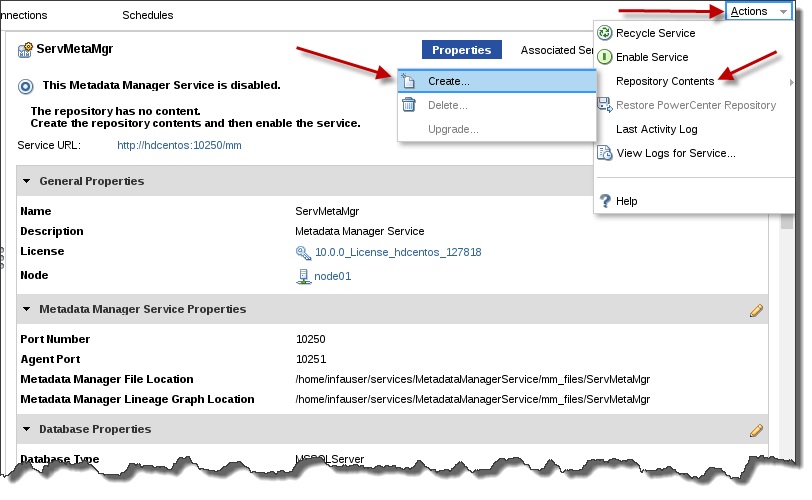
To enable the Metadata Manager Service, select the service in the Navigator and click Actions > Enable Service. The PowerCenter Repository Service and PowerCenter Integration Service must be running to enable the Metadata Manager Service.
After you create the service through the wizard, you can edit the properties or configure other properties.
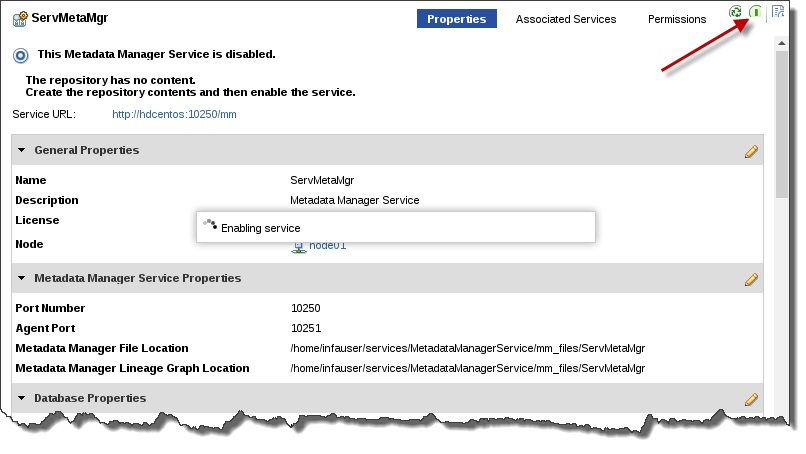
Create and Configure the Web Services Hub Service
The Web Services Hub Service is an application service in the Informatica domain that exposes PowerCenter functionality to external clients through web services.
The Web Services Hub Service receives requests from web service clients and passes them to the PowerCenter Integration Service or PowerCenter Repository Service based on the type of request. The PowerCenter Integration Service or PowerCenter Repository Service processes the requests and sends a response to the Web Services Hub. The Web Services Hub sends the response back to the web service client.
Create the Web Services Hub Service
Use the service creation wizard in the Administrator tool to create the service.
Before you create the Web Services Hub Service, verify that you created and enabled the PowerCenter Repository Service.
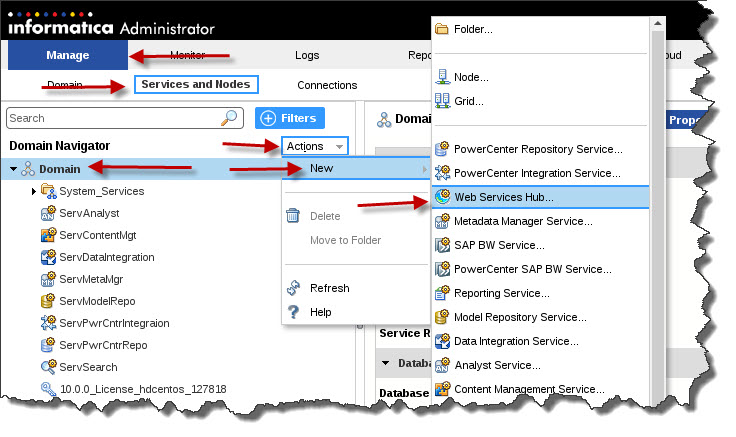
The New Web Services Hub Service dialog box appears.
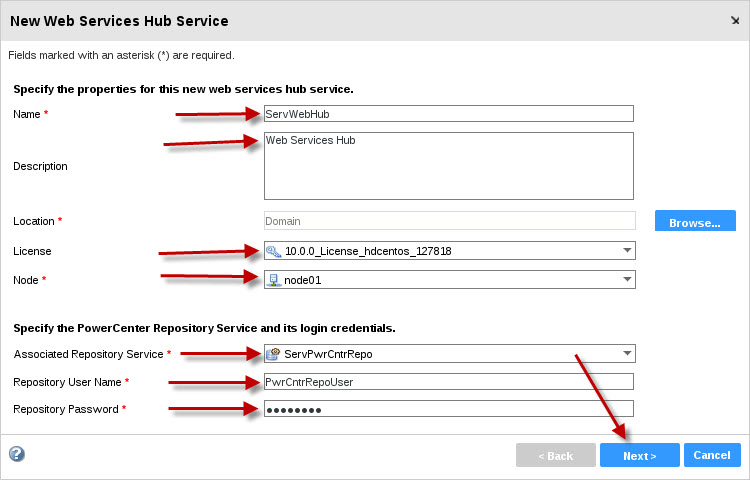
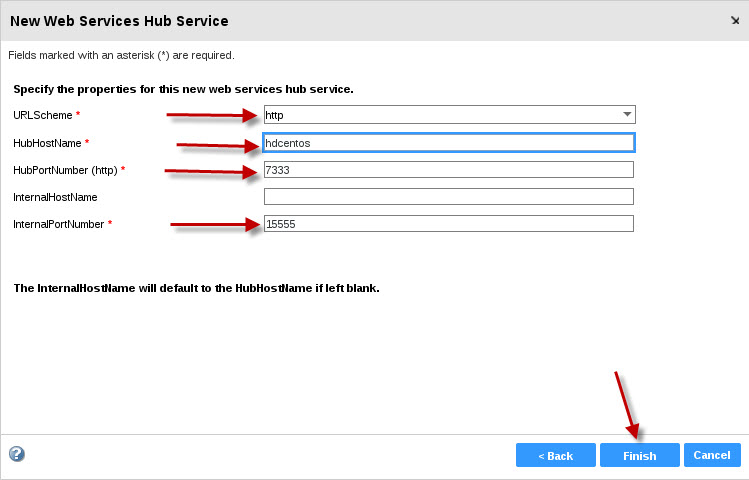
Click Finish.
The domain creates the Web Services Hub Service. The domain does not enable the Web Services Hub Service during the service creation process.
To enable the Web Services Hub Service, select the service in the Navigator, and then click Actions > Enable Service.
After you create the service through the wizard, you can edit the properties or configure other properties.
Create and Configure the Reporting Service
ServiceThe Reporting Service is an application service that runs the Data Analyzer application in the Informatica domain. The Reporting Service manages the connections between service components and the users that have access to Data Analyzer.
The Reporting Service stores metadata for schemas, metrics and attributes, queries, reports, user profiles, and other objects in the Data Analyzer repository. When you run reports for a data source, the Reporting Service uses the metadata in the Data Analyzer repository to retrieve the data for the report and to present the report.
Create the Reporting Service
Use the service creation wizard in the Administrator tool to create the service.
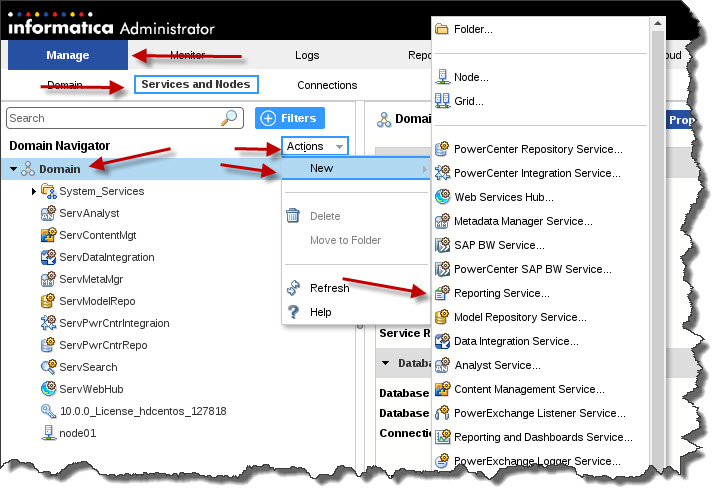
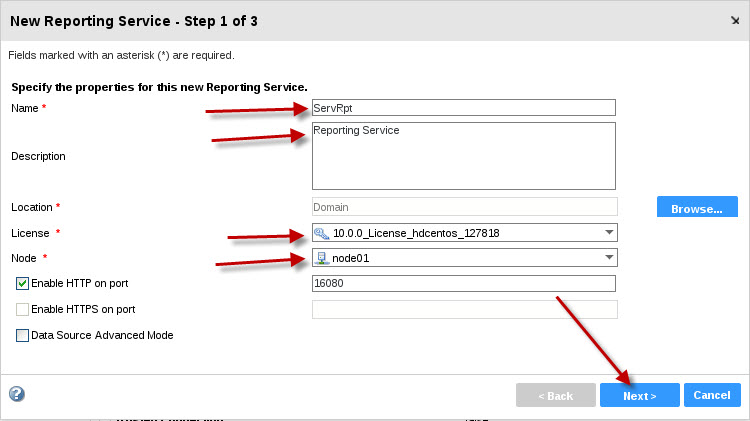
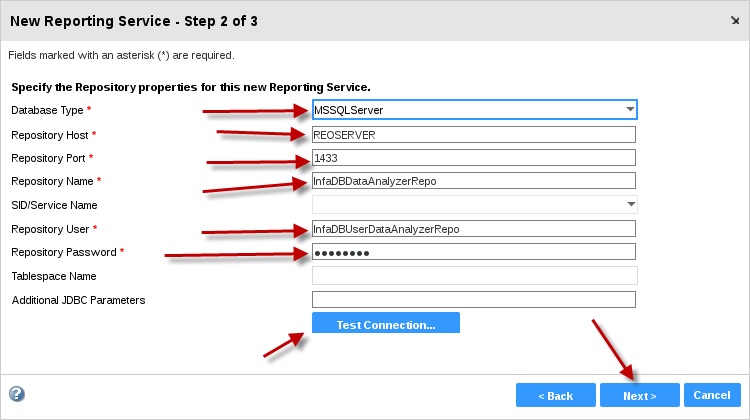
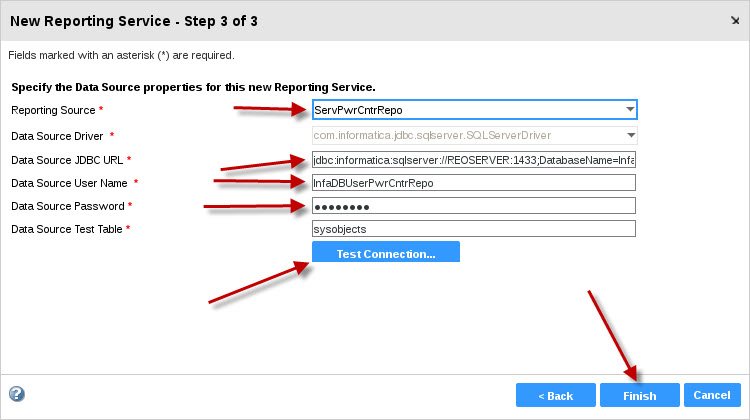
Click Finish.
The domain creates the Reporting Service. The domain does not enable the Reporting Service during the service creation process.
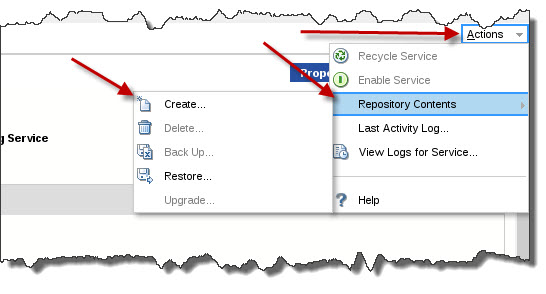


Create and Configure the Reporting and Dashboards Service
The Reporting and Dashboards Service is an application service that runs the JasperReports application in the Informatica domain.
The Reporting and Dashboards Service stores metadata for PowerCenter Repository Reports and Metadata Manager Reports in the Jaspersoft repository. You use the PowerCenter Client or Metadata Manager to run the reports. When you run the reports, the Reporting and Dashboards Service uses the metadata in the Jaspersoft repository to retrieve the data for the report and to present the report.
Create the Reporting and Dashboards Service
ServiceUse the service creation wizard in the Administrator tool to create the service.
Before you create the Reporting and Dashboards Service, verify that you performed the following tasks:
- To run PowerCenter repository reports, create and enable the PowerCenter Repository Service.
- To run Metadata Manager reports, create and enable the Metadata Manager Service.
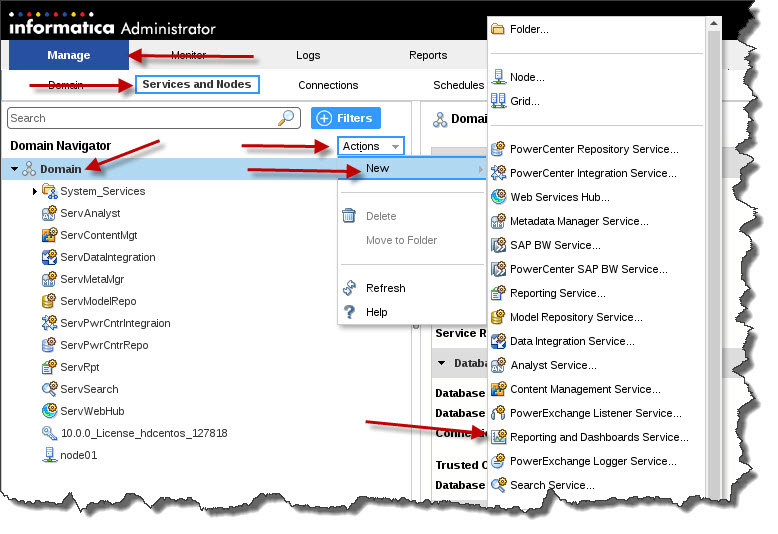
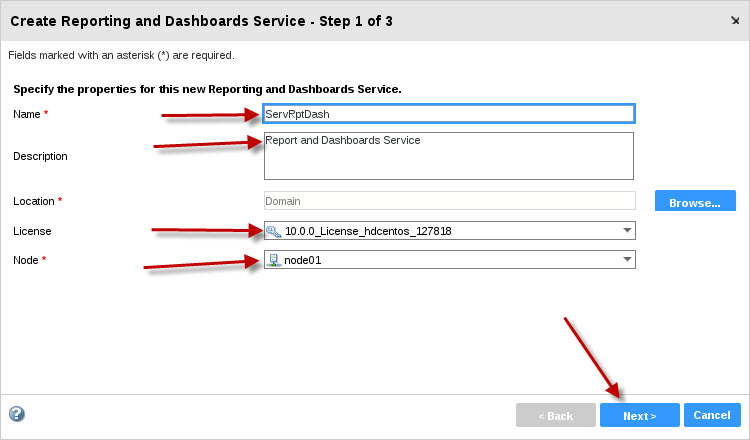
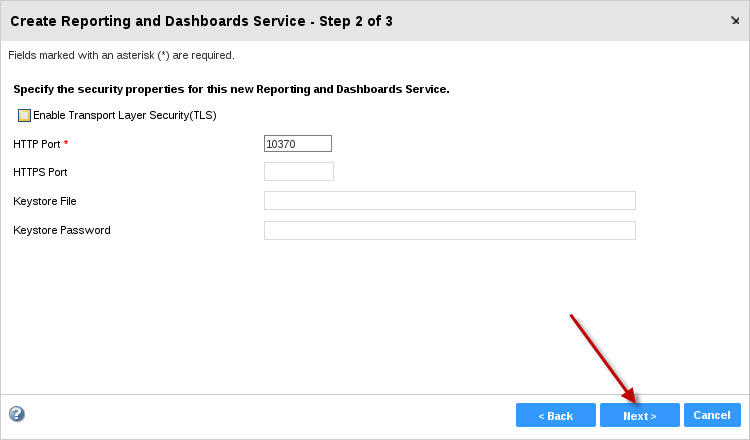
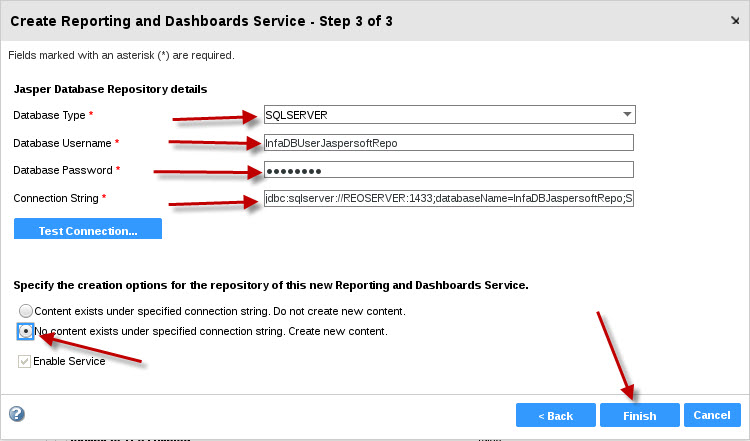
Click Finish.
The domain creates the Reporting and Dashboards Service, enables the service, and then creates content for the Jaspersoft repository in the specified database.
After you create the service through the wizard, you can edit the properties or configure other properties.
.ico)