Azure Fundamentals
 Azure Fundamentals: Network Components
Software Defined Networking
If you have previous IT networking experience, then you've probably configured routers or switches or other types of network appliances, some using a command line interface and perhaps other using a GUI tool. Software defined networking, otherwise called SDN, is common in cloud computing in that it hides the underlying technical complexities of configuring network items, and often, that means it's easy for us as cloud users to configure these types of network components using a GUI interface or even command line tools.
With software-defined networking, we've got physical network management that is done through a virtual type of graphical interface. We have either the GUI or even CLI commands, which could come in the form of the Azure CLI or Azure PowerShell cmdlets, which are accessible through the Azure portal by going into the Azure cloud shell. So whether you're using command line or GUI tools in Azure to configure network settings, in the end, it's still considered software defined networking, where it can be making changes to underline physical network equipment like routers, switches, and a variety of different types of gateways. >/p>
From within the Azure portal, we can define a virtual network. On-premises, that would be like configuring a new VLAN, perhaps in a switch or acquiring a new entire physical switch and connecting it to the network, so we can have devices deployed on that particular network, except, here in the Azure cloud, we're all doing it through a software interface, in this case, a GUI interface in the Azure portal.
The same is true if we were to start configuring a
load balancer to distribute incoming traffic to backend nodes.
There are also virtual network gateways for VPN connectivity.
So, all of these things in the end have to have some kind of underlying configuration at the network level, within an Azure data center. But those complexities are hidden from us, the cloud users, through software defined networking.
Azure Virtual Networks
Azure Virtual Networks, or VNets, are network definitions that we create within the Azure cloud. Now we would do this for the same reasons that we would define a new network physically on-premises, because we want to have a separate isolated part of the network where we deploy certain services, whether it's file servers, or DNS servers, or client stations. We would do it for the same types of reasons in the cloud.
This falls under the category of software-defined networking, or SDN, where the actual underlying technical complexities in making this happen at the data center level are hidden from us. Instead, we have easy-to-use command line tools or graphical interfaces such as through the Azure portal, through which we can configure these things.
The management is varied, the portal, CLI or PowerShell.
When you deploy an Azure virtual network, there are some things to consider, one of which is the location or the Azure region where you are creating it. Now that could have an impact because you want to try to place that closest to where the use of resources that you will deploy into that VNet will be accessed from. So, for instance, if you know that you're going to have some virtual machines accessed by client devices in the American western seaboard area, then you should probably create the VNet that will host those resources in the West US region. We then have to plan out our IPv4 CIDR notation. We've got to think about the IP address range or ranges that we want to use within our virtual network.
Now bear in mind, a virtual network contains subnets and each subnet takes an IP address range that is derived from the parent IP address range assigned to the virtual network. So there's a hierarchy where subnets fall under virtual networks. We also have to think about whether we're going to be deploying firewall and/or DDoS protection in that VNet or any of its subnets. Firewall protection controls traffic flow either in or out of VNet subnets but distributed denial of service attacks can be subscribed to as an Azure service.
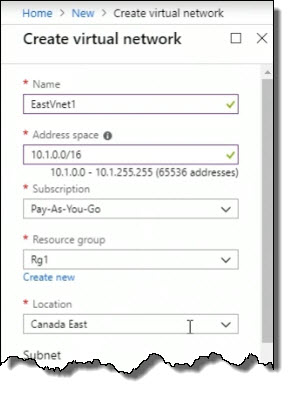
When creating a virtual network, a unique name for the VNet must be provided.
For the Address space, a range is specified (i.e. 10.1.0.0/16). The address space is defined using Classless Inter-Domain Routing, or CIDR, notation. This is something that needs to be planned ahead of time as it would be if we were creating a brand new network on-premises. We can also see that in the portal, we are also creating a new subnet while we are creating the VNet and that the subnet IP address falls within the parent VNet range.
The Subscription is typically Pay-As-You-Go and the Resource group is a value you specify. Location is a value you specify from a drop-down box (i.e. East US).
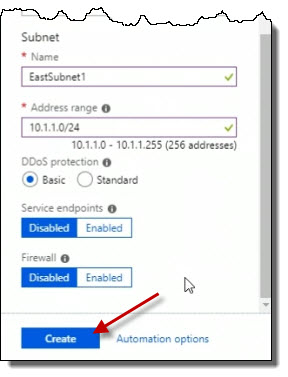
Below the VNet, a Subnet can be specified. Again, a unique name must be specified. It also has input boxes for Address range (i.e. 10.1.1.0/24). There are two options with radio buttons for DDoS protection: Basic and Standard. There are two options for Service Endpoints: Enabled and Disabled. There are two options for Firewall: Enabled and Disabled.
We can use Azure virtual networks to isolate deployed Azure resources. You could say that a VNet, in a loose way, is kind of like a security boundary when it comes to network transmissions. We can also link VNets to other VNets in Azure; this is called peering. It can also even be in a different Azure subscription.
VNets can link to an on-premises network so you can essentially extend your on-premises network into the Azure cloud.
VNet DNS can be customized. By default, it uses Azure supplied DNS for name resolution. But depending on the services and workloads that you're deploying in the VNet, you might need your own custom DNS name resolution. And so you could opt to configure addresses for your own custom DNS servers instead of using Azure provided DNS.
And for resources that we deploy within Azure, we can determine whether we want them to stick with private IP addresses, that are not directly reachable, for example, from the Internet versus those that should have public IP addresses. So you might have a public IP address assigned to a host in a subnet, so you can get into it from across the Internet. And from there, you might further be able to get access to other internal hosts using their internal IP addresses. So that's really a definition of a jumpbox that IT administrators would use.
Azure Virtual Subnets
Azure virtual subnets are created within an Azure VNet. You can have more than one subnet within the VNet.
Each subnet is assigned a network security groupM, or NSG, which is used to control in and outbound network traffic. And also, each subnet is assigned a routing table to control network traffic flow. You might want to modify this, for instance, if you have a firewall appoints, deployed as a virtual machine, that you want all traffic to go through first to be inspected, either on its way in or on its way out of your Azure VNet.
The subnet IP address range must fall within the parent VNet range. So it's important to have planned the IP addressing that will be used ahead of time.
You can also go back into a subnet and change IP address ranges at any time. So for example, if you decide you wanted to find a new subnet or a new range within a subnet, you can go ahead and do that, using either the Azure portal or command line tools.
Azure Virtual Network GUI Management
Let's deploy a new Azure virtual network. When I create a new virtual network, or VNet, in the Azure cloud, I need to have some upfront planning, much like you would do if you were about to set up a new network on-premises. If you don't have that experience from the past, what we're really talking about doing is first of all determining, do we need another network in the first place?
Normally, you might need a new network if you're going to, for example, deploy a test web application you want to keep it isolated network-wise from other resources in production. And so, you might configure a switch with a new VLAN, a virtual local area network, so you'd also have to think about things like IP address ranges.
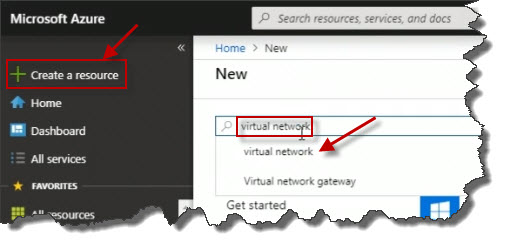
In Azure, I'm going to begin the process of creating my new virtual network by clicking Create a resource. I could search for what I want to create. When I type in virtual network in the search box, and I can see virtual network shows up.
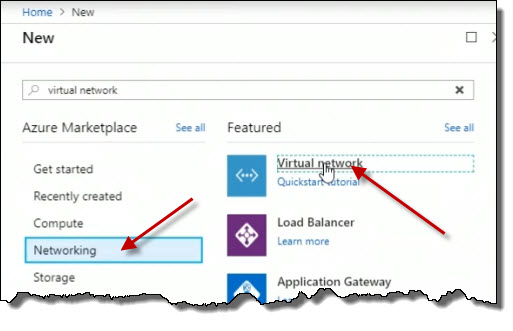
I could also browse through the presented categories in the GUI. If I click Networking from the menu on the left, I can see Virtual network over on the right. I'm gonna click on it.
We need to have a standard naming convention we adhere to when it comes to the naming of Azure resources. So in this case, I'm going to call this EastVnet1.
We mentioned that we should have pre-planned an IP address space that we want to use. So, for example, here I'm going to specify 10.1.0.0/16. So this is CIDR notation where we use the slash and the number of bits in the subnet mask. Here, I'm specifying /16, so that tells us then that the first two octets, or the first two bytes, 10.1, identify the network for this VNet. We can split that up further when we start creating subnets within this VNet.
So I'm going to tie this to my subscription.
I can either create a new resource group or choose an existing one. I'm going to choose an existing one from the list that I've previously created.
The location I'm going to leave as Canada East, that's my region.
Down below, it wants to call the Subnet default. I don't want it called that, so I'm gonna call this EastSubnet1.
The next thing I want to do is specify the address range for this subnet. What I'm going to do is use 10.1.1.0, which means this is a network address, not an address for a specific host, and then /24. I'm using a 24-bit subnet mask here for this subnet within my VNet which tells me that the first three numbers here, the first three octets, are being used to identify my network. When I tab out of there, notice we get the green check mark. You'll see this everywhere in the Azure portal; it's a good thing. It's telling you that what you're doing is acceptable; it's correct, when it comes to a valid name or in this case, a valid IP address range.
For DDoS protection, I'll leave it on Basic.
I'm not going to change any of the other settings here for Service endpoints or Firewall. I'm simply going to click Create.
Now, after a moment, it will have created both the virtual network as well as the subnet. So we have the message in the upper-right about the Deployment in progress.

At any point in time, we can just click the little alarm bell icon for notifications in this session.

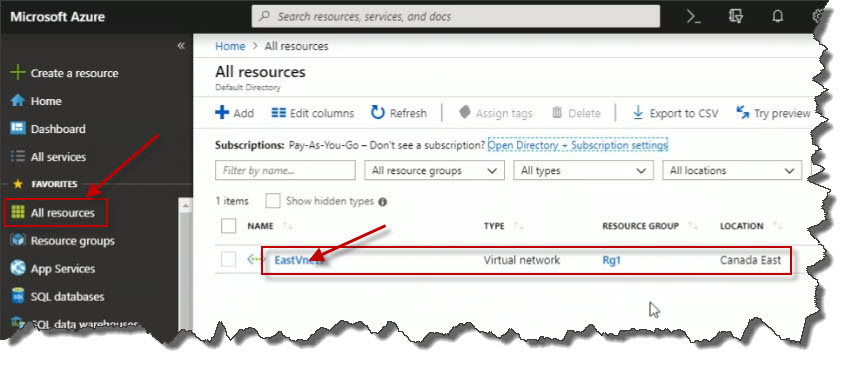
I might want to add tags to assign it to a department or a project.
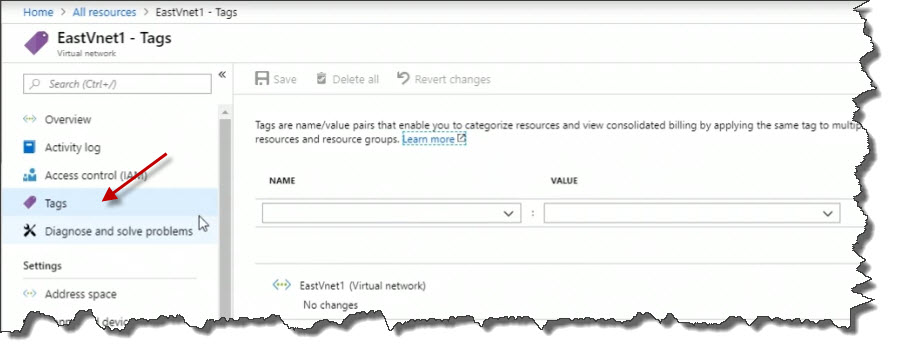
This is where I will see subnets. So the subnet itself is not a standalone Azure resource like the VNet is, and shows up as such. Instead, we get to the subnets for a VNet, because it's within that in the property sheet. And that's because it's part of the hierarchy, you can't have a subnet without a VNet. So we could also select our subnet from here to open up its details.
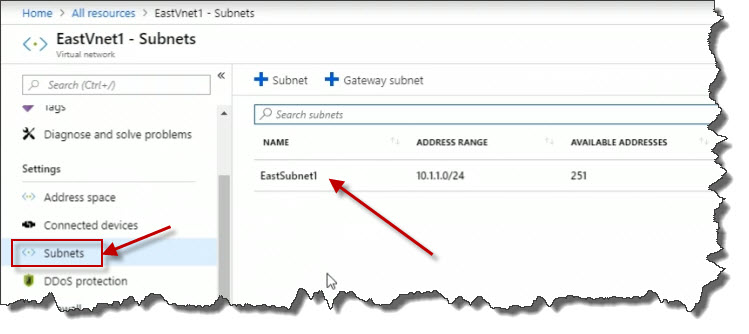
We can see the address range. We can see whether it's assigned with the network security group to control network traffic.
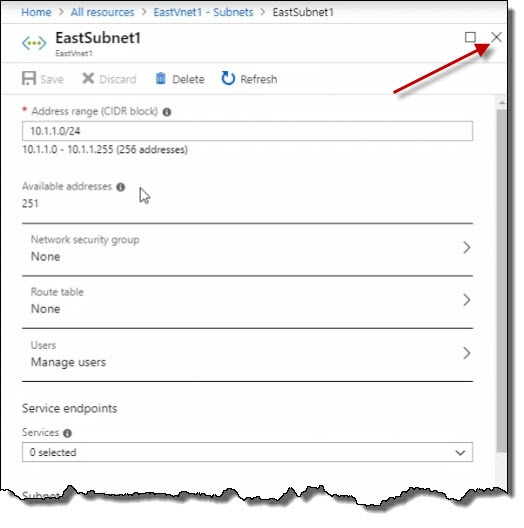
We've now got one virtual network that we've deployed in the Azure Cloud.
Azure Virtual Network PowerShell Management
You can use PowerShell cmdlets to manage Azure virtual networks.
Before doing anything within PowerShell, ensure you have already run the
Connect-AzAccount cmdlet to authenticate to my Azure account.
I'm running PowerShell here on-premises outside of the Azure portal, where
I've downloaded and installed the Azure PowerShell module. To
get started, I'm going to create a variable that I'm going to call
$vnet. In PowerShell, variables are always prefixed with the
dollar sign.
I'm going to say equals, and what I want to put in that variable is the result
of this PowerShell cmdlet, new-azvirtualnetwork. So let's go
ahead and press Enter to populate the
$vnet=new-azvirtualnetwork -resourcegroupname rg1 -location canadaeast -name EastVnet3 -addressprefix 15.1.0.0/16
But we're not finished because we need to also define a subnet. Here is the
command:
$subnet=add-azvirtualnetworksubnetconfig -name Subnet1 -addressprefix 15.1.1.0/24 -virtualnetwork $vnet
Finally, what I want to do is use our $vnet variable and simply
pipe the result of that to the set-azvirtualnetwork cmdlet, which
means we want to make a change to the virtual network. In other words, we want
to make sure our subnet that we've just defined above is actually added to that
Vnet. So I'm going to go ahead and press Enter.
$vnet | set-azvirtualnetwork
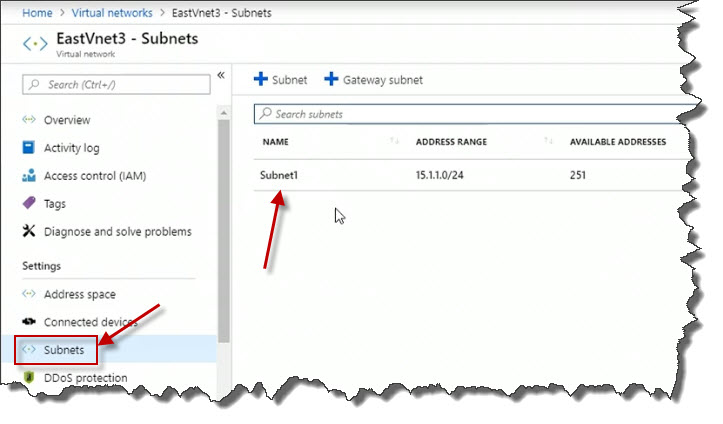
Next thing we'll do is we'll pop over into the Azure portal and take a peek at the result of our efforts. Here in the portal, on the left, I've clicked on the Virtual networks view and indeed we can see our newly created virtual network EastVNet3. And if I click on it to pull up its Properties blade, and if we click on Subnets, we'll see, there's Subnet1 with the appropriate IP address range.
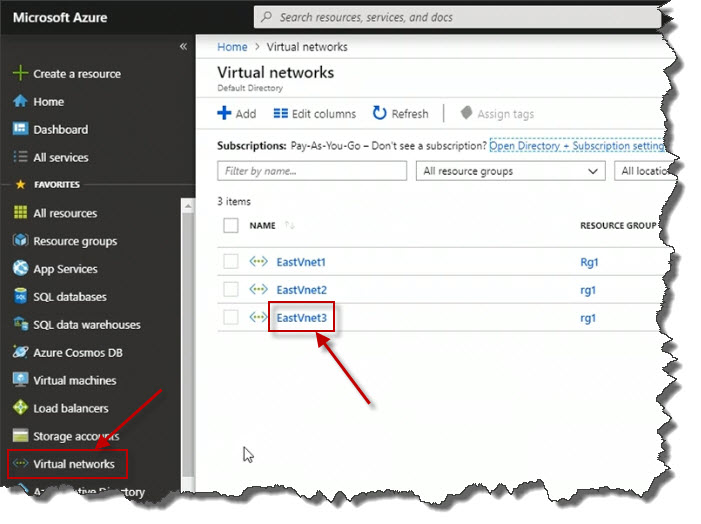
If we click on Subnets, we'll see, there's Subnet1 with the appropriate IP address range.
Azure IP Addresses
IP addressing is used in the Azure cloud to allow different devices to communicate, such as virtual machines or database server instances. And as such, it's important to have a solid understanding of how IP addressing actually works in Azure.
Azure devices, such as virtual machines, can have private addresses or public
addresses. A public IP address would be used to allow access from the
public Internet directly into a virtual machine. Now at the same time, bear
in mind that the public IP addressing is something that is configured in
Azure as an Azure resource. It's not something that we configure the way
you would normally configure TCP IP within the virtual machine operating
system. And that's an important distinction. So if it's a Windows host, and
you type ipconfig at the command line for an Azure virtual
machine, you won't see the public IP address. Instead, the public IP address
is controlled through Azure, through a resource.
We can also set static or unchanging IP addresses, as well as configuring dynamic or changing IP addressing. Static IP addressing is going to be important when you need the IP address to stay the same. The way it works in Azure is that the IP address will be allocated to the resource until the resource is deleted. So if that resource happens to be a virtual machine in Azure, then the IP address it gets will stay with it until you delete it. Even if it's shut down, it will still retain the address when you fire up that virtual machine later on. This is definitely useful when you need the IP address to remain the same. Example of this might be if you're defining your own custom DNS server for name resolution. Static IP addresses get assigned by an Azure address pool. So while you can't specifically select the IP that you want to assign, once your resource gets it, it gets it until the resource is removed from Azure.
Dynamic IP addresses are useful when you don't really care if the IP address changes. And so the IP address could change within each invocation of a service such as each time that you stop a virtual machine. When you fire it back up, you might always get a different private IP address in the case of dynamic private IPs or a dynamic public IP. So as long as you don't need to depend on that address remain the same, dynamic IP addresses would be the correct selection.
With Azure private IP addressing, you can use both IPv4 and IPv6. Both static allocation of IP addresses, where you can't choose the address you get, but once you get it, you've got it until the resource is deleted, can be used as well as dynamic allocation of IP addresses. And these addresses are allocated or set, if you're doing it manually from the VNet subnet IP range. So you have to know what that range is for the subnet in order to know what to assign if you're doing it statically. You can also use private IP addressing within a VNet to allow communication between deployed resources like virtual machines, or also you can use private IP addressing if your VNet is connected through a VPN or an ExpressRoute circuit to an on-premises network.
You can also assign public IP addresses as we have mentioned, whether they be IPv4 or IPv6. And like private IP addresses they can be assigned statically or dynamically. Now, the public IP address will allow incoming and outgoing Internet connections. Now to be clear, even if a public IP address isn't associated with a virtual machine, let's say, that virtual machine will still be able to get out to the Internet. So what we are talking about is the inability of a connection to be initiated from the Internet into a virtual machine that has only a private IP address. Public IPv6 addresses currently are useful in Azure only for public-facing load balancers. So IP addressing, whether it's public, private, static, or dynamic, needs to be planned for ahead of time. And we need to think about certain services that might require unchanging addresses that might even need to be reachable from the public Internet.
Azure VPN Gateway
Virtual Private Networks, or VPNs, have long been used by business users to allow a secured way to connect over the internet to a private network. And that's what the Azure VPN gateway is also for. It provides an encrypted tunnel between two endpoints. Those endpoints could be one VNet in Azure to another VNet in Azure, or it would be a link from an on-premises network or an on-premises individual client station to a VNet in the Azure cloud.
In order to deploy the Azure VPN gateway, you need to define a gateway subnet in your Azure virtual network. And the subnet must be named GatewaySubnet. But that's not a problem in the portal because that name is set and you cannot change it. What happens in the background is two virtual machines get deployed in the Gateway Subnet. However, they are not directly manageable, nor should you deploy anything else into that specific subnet. It should be set aside for this purpose only.
There are two types of Azure VPN gateway configurations: point-to-site and site-to-site.
With the point-to-site configuration, it supports SSTP and IPsec protocols. However, you don't need a VPN device on the client side. So it really provides a single device VPN connection. That device could be a laptop used by a traveling user that might travel and need to make a secured connection into Azure to access a line of business application.
Site-to-site VPN configurations use IPsec in Azure. This might be used, for instance, to link our on-premises network to the VNet. And in order for this to work, we need to have some kind of a VPN device on our on-premises network, unlike with a point-to-site configuration. Now that VPN device could come in the form of software through Windows Routing and Remote Access Service, Windows RRAS, or it could be an actual VPN appliance. Either way, we need a public facing IPv4 address to establish the encrypted tunnel from on-premises to our VNet in Microsoft Azure.
If you're going to be configuring a VNet to VNet connection in Azure, then you don't actually need a VPN device; it's already taken care of.
Configure an Azure Point-to-Site VPN
An Azure point-to-site VPN is essentially a client-to-site VPN. We're going to implement that here through the portal. To get started, I'm going to open up an existing virtual network. To do that I'm going to go to my Virtual networks view on the left here in the portal. And I'm going to click on my first virtual network here, EastVnet1.
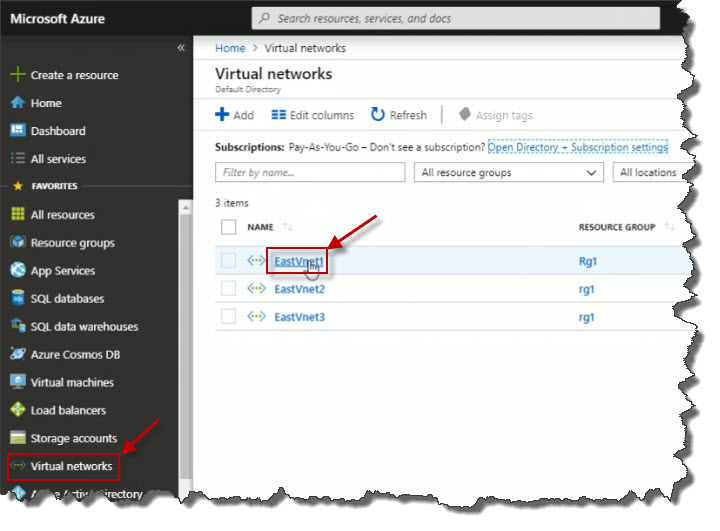
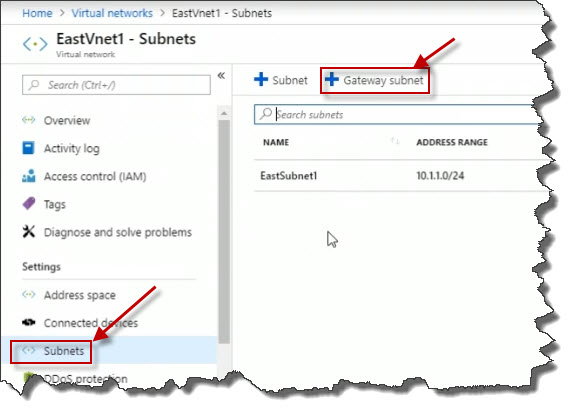
When I click on it to pull up its Properties blade, I can then click on Subnets. The reason I'm here is because when you want to set up a point-to-site VPN, you have to choose a virtual network where you're going to create what's called a Gateway subnet, which is required for this type of point-to-site VPN connectivity. Notice that we've got a button here called Gateway subnet with a plus sign. So to add one, we're going to go ahead and click on that.
And here I'm going to specify, let's say, an address range for this subnet of 10.1.2.0/24. Down below, I'm not going to make any other changes, I'm simply going to click OK.
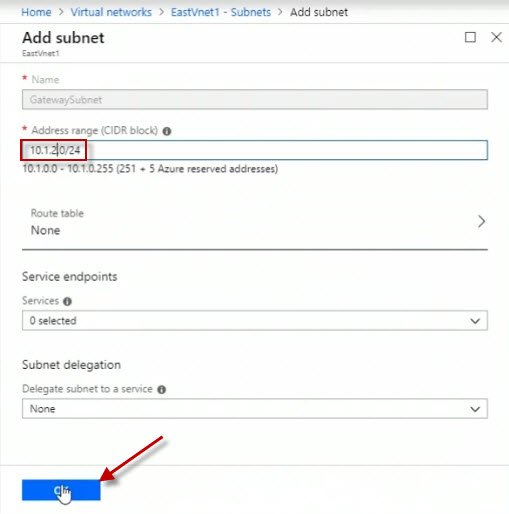
You need to have this gateway subnet defined in order to move further with your configuration of a point-to-site VPN. Now the next thing I need to do is create a virtual network gateway. I don't do that here in the Properties blade of a virtual network, it's its own separate Azure resource. And so I'm going to click on Create a resource in the upper-left.

Search for virtual network gateway and we could see it pops up in the list. Click on that.
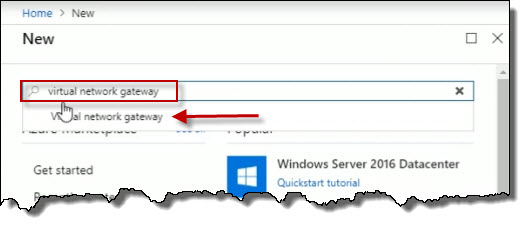
Click the Create button on the introductory screen.
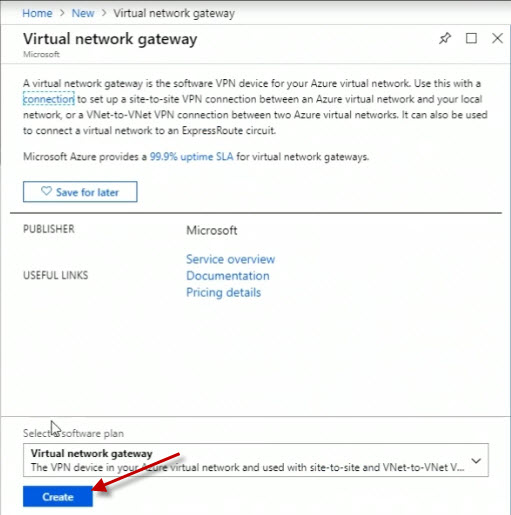
For the name, set it to vpngw1 for VPN gateway 1.
It's not for a dedicated express route circuit, which is used if you have a dedicated network link from your network to the Azure cloud without going through the Internet. That's not the case here. This is going to be going over the Internet, so select VPN.
It's going to be a route-based VPN connection.
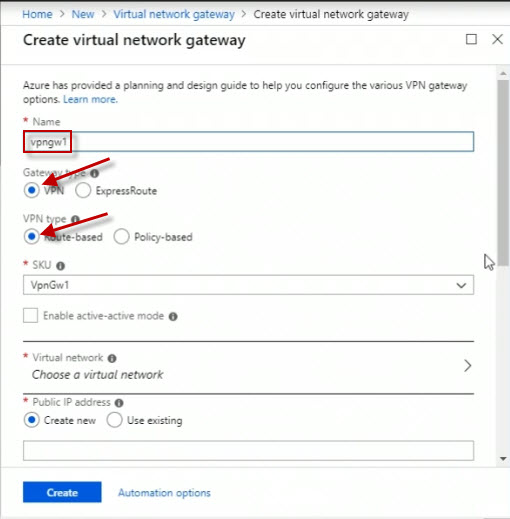
For Virtual Network, click on this to open a selection box. And select EastVnet1.
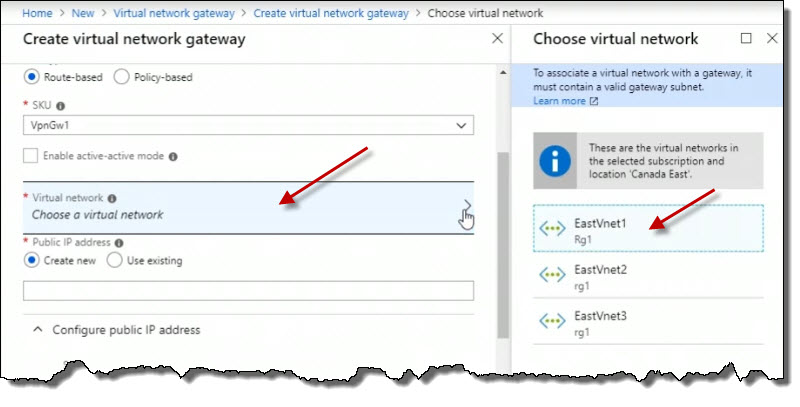
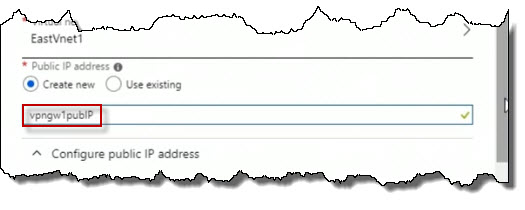
The next thing is I need to have a public IP address defined for this, because if you think about it, we need some way to make a connection over the Internet to some location to get into the Vnet through an encrypted tunnel. And so I'm gonna let it create a new public IP address, and so we're going to call it vpngw1pubIP.
And as we go further down, it's going to be a dynamic IP address. We don't have much of a choice here.
For Location, set it to Canada East.
Click the Create button.
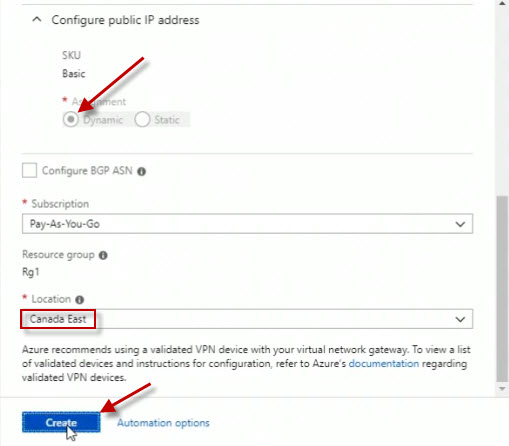
Please note that this can take some time. Microsoft states in their documentation it can take up to 45 minutes before this is ready to go.
In the meantime, we can deal with the whole PKI certificate issue. Clients that connect to the point-to-site VPN need to authenticate themselves with a PKI certificate. A purpose of a public key infrastructure, or PKI, to facilitate the secure electronic transfer of information for a range of network activities such as e-commerce, internet banking and confidential email. Here in the PowerShell ISE, the first chunk of code I have is going to create a self-signed root certificate.
$cert = New-SelfsignedCertificate -Type Custom -KeySpec Signature `
-Subject "CN=RootCert" -KeyExportPolicy Exportable `
-HashAlgorithm sha256 -KeyLength 2048 `
-CertStoreLocation "Cert:\CurrentUser\My" -KeyUsageProperty Sign -KeyUsage CertSign.
So I'm doing that using the
New-SelfSignedCertificate PowerShell
cmdlet. And it's going to be a custom self-signed type of specific certificate
that I'm going to call RootCert, CN= means common name.
And we can see here that the hashing algorithm is sha256 and the key length will be 2048 bits. It's going to be stored in the certificate store drive here on this Windows machine.
I'm going to go ahead and select that code, and we're going to execute it by clicking the Run Selection button.

When the command completes execution, So I'm going to change directory to the cert drive:
cd cert:We are going to continue to the current user:
cd currentuser

If you are already there, you will see this message:

Here I can see I'm in Cert:\CurrentUser\my.

Type the command dir for a directory listing.
dirWe can see our new RootCert.

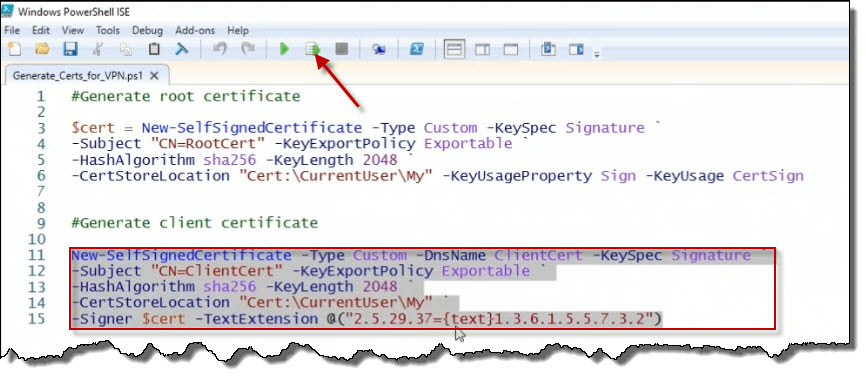
The next thing we're going to do is we're going to create a client certificate
using the New-SelfSignedCertificate PowerShell cmdlet.
New-SelfSignedCertificate -Type Custom -DnsName ClientCert -KeySpec Signature `
-Subject "CN=ClientCert" -KeyExportPolicy Exportable `
-HashAlgorithm sha256 -KeyLength 2048 `
-CertStoreLocation "Cert:\CurrentUser\My" `
-Signer $cert -TextExtension @("2.5.29.37={text}1.3.6.1.5.5.7.3.2")
I'm going to go ahead and select that code, and we're going to execute it by
clicking the Run Selection button.
The machine on which I've run this code is where that client certificate was created. Otherwise, I could go into the MMC tool and then load up the certificates snap-in and export it. You would need to do this if you wanted to use that client certificate on a different machine. But I'm going to leave that on this machine.
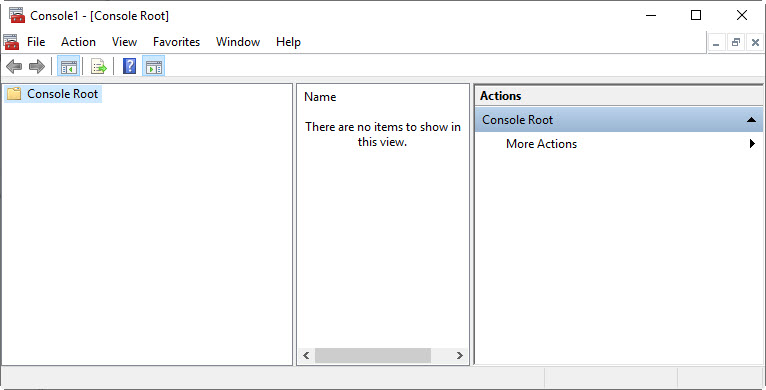
From the Start menu on my machine, I searched for and launched MMC, otherwise known as Microsoft Management Console, and this is what I get.
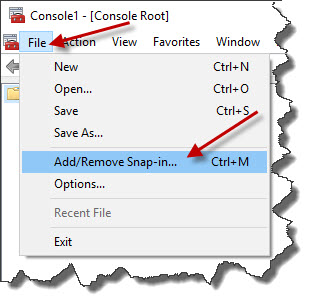
I'm going to go into the File menu and choose Add/Remove Snap-in....
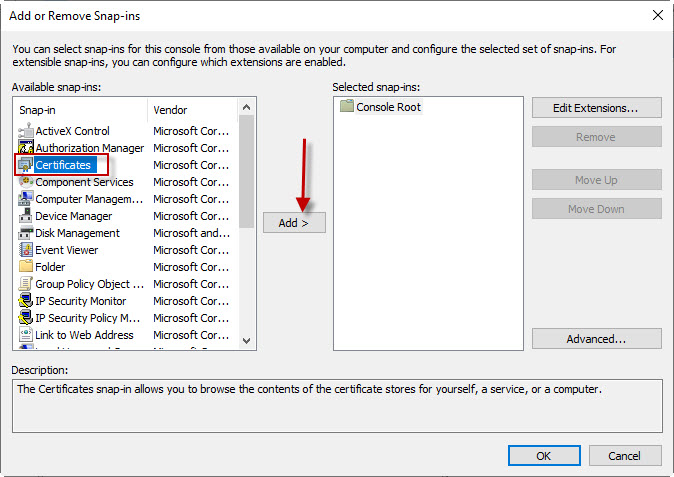
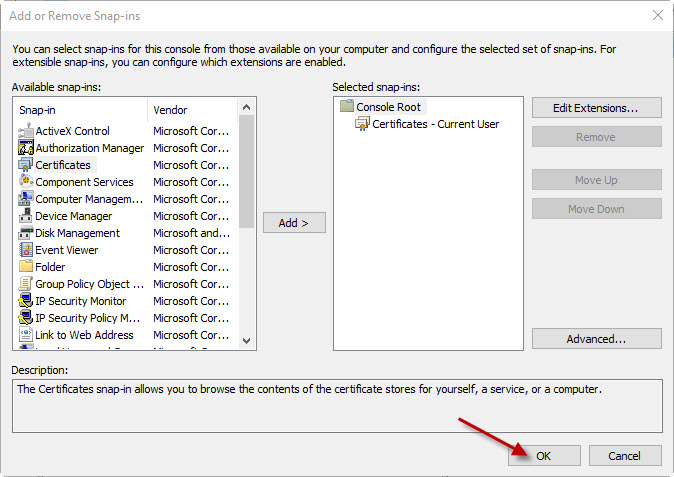
On the Add or Remove Snap-ins window, highlight Certificates and click the Add > button.
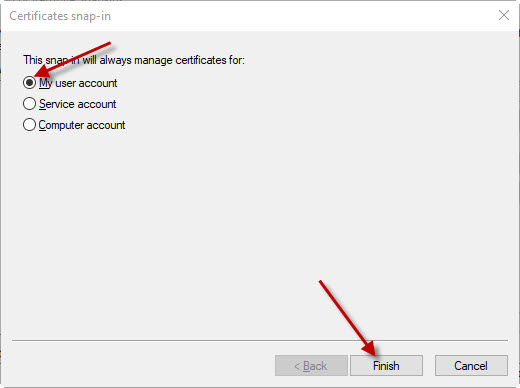
Ensure the My user account option is selected and click on the Finish button.
Click the OK button.
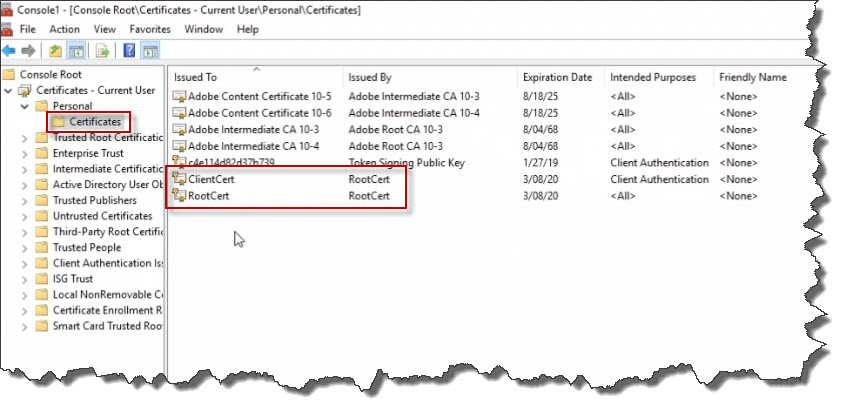
On the left menu, drill down to the Certificates folder (Console Root -> Certificates - Current User -> Personal -> Certificates). You may have to refresh the screen to see the most current certificates on the system. There is one RootCert and one ClientCert on the system.
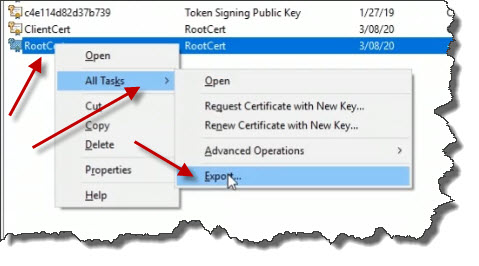
The RootCert needs to exported to a file. The public key portion needs to be configured in Azure. Right-click on the RootCert and choose All Tasks followed by Export.
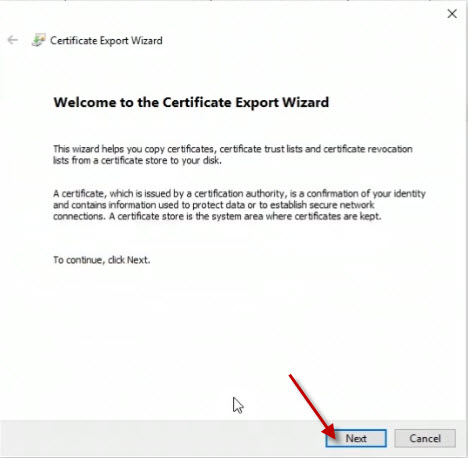
On the Certificate Export Wizard, click the Next button.
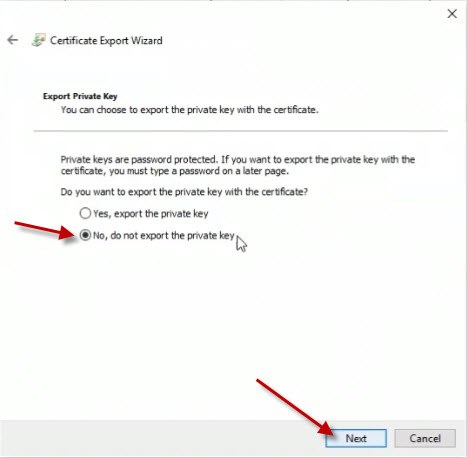
On the next page, ensure that the No, do not export the private key option is selected and click the Next button.
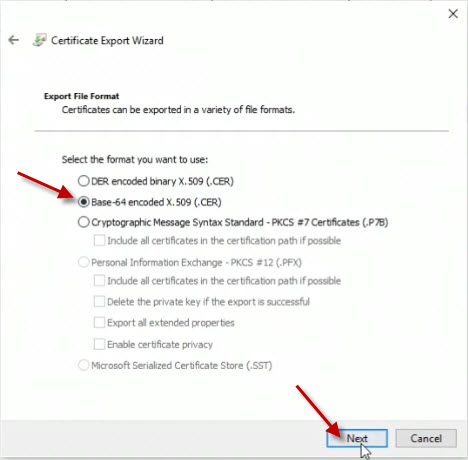
On the next page, ensure that the Base-64 encoded X.509 (.CER) option is selected and click the Next button.
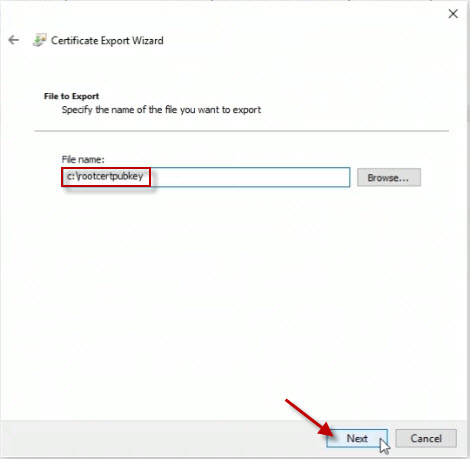
On the next page, specify a file name. In the example, we are setting the file name to c:\rootcertpubkey. Click the Next button.
On the next page, click the Finish button.
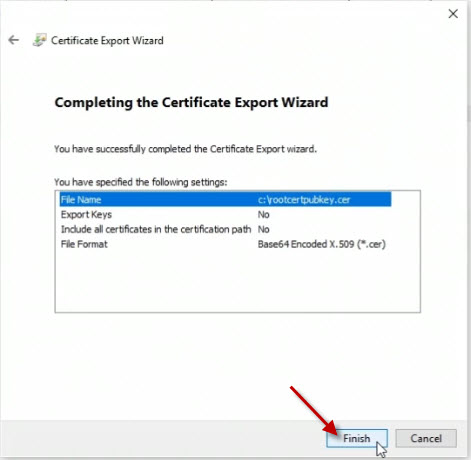
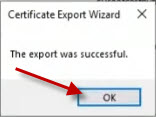
On the last page, click the OK button.
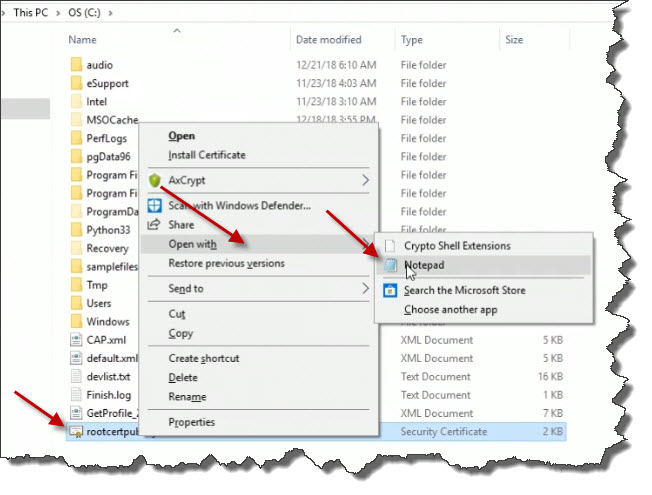
On the C: drive, we can see the file rootcertpubkey.cer. Right-mouse click on the file and open it with Notepad.
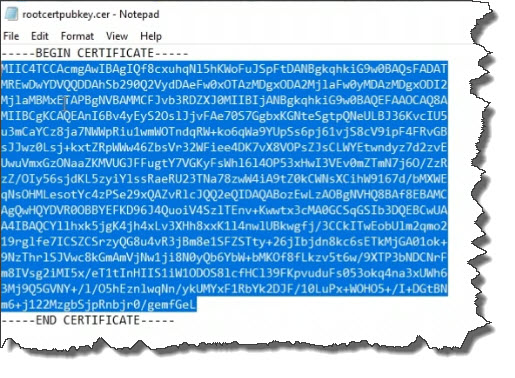
With the file open in Notepad, highlight everything between -----BEGIN CERTIFICATE----- and -----END CERTIFICATE-----. This is the public key portion of the root certificate. Copy this information to your clipboard. We need to paste this information into Azure as we will demonstrate in just a moment.
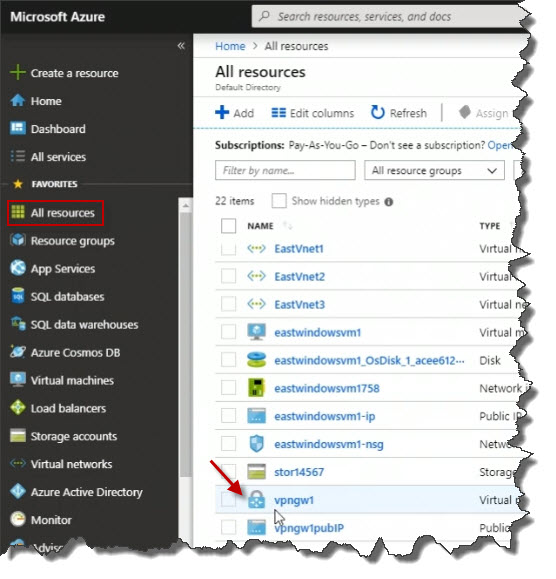
Back in Azure, click on All resources and click on the Virtual network gateway we created earlier. This was named vpngw1.
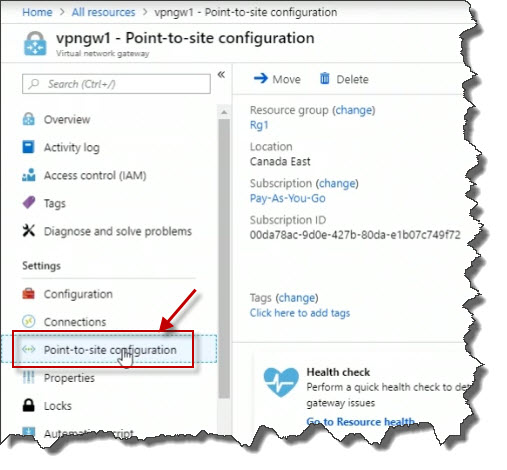
On the properties blade, click on Point-to-site configuration.
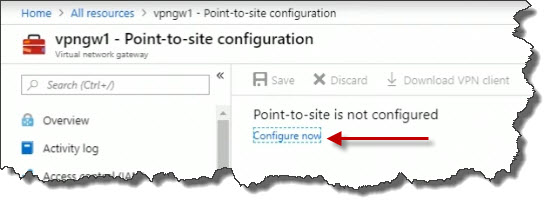
On the Point-to-site configuration page, click on Configure now.
For the address pool, this is used to assign IP addresses to VPN client. IT must match whatever they should have access to on a specific network. So, for example, maybe what I would do is set that to 1.1.1.0/24 that has to match what's on the internal part of the network in Azure that I want clients to have an address for.
For the Tunnel type, set this to IKEv2 and SSTP (SSL).
For Root certificates, set the name to RootCert. Paste the data from the Notepad session into the Public Certicate Data text box.
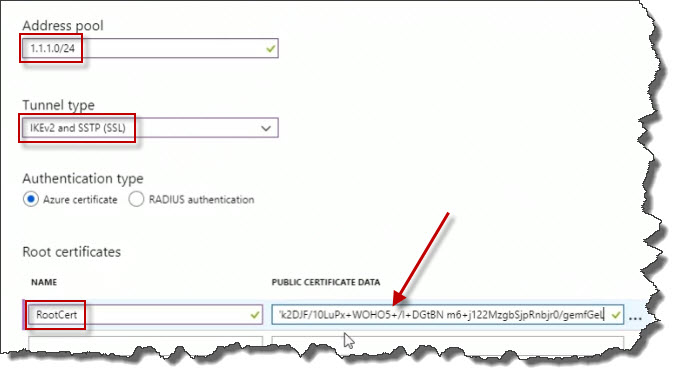
Click the Save button.

Click on Connections part of the blade.
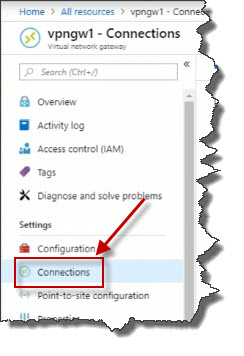
Notice currently we have no VPN connections.

Click on Point-to-site configuration. This is where I have the option to download a VPN client package. Click on Download VPN client.
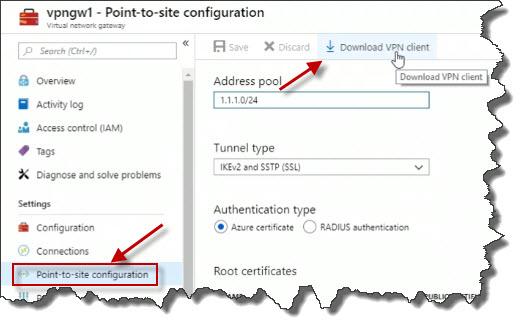
This will download a zip file to your computer. Open the zip file. Inside the zip file, there will be folders for specific architectures. Open the folder that matches your architecture.
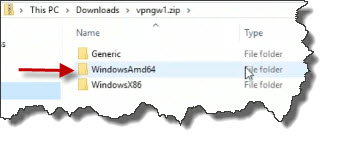
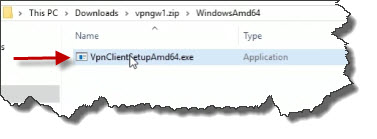
Execute the installer file.
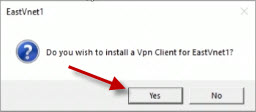
It will ask you if you want to install a Vpn client for this network. In this example, the network name is EastVnet1. Click on the Yes button.
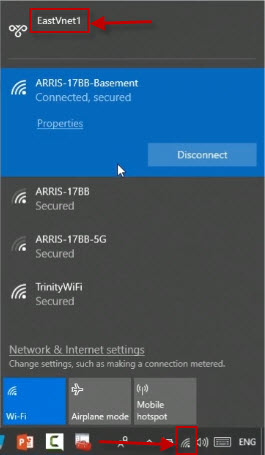
After a few moments, it will install the Vpn client. On your computer, go to the system tray and left-click on Network Settings. You will see a connection to the VPN, in this case, EastVnet1. Click on the VPN connection.
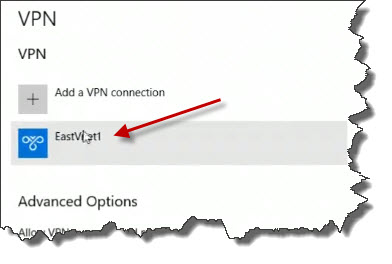
On the VPN page, click on the EastVnet1 button.
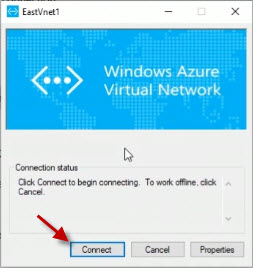
Choose to Connect to initiate a connection.

On the Azure Virtual Network window, click the Connect button.
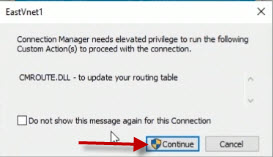
On the elevated privileges screen, click Continue. You may have to click on this several times to complete the connection.
After a moment, the connection will be made.

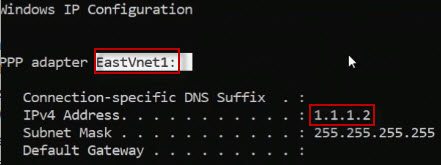
You are connected. To verify, if you open a command prompt your machine and
enter the command ipconfig. We now have an IP IP address within
that specific range for that point-to-site VPN connection.
Azure Application Gateway
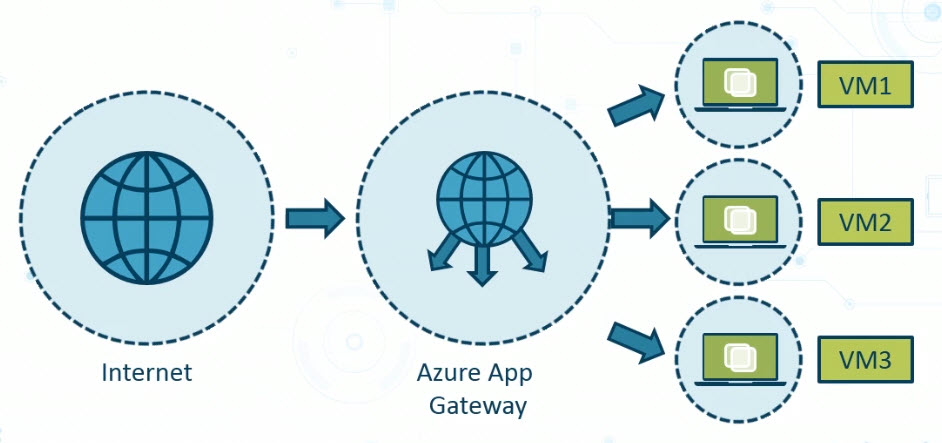
The Azure Application Gateway is a load balancer for web application traffic. But that's where the similarities end. With a traditional load balancer, traffic gets routed to backend virtual machine instances through the load balancer based on things like the IP address and port number. However, with the Azure Application Gateway, we have many options above and beyond what you can do with a traditional load balancer.
As an example of this, the Azure Application Gateway could load balance and get clients connected to backend virtual machines based on routing rules that might be based on an incoming URL passed to the application from the client.
So pictured in this diagram, we've got the Internet listed over on the left. The Azure Application Gateway is then connectable from the Internet. It will have a public facing IP address if it's designed to be made publicly visible. The Azure Application Gateway will then have access to backend VMs, listed here as VM1, VM2, and VM3, Although it doesn't have to be three; it could be two, it could be more than three.
Also, we can configure options like session affinity. This can be used so that a user that's got an established session on VM1, let's say, the next time that they make a connection which could be moments later, they will still have their session directed to that same backend server. Remember that when we talk about web applications over HTTP or HTTPS, bear in mind that HTTP and HTTPS are really stateless. In other words, once we contact a web server and ask it to do something and it does it, that's it. We need to have a way where we can maintain session affinity information on the backend. And this is a configuration option within the Azure Application Gateway among many others.
The application gateway also supports a (b>Web Application Firewall, or WAF. A Web Application Firewall is available through the Azure Application Gateway. The firewall is designed to block web application exploits. Examples of exploits include cross-site request forgeries, or directory traversals, where attackers might try to go further back in the file system outside of the location of files that make the website run, which could give them unauthorized access to other files in the operating system. Cross-site scripting is also another type of attack that can be prevented, and SQL injection which might allow a user to input query statements in fields that get sent to a database. And those fields are validated properly and so might reveal more sensitive information than it was designed to do. Now there are many other types of web application exploits that are protected with a web application firewall.
Configure Azure Application Gateway
The Azure application gateway takes incoming client requests for an
application and forwards it off to a backend server that can host that
request. That might sound like a load balancer, and it is a load-balancing
solution. But what makes the application gateway different than a
traditional load balancer is that beyond just looking at IP addresses and
port numbers, the application gateway can look at the incoming URL request.
And it can make a routing decision to a backend virtual machine based on that.
So if a client requests something in the URL that includes /jpg
images, that can be forwarded to a backend host that's been optimized to serve
up that kind of content.
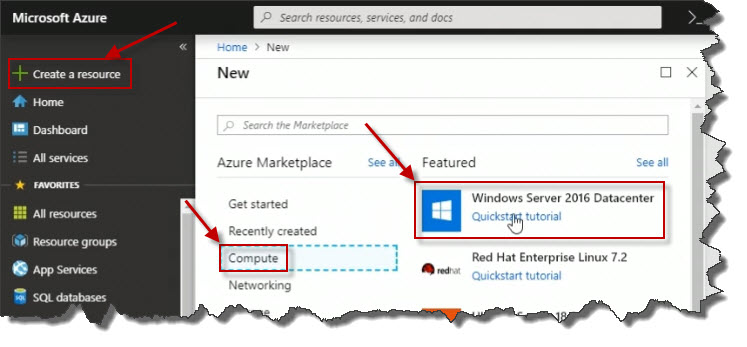
I'm going to start by deploying two virtual machines that are going to be running Windows Server 2016 Data Center. These two virtual machines will be deployed into their own specific virtual network and subnet. And these virtual machines will be used as our backend pool for our application gateway. So let's get started here in the portal by clicking Create a resource. From the Azure Marketplace, clickon Compute. Then click on Windows Server 2016 Datacenter.
On the Create a virtual machine page, scroll down a little until
PRODUCT DETAILS is at the top.
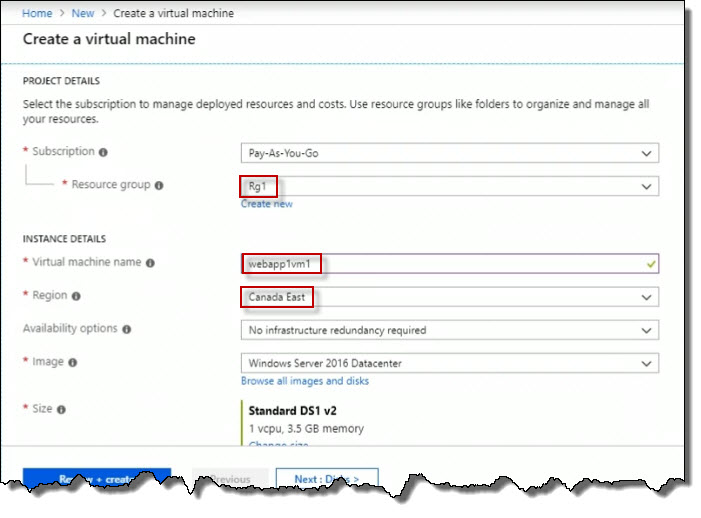
For the Resource group, set it to Rg1.
For the Virtual machine name, I am going to call this webapp1vm1.
For the location, set it to Canada East.
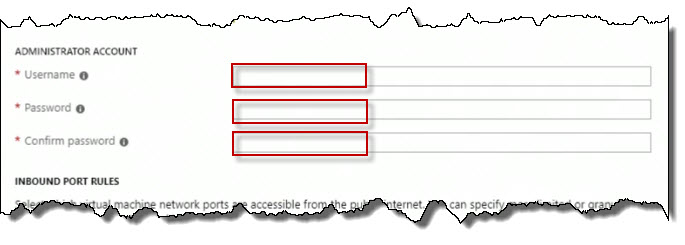
Scroll down and specify the username and password information.
And then for inbound port rules, click on All selected ports. For the Select inbound ports, select RDP from the combo box. This will allow incoming RDP on port 3389 for management. I don't have to enable port 80 or 443, because these will be running in the backend pool. They don't need to be publicly accessible.
Proceed to the next screen by clicking on the Next:Disks> button.
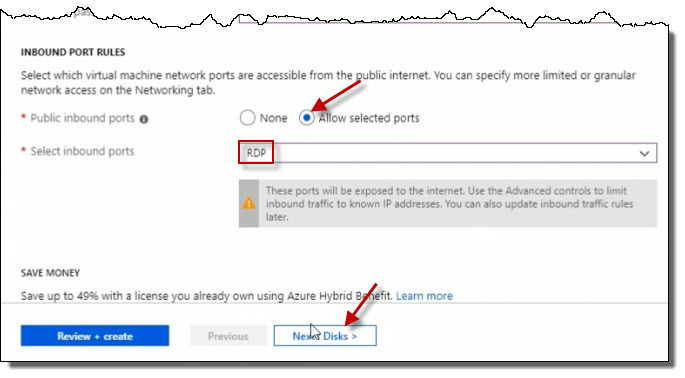
I'm okay with Disks, so click on Next:Disks> button.

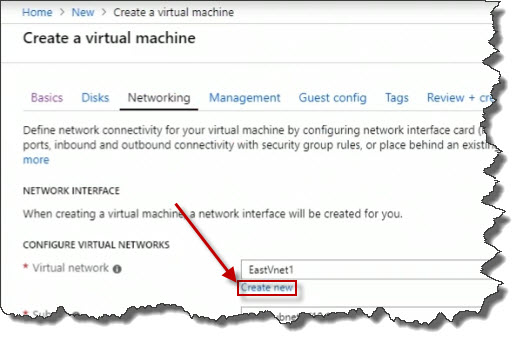
I'm interested in the Networking. On the Networking tab, click on Create new.
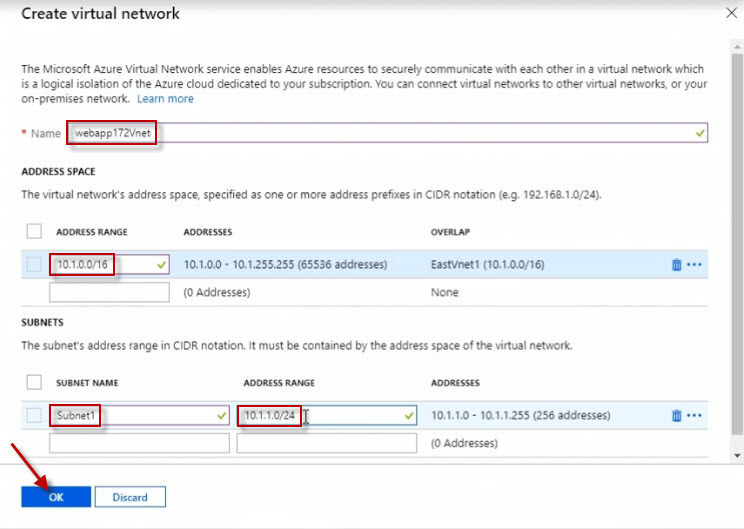
For the name, set it to webapp172Vnet.
And I'm going to specify the address range I want to use for that, which would have been planned ahead of time, that's for the VNet. For the ADDRESS RANGE, set it to 10.1.0.0/16.
For the SUBNETS, set it to 10.1.0.0/24.
Click on Review + Create.
Once the validation passes, I'll go ahead and I'll click the Create button.
And while that's happening, I'm going to go ahead and deploy a second virtual machine. Everything will be the same except the name will end in vm2 instead of vm1. Go ahead and create the second server now.
It must be noted that if you've got existing virtual machines hosting your app, you can use those. It just so happens, I'm deploying them from scratch here. And, of course, what you would do is install, in this case, the IIS web server and any other components within each virtual machine that you need to support your web application.
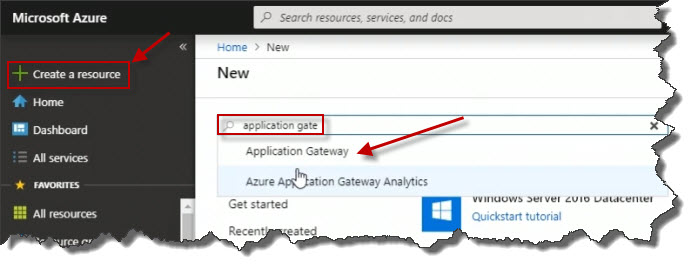
So the next thing I'll do is actually deploy the application gateway. I'll click Create a resource, and I'll type in application gateway in the search box. Select Application Gateway from the suggested findings.
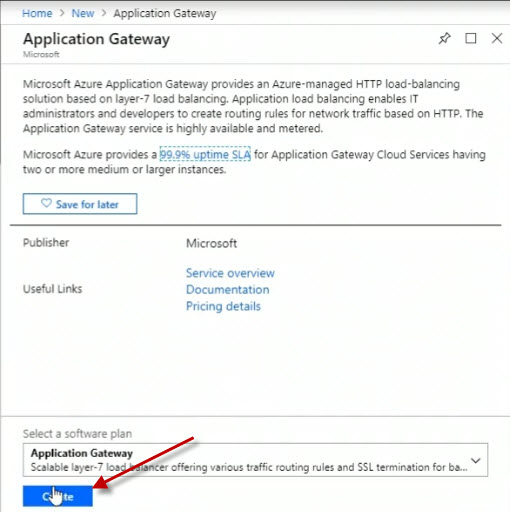
On the Application Gateway screen, click on Create.
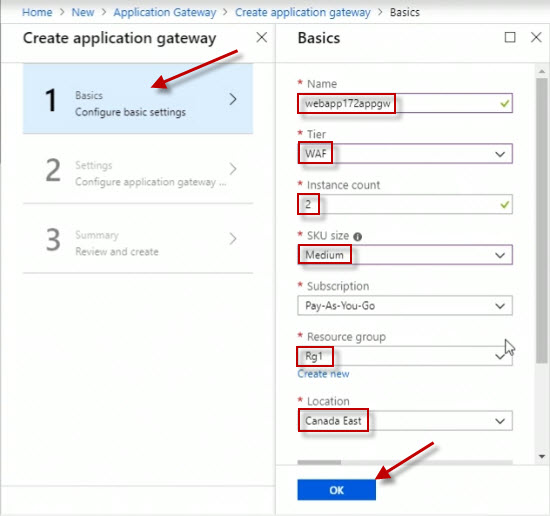
For the name, set it to webapp172appgw.
For the Tier, set it to WAF. If I leave it on the Standard tier, I can see the SKU sizes available are Small, Medium, and Large. And these relate to the amount of throughput that can be handled by the application gateway. If I were to choose a Web Application Firewall tier, then all I have are Medium and Large available as sizing.
For the SKU size, set it to Medium.
For the Instance count, set it to 2.
For the Resource group, set it to Rg1.
For the Location, set it to Canada East.
Click on the OK button.
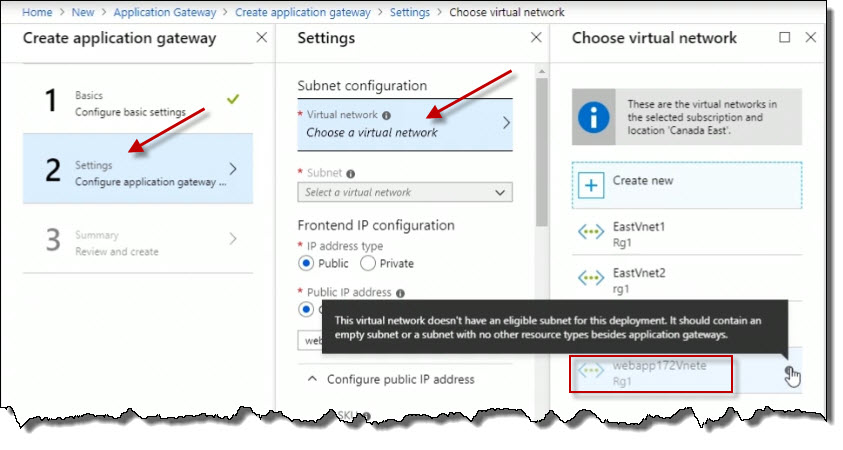
On the Settings page, click on Choose a virtual network. Notice here how the webapp172Vnet that we created is unavailable because we need another empty subnet as indicated here by the information popup. This is not a problem.
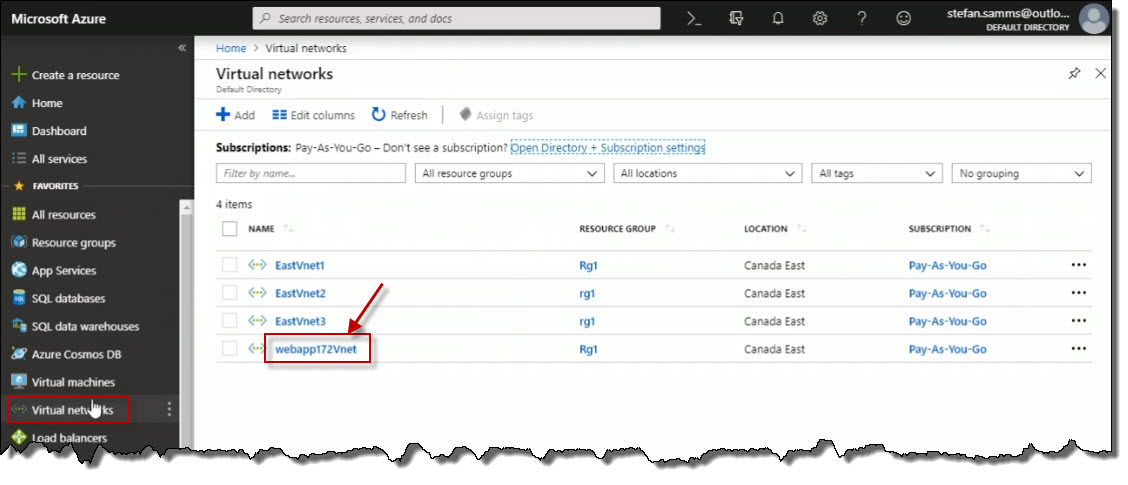
Open up another web browser window to the Azure portal and navigate to Virtual networks. Click on the virutal network webapp172Vnet.
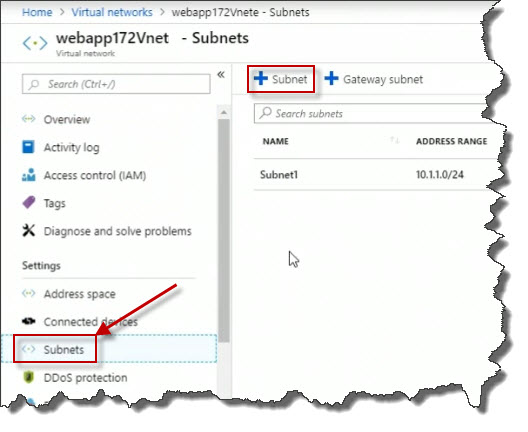
Click on Subnets followed by add new Subnet.
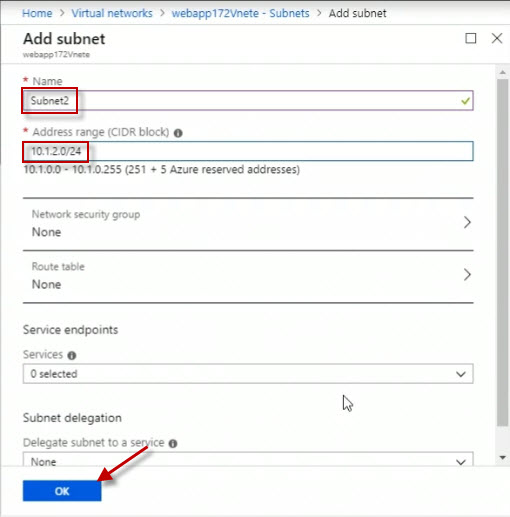
For the name, enter Subnet2.
For the address range, I'll use 10.1.2.0/24 for bits in subnet mask.
Click the OK button to add a second subnet.
Go back to the Choose virtual network tab in the browser.
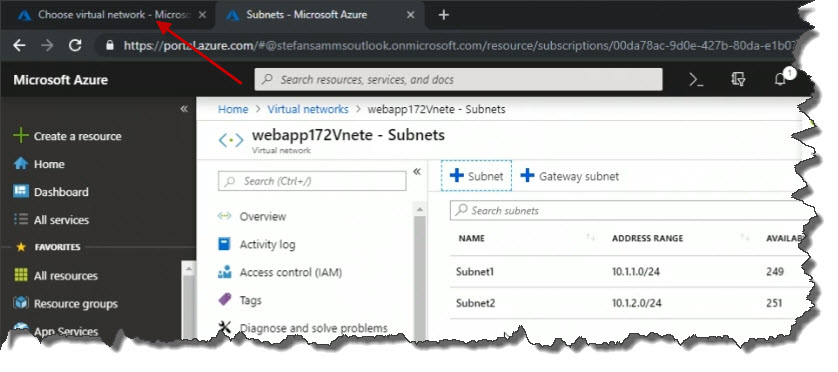
And select the Choose a virtual netowrk, followed by selecting the webapp172Vnete network.
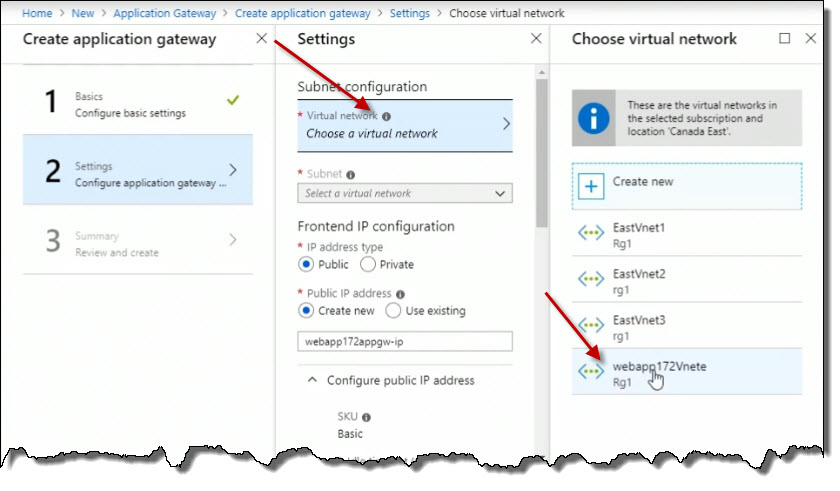
This is going to be a public facing application gateway, so I'll leave the IP address type as Public, as opposed to Private for an internal line of business app, for example.
We'll let it create a new public IP address.
I'm going to accept all the defaults here for HTTP port 80, and I'll click OK.
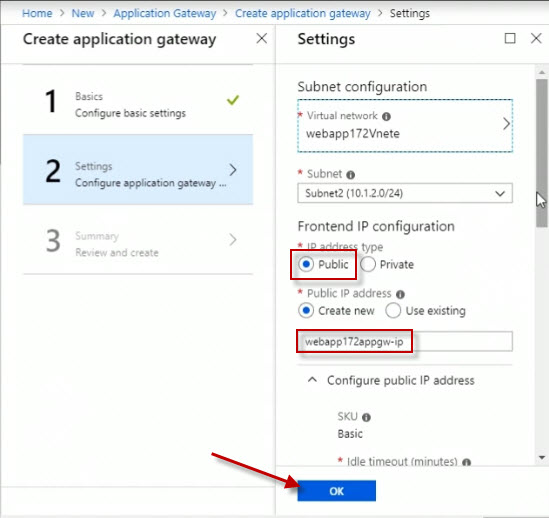
Then I'll click OK on the Summary screen.
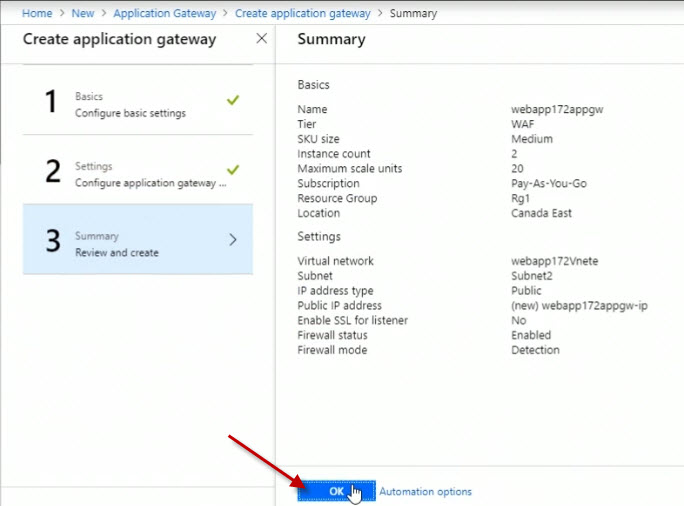
It this point, the application gateway is being deployed. But we're not finished configuring it yet. We have to link our backend virtual machines to the backend pool for the gateway.
So now if I go to the All resources view, and if I filter it for web, we can see that we've got a number of resources with that prefix such as our webapp172appgw. Click on it to pull up its Properties blade.
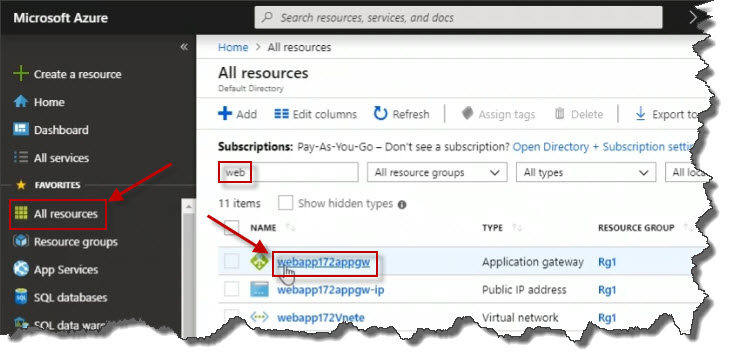
On the Properties page, click on Backend pools.
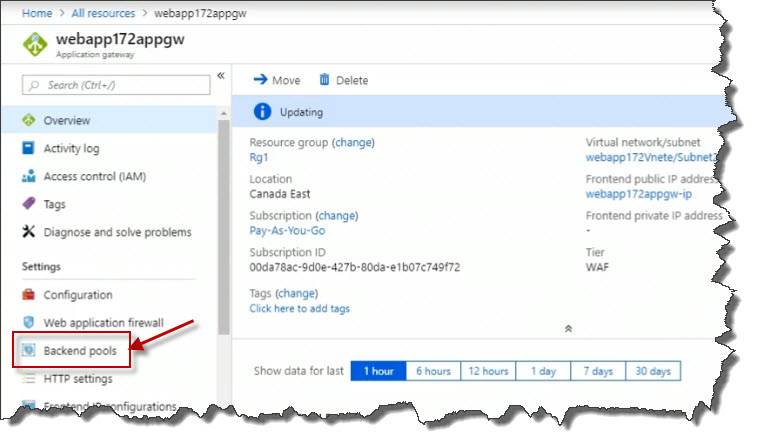
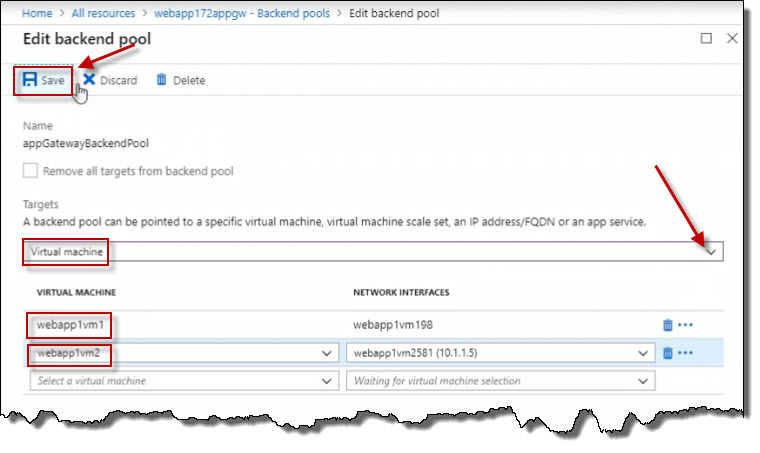
Click on the pool appGatewayBackendPool.

Set the Targets to Virtual machine.
For the VIRTUAL MACHINE, add the virtual machines webapp1vm1 and webapp1vm2 with the appropriate NETWORK INTERFACES. Click Save to save that backend pool configuration.
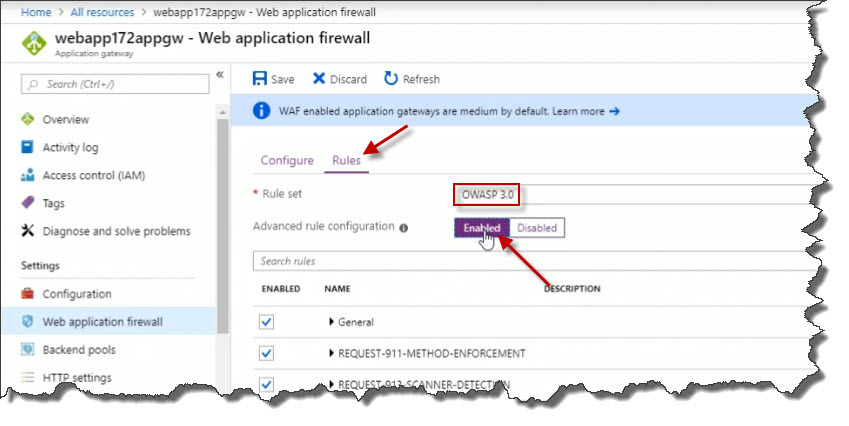
We can also click on Web application firewall in the Properties blade to ensure that the Web application firewall is enabled.
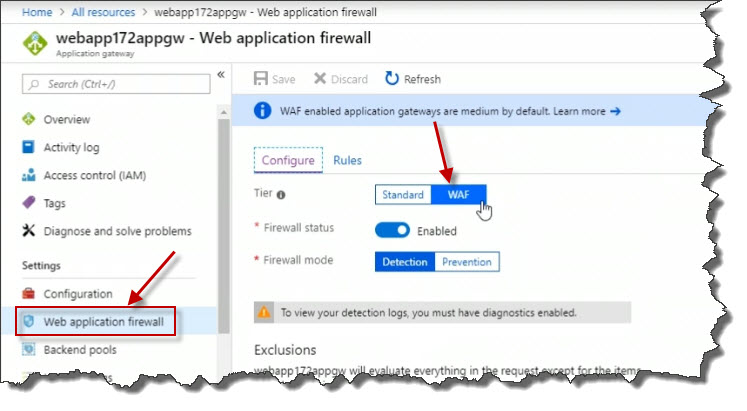
If we go to Rules, we can see the ruleset that's being used. If you really want to, you can enable Advanced rule configuration to determine exactly which type of web application firewall rules that you want enabled.
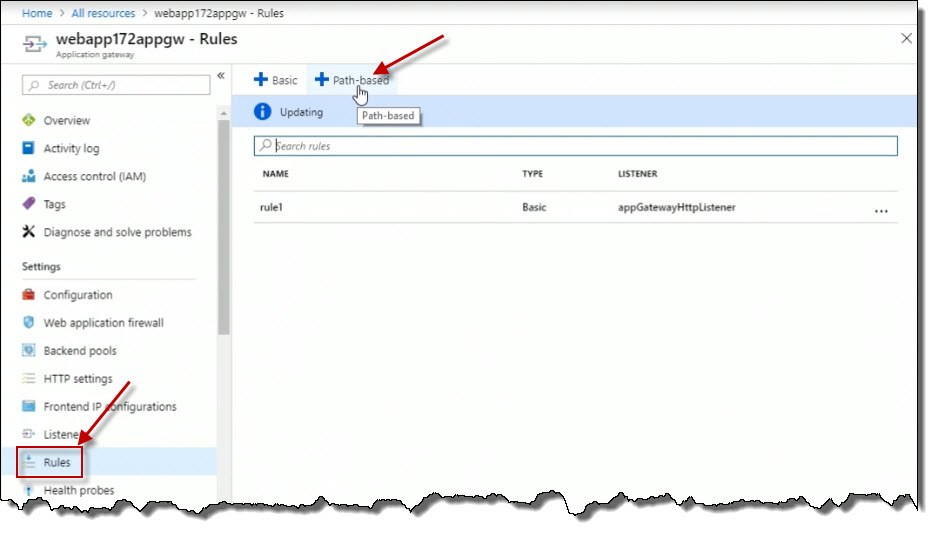
Also, if we go to Rules, we also have the option of configuring additional path-based rules to look at incoming URLs for routing purposes. That would require creating a front-end listener as well.
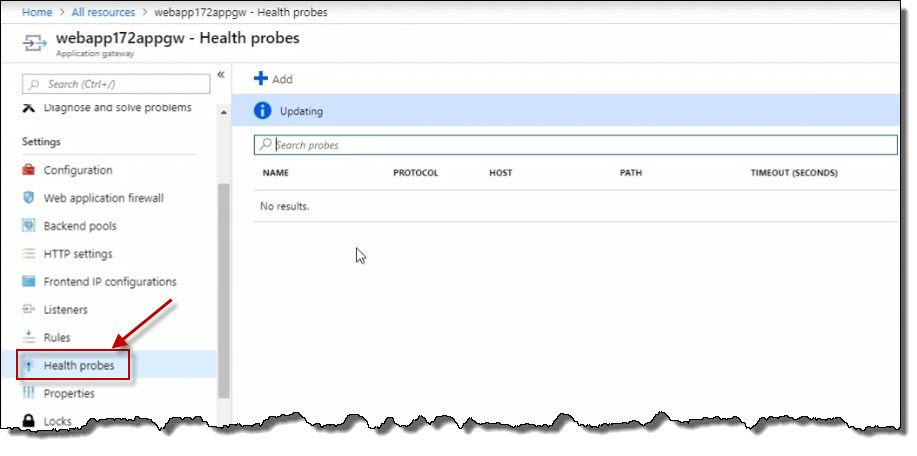
We can click Health probes to determine the configuration for how often we're going to check backend servers to make sure that they are responsive.
Content Delivery Networks (CDNs)
A Content Delivery Network or CDN is a strategy that we can employ in Azure to make sure that content is available to users locally. The overall goal is to speed up the user experience when content is delivered to them, whether it's basic standard website files, graphic images, audio-video media, whether it's streaming or not, we want to make sure that gets to end-users as quickly as possible. And that can be done with a CDN.
This is because the Azure content delivery network has geographical point of presence servers in Azure regions all over the world. And so we can create configurations in Azure to specify details about what should be cached and for how long on these geographical point of presence servers in different parts of the world. The idea is that users that request content in one region should get that content served within the same region instead of having to retrieve it across multiple regions which will slow down the end-user experience.
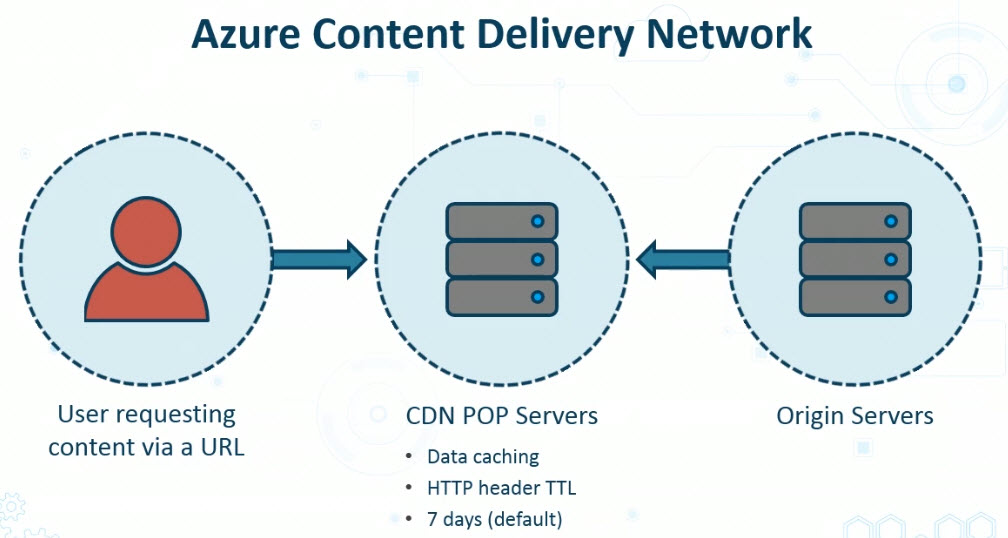
The Content Delivery Network process begins with the user requesting content via a URL. That URL is then sent to a content delivery network point of presence, or POP, server, and we will have configured data caching, or the client might have sent HTTP headers that have Time to Live, or TTLs, related to caching content and how long it should stay there. Otherwise, by default, content that gets cached sits on the CDN servers for seven days.
In the event that a user makes a request for content that is not cached already, then the CDN server will make the request to the origin server, which in turn will feed the content back to the user through the content delivery network.
There are a number of features to be aware of that you might want to configure while you're configuring your Azure content delivery network settings.
One of which is geo-filtering. Geo-filtering lets you specify the type of content that should be cacheable based on the country of the origin request.
Content compression allows us to enable compression for files so that they are more quickly delivered throughout the CDN, and that we could potentially incur lesser bandwidth charges since we're sending less data.
Caching rules can be used to specify exactly how data gets cached and for how long. And there are a couple of different types of caching rules that you can configure, that we'll see when we configure a demo. Whether we're talking about just generic mobile caching rules or query string caching rules based on incoming query strings with HTTP requests.
There's also a site acceleration option where you can configure this as you add endpoints to your CDN configuration to speed up access to content.
Finally, you can also use HTTPS custom domain names to map more to your organizational presence on the Internet using your fully qualified domain name in your configuration.
.ico)