Azure Fundamentals
 Azure Fundamentals: The Ecosystem
Azure Data Centers
Microsoft Azure data centers are the physical side of Microsoft Azure cloud computing. A couple of terms come to mind when talking about data centers, as we see here. Physical facilities is one of them. A data center is a physical facility, often a very large building or a collection of buildings that house computing equipment. In this case, for potentially thousands of different cloud customers.
Now, in the case of Microsoft Azure, these physical facilities, or data centers, exist currently in 140 countries around the globe. Although that will be changing over time. Then physical security becomes an important aspect of it, due to the fact that we do have a centralized location physically, that houses a lot of potentially sensitive data for many different customers. So as a result, you'd be hard-pressed to get a specific address for a Microsoft Azure data center, as the actual physical locations are not disclosed.
One data center component to consider, much like you would if you had a data center owned by a single large organization or even a server room within a building, is HVAC. Heating and ventilation and air conditioning. Within a data center, on a large scale, it's absolutely crucial that we've got pathways for air to travel. So that we can take warm air exhaust and feed it away from equipment, often out of the facility, and then, of course, have cool air fed into the facility from the outside and maybe through air-conditioning units that are filtered to equipment intake fans.
The next thing that we should consider is the number of equipment racks that would exist within a data center. It's often a very large number because pretty much everything these days, every physical computing device, is an appliance that can be rack mounted. Whether it's a hypervisor server that's used to host virtual machines running in the Azure cloud environment. Whether it's storage arrays that Azure customers enjoy when it comes to provisioning cloud storage. Whether it's physical routers and switches to provide network connectivity. UPSs, UPSs, uninterruptible power supplies, are used for short-term battery power for a device to shut down gracefully when it detects that the AC power from the power grid is no longer there. For longer-term power supplies, we looked at things like power generators that might run, for instance, off of diesel fuel.
At the physical security level, we have to consider things like fencing around the perimeter of an Azure data center. Along with both interior and exterior alarm systems, often in the form of motion detection sensors. And then, of course, physical guards on premises to check badges. Mantrap doors work in such a way that after access to an outer door is granted and the door opens there's an area within the door that the person must wait before they can enter a second inner door. The outer door has to close first. And often these doors are locked, of course. And they are controlled, or access is granted, through a proximity card. And all entry and exit points in the facility are logged centrally.
Microsoft performs thorough background checks on all employees. Especially those that work in Microsoft Azure data centers. Within the data center, specific rooms that might contain a specific type of equipment, such as storage arrays, might be in a locked area that requires additional access beyond just gaining access to the facility itself. In the same way, we can also have locked equipment racks so that in order to gain access physically to a device, whether it is a rack-mount server or a router or a storage array, access must be granted to the rack itself. We have to physically be able to open the rack before we can even get our hands on the equipment.
So all of these things together provide a secure physical environment for an Azure data center.
Azure Regions
Microsoft Azure regions are an important concept to understand. Whether you're managing Azure at the command line, or whether you're doing it using GUI tools like the Azure portal. And in some cases you'll see references to, not an Azure region, but rather a location. Either way, it's the same thing.
An Azure region is geographical in nature. We are talking about a physical region whereby Azure resources can be deployed. And when you actually deploy new resources like a virtual machine, let's say, in Azure, you need to specify the location or region. Currently, Azure has a presence within 140 countries, and that is organized into 54 regions. But bear in mind that while these numbers are current, they're always changing. Microsoft is always looking at expanding Azure with more regions in additional countries.
Microsoft Azure also supports some special Azure government cloud options, and those specific regions are not disclosed anywhere. Unlike standard Azure cloud regions like East US and Canada Central, are made available.
We get a sense of what an Azure region really is. We can also see a bit of a hierarchy. So you can think here of a region as being interconnected over the Internet by the wide area network link. So on the left, we've got Region 1. Let's say that's East US. Then we've got Region 2. Now, Region 1 and Region 2 are my labels. In Azure, they would actually be named East US and, in this case, Region 2 is Central India. So they can be very far apart from one another. And you can deploy Azure resources into disparate regions like this. And you might do that for availability in case there is some kind of a regional disaster. Although in this case we're talking about pretty much opposite sides of the planet, so it's an extreme example.
What we see within each region is a set of data centers, and we'll talk about availability zones shortly. But essentially we've got very high speed network links within a region compared to between regions.
Availability zones, or otherwise called AZs, exist within a Microsoft Azure region. And often, you'll find that most regions have three availability zones, although in some cases, you won't see that. This means that we've got one or more data centers. So what we're really saying is that there is not a one-to-one correlation between an Azure availability zone mapping to one data center. It's not always that simple. You could have an availability zone that consists of three data centers.
Then we have to think about Azure Service Availability and how it relates to regions. The first thing we have to bear in mind is Azure Services, so the cloud stuff that we as customers want to use, varies. It varies in its availability from one region to the next. So as an example, if we want to use the Azure search feature, when we configure that and deploy it, we won't be able to specify a location or region of Canada East, at least not currently. And again this is always in flux. Another example would be the deployment of G-Series VMs, virtual machines, high-end virtual machines. This specific series or type of VM is not available in Central US.
G-Series virtual machines might be important to you if you need to accommodate very large database workloads and you need as much CPU, memory, and processing power that you can get. So in some cases this could be very important, but we do need to understand that when we go to manage and deploy resources, they will vary in their availability, in some cases from one region to another.
Azure Availability Zones
If we had to sum up Azure Availability Zones in one word, we would simply use the word availability.
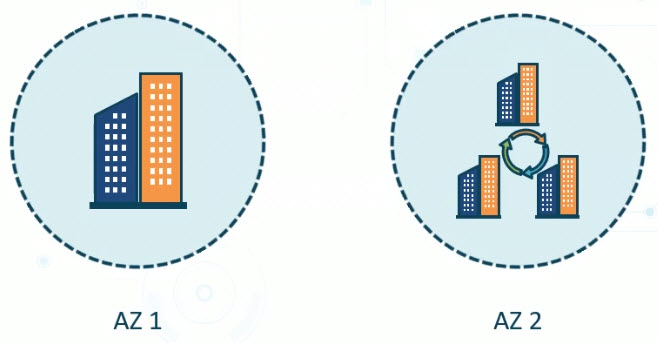 Pictured here, we have two availability zones, or AZs. One on the left, AZ 1,
and another on the right, AZ 2. On the left with AZ 1, notice we have a
picture of a single data center. So in other words, an availability zone
doesn't have to be, but it can equate to a single Azure data center. But
on the right, we've got three data centers. So what we're seeing here then
is that an availability zone can consist of more than just one data center.
So what we're talking about using this for is to spread out services to
increase availability.
Now, how is that? Well, we might replicate data between availability zones, so that if there's some kind of a catastrophe or a failure in one availability zone, the data is still available elsewhere. And it doesn't have just to be data, it could be an entire application ecosystem that we've duplicated in another AZ.
With Azure Availability Zones, we get the benefit of high availability of IT systems and data. And we know that an Azure Availability Zone could consist of one or more data centers. But then we've got the notion of fault domains. The purpose of a fault domain is essentially to spread out our deployed services like virtual machines that we might create in Azure. Spread them out if we've got a cluster of them across multiple physical data center racks. Where each rack has its own network switch, at least one, its own power source, its own hypervisor, and so on. And that way if there's some kind of an unanticipated failure within an Azure data center in a rack. So whether it's power-related, network-related, or hypervisor-related, at least we will still have some of our virtual machines that were deployed to another fault domain. And so when you start deploying resources, this happens automatically.
Then we've got the notion of an update domain. So an update domain is a little bit different here because instead of an unpredictable or unanticipated failure, we have a planned maintenance type of downage of something like a hypervisor server. Maybe Microsoft needs to apply configuration changes or updates. So, instead of bringing down a whole bunch of physical hypervisor servers in an Azure data center simultaneously, one would be brought down, its configuration changes and/or updates will be applied, and then once that's back up and running then the next server would get the same treatment where it would be perhaps brought down or reconfigured, updates are applied, that type of thing. And the whole purpose here is that when updates need to be applied, we don't end up with the service outage. It minimizes what is affected. And we're not talking here about how we, as Azure customers, might deploy virtual machines manually ourselves, because we are responsible for updating them. So this is more at the underlying Azure data center level.
 Pictured here, we've got an example of deploying a virtual machine using the
Azure portal, the web interface. Notice here, the selected region is
Canada East. And when we take a look at availability zones within that
region, it says that there are no availability zones available. Now that
depends on the region. So some regions are much larger than others and
will have numerous Availability Zones within them. So depending on which
region you work with, as in this case when deploying a virtual machine,
you can expect, in some cases, to not have the choice of Availability
Zone. It simply depends on the region that is selected.
Azure Resource Manager
Azure Resource Manager, or ARM, is often used to manage related Azure resources together as a group. Although you don't have to do that. You can use ARM, for example, to deploy or manage a single virtual machine. But it really shines when you're talking about something like a web application which might consist of a front-end load balancer, a public IP address, numerous virtual machines to host the website, or the web front end, and then even some back-end databases which may include storage. So all of those things together, all of those different Azure resources, can be managed as a single unit through an Azure Resource Manager resource group.
So we use ARM to deploy resources, so to create new things like virtual machines, storage accounts, virtual networks, databases, and so on. But we can also use ARM to manage existing resources, maybe to change a configuration or to remove a deployed resource.
So what is an Azure resource? Well, it's pretty much anything that you can deploy in the Azure Cloud, including things like a web application that's hosted in Azure. Maybe a Cosmos DB NoSQL compliant database or an Azure SQL database. Or a storage account, because you want to store files such as Office productivity files in the Cloud. Also virtual machines that we deploy, these are all resources. So if we've got a single application, it might consist of all of these items. And so we could organize these into what's called a resource group.
You'll notice that when you deploy and manage Azure resources, whether it's through command line tools or through the Azure portal, the web GUI, you'll always have to deal with the resource group. For example, if you're deploying a virtual machine, one of the things you have to do is either deploy it into an existing resource group or define a new resource group.
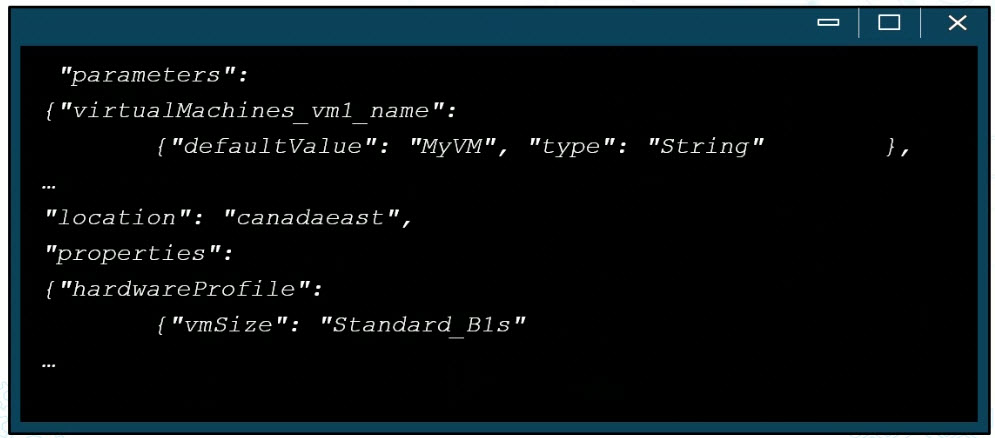 Here we see an example of an ARM template. When we work with ARM
Template files, they use JSON file format, J-S-O-N. It looks kind
of like JavaScript, but it's not JavaScript, it's JSON. So here we
see parameters. So we can set a default parameter, in this case for
a virtual machine name, where the default value, if not specified
otherwise, would be MyVM. We can see the location, or region, into which
this virtual machine
will be deployed, in this case canadaeast. We can see the virtual
machine size listed below, which determines the underlying horsepower,
like virtual CPUs, the amount of RAM. Whether it uses solid state
drives and so on.
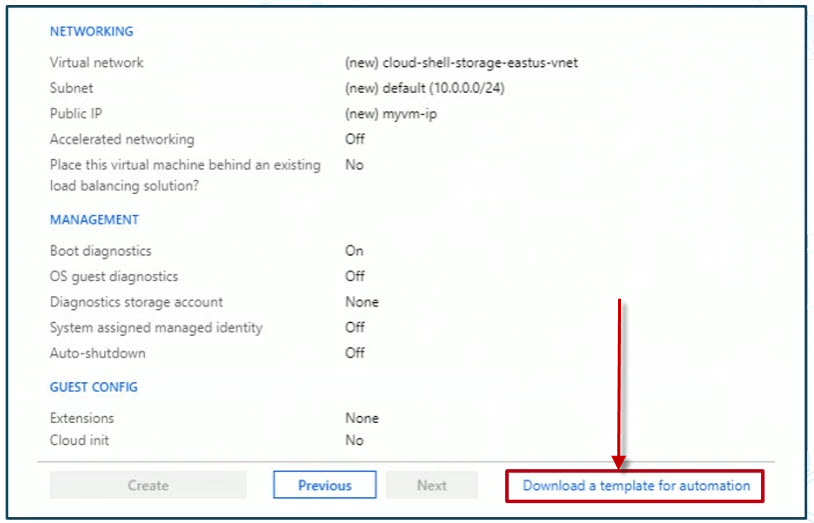 In the Azure portal, when we deploy a resource, in this example, if
we've deployed a virtual machine. So we've created a new Azure
virtual machine in the Azure Cloud. When you get to the end
of the screens, the Wizard in the GUI, you'll see that there's a
link, as we see outlined here in the bottom right, to download a
template for automation. So in other words,
the Azure portal is essentially tracking all of your choices when
you deploy your resource. And then you have the option to download
a template, so that you could reuse that template to deploy more
resources of that type. Now, of course, you might want to change
things like the specific name of a virtual machine and so on. Or
you could customize it and parameterize it as we were talking about
previously.
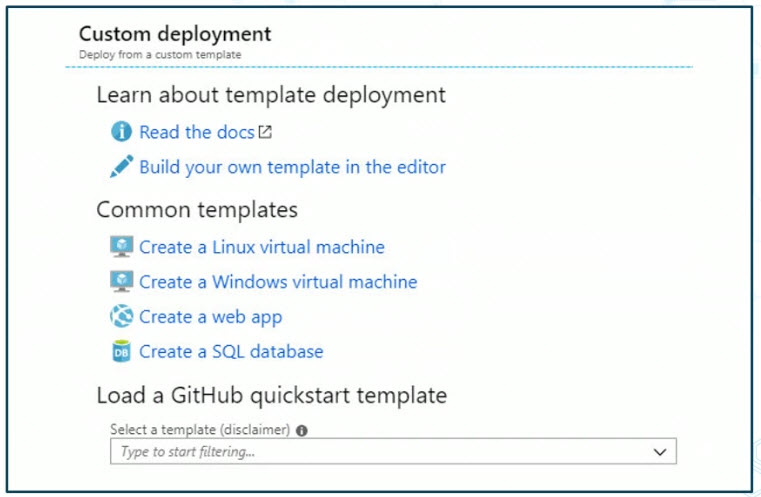 Now you can also deploy ARM templates in numerous ways, such as
through the Azure portal as seen here.
When you create a template deployment in Azure portal, this is what
you see. You could build your own template in the editor, there's
a built in editor online, where you can also import a template.
Remember, template is a file that uses JSON syntax. So you can
build it in the cloud, if you already built it, you could import
it into the cloud. And there's also a list here of common templates
for creating things like Linux or Windows virtual machines or a
web app. And you can even connect to templates over the Internet,
such as through GitHub.
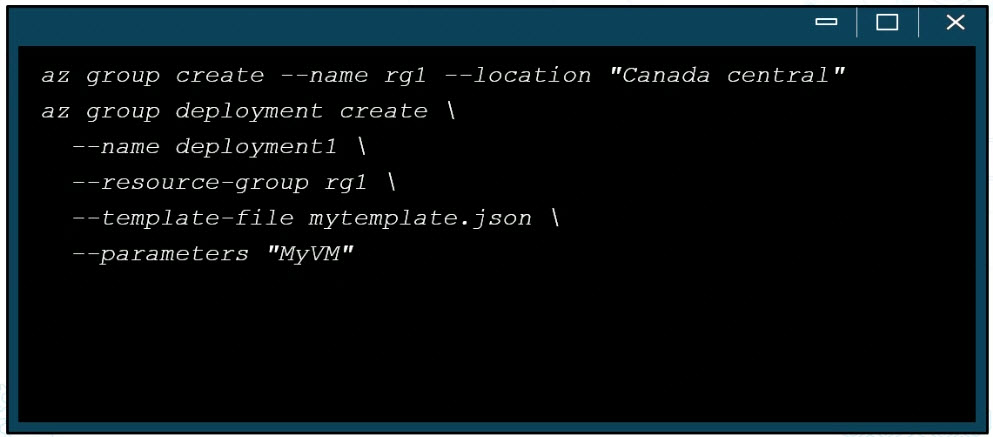 In this example, we're talking about the Azure CLI, the command
line interface, which you can download and install so that you
have command line management of Azure. So here we're deploying an
ARM template through the CLI. In the first command, az group create,
we are creating a resource group. The resource group is called rg1
and it's been deployed on a location, or a region, called Canada
central. Next thing we see is a command that says, az group deployment create.
We are creating a deployment. We want to deploy or create resources
in Azure. In this case using a JSON formatted template file. So we're
giving our deployment a name. Here I'm calling it, deployment1,
referencing my resource group rg1. And then I'm specifying a local
template file, in this case, mytemplate.json. But you could also
specify a location elsewhere over the Internet. Again, as in the case
of connecting to an ARM template, that you might want to deploy from
GitHub. And then you might specify parameters. In this case, such as
a parameter for MyVM.
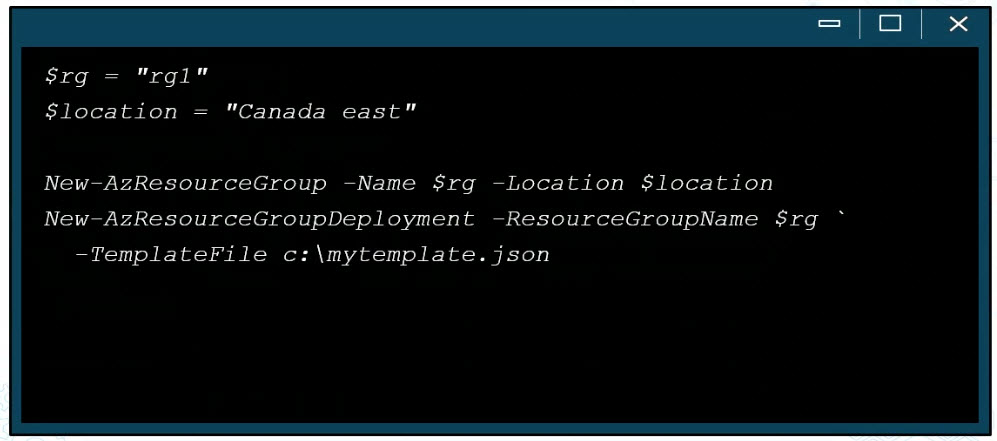 We can also deploy ARM templates using PowerShell. In the first line
we're creating a variable called
 $rg that contains the text
rg1. That's the name of the resource group. And we're setting
the location variable to Canada east. Then we're using
the New-AzResourceGroup cmdlet to build a resource group.
And then we're building a New-AzResourceGroupDeployment.
So we're referencing our resource group name and a local
TemplateFile. In this case, it is located on the
root of drive C called mytemplate.json.
But just like with the Azure portal, with the Azure CLI, we don't have to reference a local template file. We can actually point to one over the Internet, such as stored in a GitHub repository.
Azure Resource Groups
The Azure Resource Manager, or ARM, method of managing Azure resources allows us to group resources together. For example, if we've got a web application that consists of a front end load balancer, and a couple of load balanced web servers and backend databases. All of those items together could be grouped into a single resource group to facilitate management. And we can even build resource group templates or ARM templates that allow us to deploy and manage these resources together.
So here in the Azure portal, we can see that on the left we've got a Resource groups view.
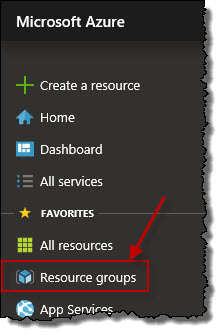
When I click it, any resource groups that I've already defined will be shown. Currently I don't have any.

We can add a resource group at this point by clicking the Add button.

Now aside from doing that, if I were, for example, to deploy a new virtual machine. So let's say I click on Virtual machines on the left.

Then click the Add button in the Virtual machines view.

You'll also notice that as you deploy resources here in Azure, you also get the chance to select an existing resource group, but you can also create a new one here while you're deploying this resource.
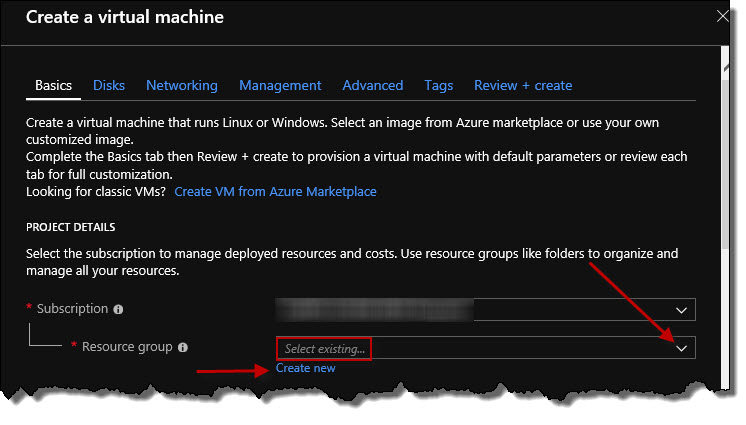
So what I'm going to do then is close out of this Create a virtual machine window and I'm going to go back to the Resource groups view over on the left and I'm going to click Add.
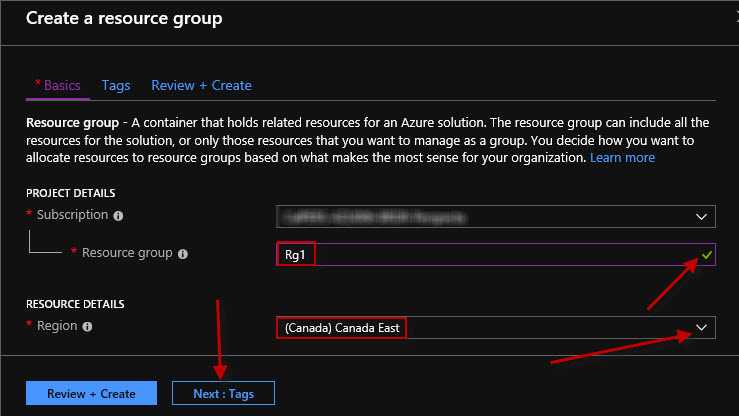
First thing I have to do is tie it to a subscription. So I've only got one subscription that's listed here, my pay as you go subscription.
I need the name of a resource group. So I'm going to call my first resource group Rg1. Now if this were a resource group that would be used to manage the Azure resources to support a web application, I would have a more meaningful name. Perhaps the name of the web application followed by Rg. It's important in Azure that you have a standard when it comes to naming conventions for items. So in this case, I'm just going to stick with Rg1 for Resource Group 1.
Then I have to determine into which region I want to create this resource. Currently it's set to Central US. If I open the drop-down list, I can choose whichever one makes the most sense. Because I'm on the East Coast of Canada, I'm going to choose Canada East.
And then I'm going to click Next : Tags.
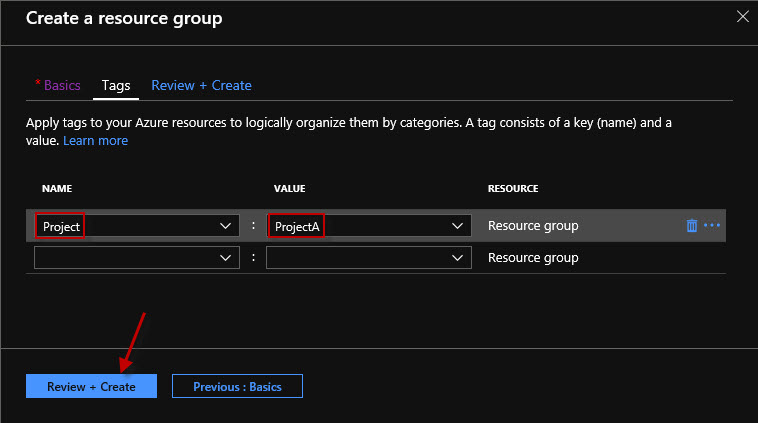
Here we can build a tag or we can add multiple tags, which is really just metadata. You can do this for more than just resource groups in Azure. You might, for example, do it for storage accounts or virtual machines so you could tag it and assign it to a specific department or a billing cost center or something like that. So for here I'm going to create a new tag called Project. And let's say that this is going to be for a project that we are currently working on called ProjectA. So that's what I'm going to tag this resource group with. You don't have to tag.
Now the next thing I'll do is click the Review + Create button down at the bottom.
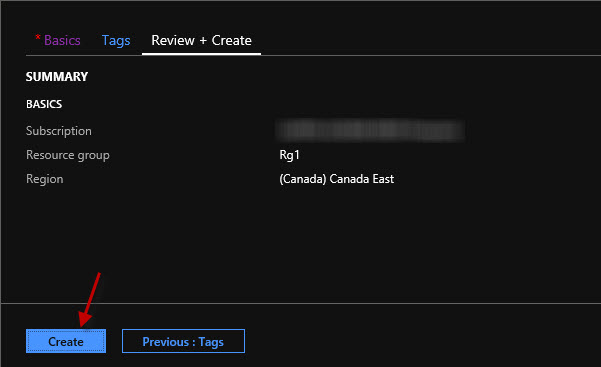
And here we have a little summary of what we are configuring, which is a resource group, which will be deployed in the Canada East region. And then I'll go ahead and click Create.
After a moment if we refresh the Resource groups view, we'll see clearly that we've got our resource group, Rg1, listed here. So I could click on it to select it to open up its properties blade. And we kind of have a navigator here on the left related to the property categories for the resource group called Rg1.
And as we scroll down, we can see we've got tags and we can see that we've got a Project tag with the value of ProjectA. However, I'm going to go ahead and close that property sheet for that resource group.
And if I were once again to click on Virtual machines on the left and then click the Add button in the Virtual machines view. Notice that when we go to deploy our virtual machine we now have our Rg1 resource group available from the drop-down list. Again, we could create a new one, but we have a couple of ways that we can work with it here in the Azure Portal.
Azure Portal
The Microsoft Azure Portal is a GUI tool, a graphical user interface type of tool, that comes in the form of a web application. This facilitates managing Azure resources. So it's a GUI management tool that also supports role based access control, or RBAC, self-provisioning. What this means is that we could give other administrators limited access to manage specific resources in Azure instead of everything.
The Azure portal has a lot of functionality. And part of this includes creating and managing Azure resources. So you can very quickly, using the portal, deploy a new Linux or Windows virtual machine, or a storage account to store files in the cloud, or even quickly deploy in Azure SQL database. You don't have to know any commands to type in, it's all done visually.
We can also work with Azure resource manager, or ARM, templates. ARM templates use the JSON file syntax and they allow us to create and manage Azure resources of any type. We can use an ARM template to create resources like storage accounts in virtual machines. We can also use the portal to edit templates. We can also import existing templates into the portal and maybe modify them. And we can also even download ARM templates because whenever you deploy your resource in the Azure portal, it's watching what you're doing and tracking in the background what that comprises of in terms of JSON commands. And so you can then download an ARM template based on what you've deployed in the GUI.
In the Azure portal, we can also tag resources. Tagging means you're adding extra metadata, such as assigning a virtual machine and a storage account to a specific project, or maybe to a specific department within a large organization. The benefit of tagging is that you can then search based on the tag. So for instance, show me all deployed Azure resources related to project A, or I would like to see all deployed Azure resources for billing purposes related to the Human Resources department.
We can also search for resources within the Azure portal. So instead of rummaging around through potentially dozens, hundreds, even thousands of deployed resources in a larger subscription, we could simply search for what we're looking for, such as a specific virtual machine that we want to manage.
There's also this notion of the Azure Cloud Shell. When we talk about the Azure Cloud Shell, we're talking about either issuing commands using a Linux-style bash shell or using PowerShell cmdlets. Now why would we want to do this? Well, we're talking about command line management of Azure resources. So instead of having to download, and install, and configure, and authenticate to some command line tool like the Azure CLI or Azure PowerShell, which you can do, and we'll talk about later, instead you can simply launch the Azure Cloud Shell within the portal, and you're already authenticated.
So the PowerShell also supports a number of built-in languages. If you want to work with Node.js, or Java, or Python, it's available. It also support Azure file share storage. So if you need to store something in a file persistently between Azure Cloud Shell sessions, well, you can do it. So Azure Cloud Shell is yet another benefit of working through the Azure portal.
Navigate the Azure Portal
The Azure portal is a web-based GUI management tool for Azure resources. I've popped in the URL of https://portal.azure.com. The website wants me to pick an account to login with.
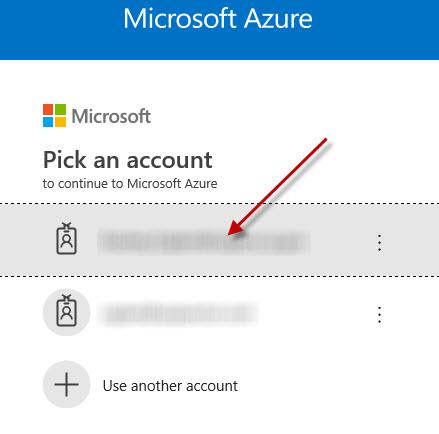
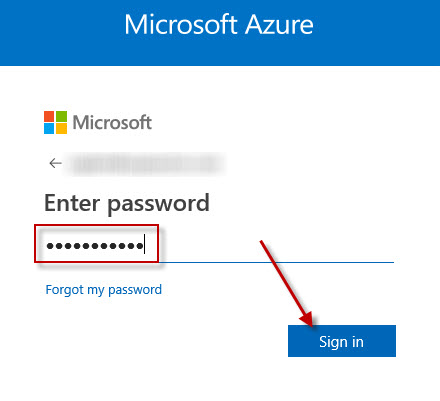
I'm going to go ahead and choose my Azure account. Next, I need to enter my password. Choose Sign in.
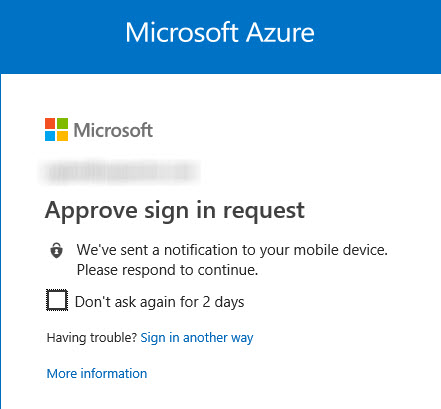
You may also have to respond to a request to approve your sign in.
And after a moment, I will be brought to the main home screen in the Azure portal, where we can see that we've got a quick way to quickly jump into things like virtual machines.
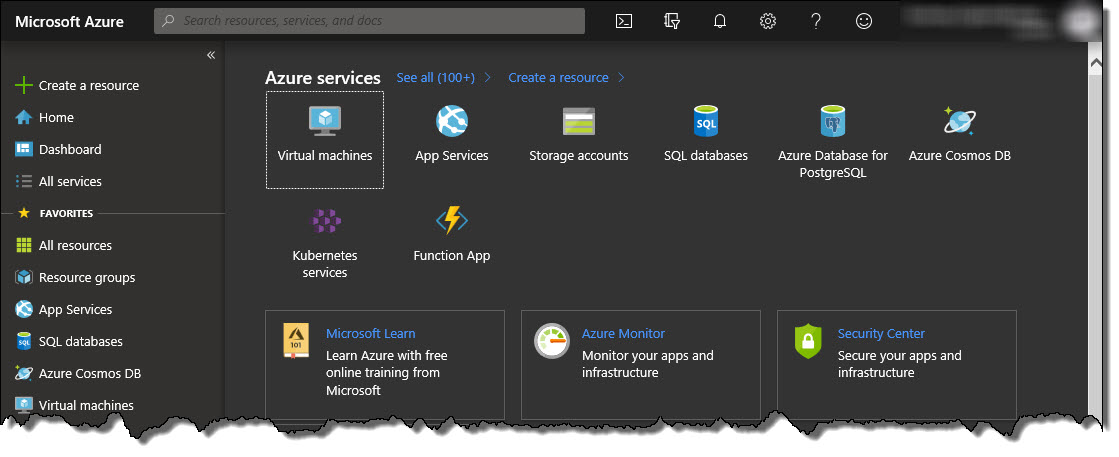
If I click on Virtual machines, that will take me into the Virtual machines viewer.

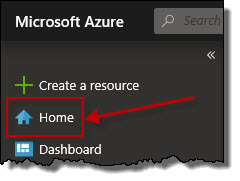
When I click on Home, I am returned back to the Home page.
When I click on view Storage accounts, the storage account page is opened.

Of course, we've got a left-hand navigator that we can use to navigate to many areas of Azure.

It is possible to navigate between different active directories. Click on Azure Active Directory.
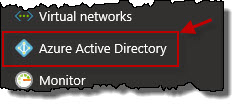
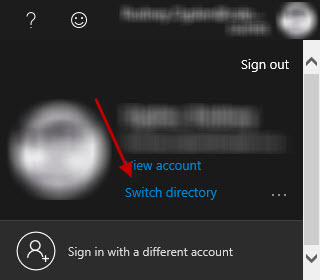
This brings you to a page that has the details about the current active directory. Azure Active Directory serves as a storage location for additional users and groups. To be taken to another active directory, click on your name in the upper right corner and click on Switch Directory. You might do this for different business units, one might be for testing and development, while the other is for production. It switches me to it in the portal.
We also have couple of buttons across the top that we should be aware of. The first here looks like a command prompt icon, and when I hover it, it says Cloud Shell. Cloud Shell allows me to run either CLI commands or PowerShell commands right here through the Azure portal, without having to download and install the Azure CLI or Azure PowerShell files.

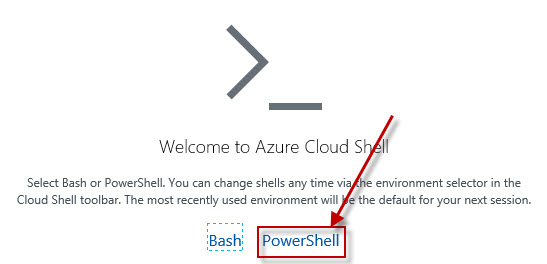
You may be prompted to select either Bash or PowerShell.
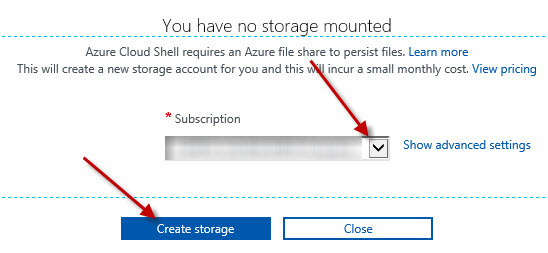
You may also be asked to define how you want your storage persisted. Select the Subscription to tie your persisted storage to and click on Create storage.
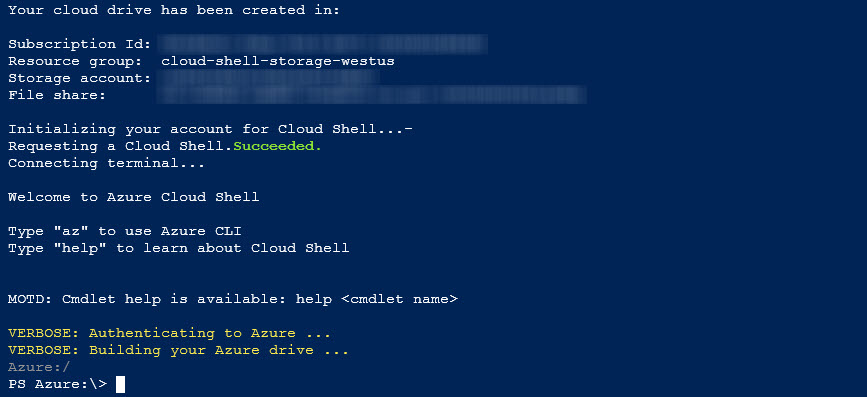
This opens a PowerShell command window.
To close the PowerShell window, click on the X in the upper right corner.
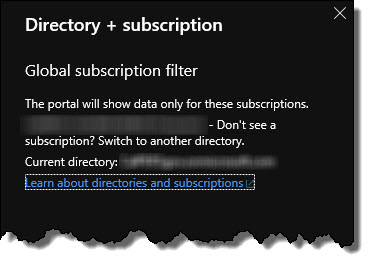
Now the other thing to bear in mind here is that we can also filter based on our subscriptions and our directories.

So we can see that we've got a couple of Azure Active Directory instances. So we can determine how that appears here in the Azure portal.
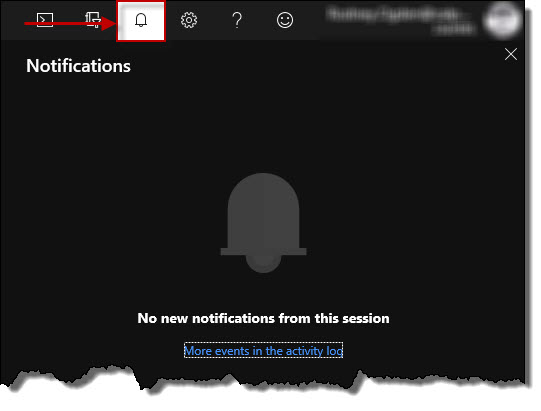
The alarm bell is for any notifications in this session, such as the creation or the deletion of an Azure resource.
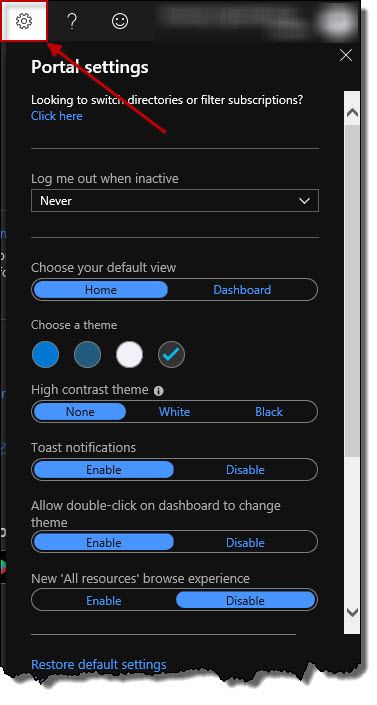
We've also got some graphical configuration settings for the portal, and some timeout items, such as logging out when there's a period of time for inactivity.
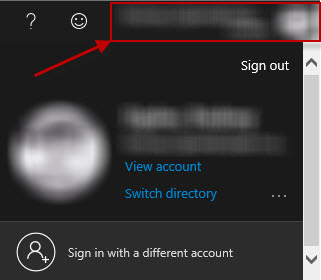
And of course, we can click on our account name over here and sign out, or as we know, switch to a different Azure Active Directory instance.
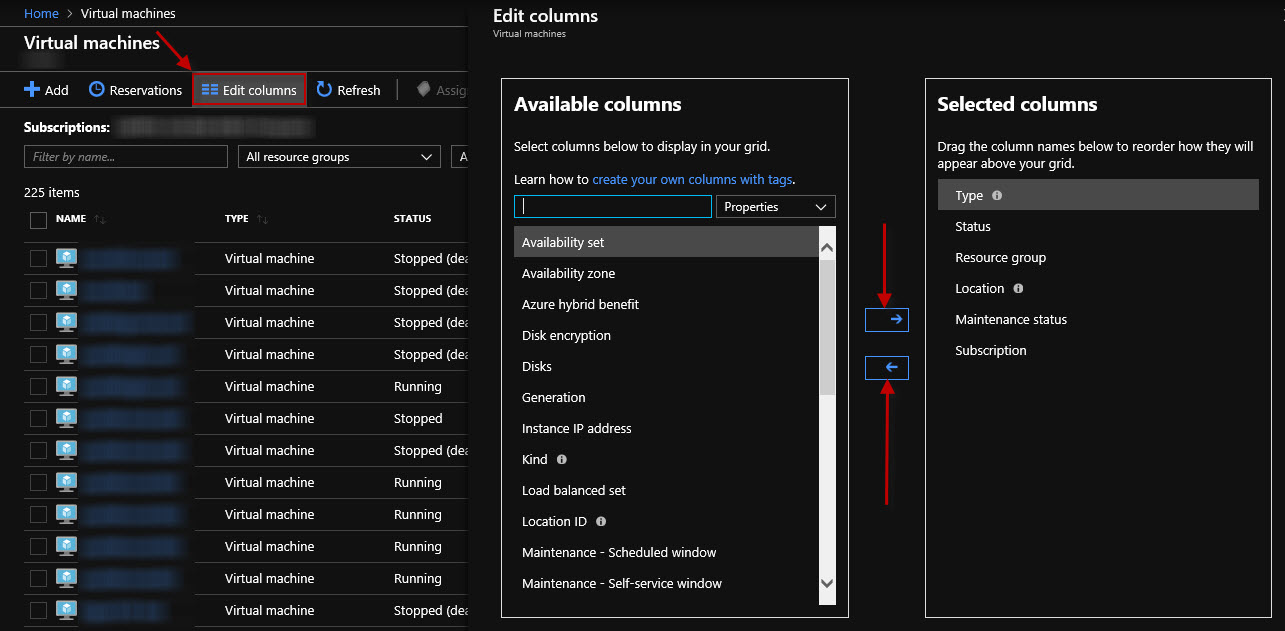
Now when you're looking at a view, so for example, let's say that we go to the Virtual machines view, bear in mind that you can also edit the columns here at the top. And when you do that, you can determine what you want to see. The selected volumes are listed on the right, what's available to you is listed on the left. And if I'm interested in Tags, let's say, because I've tagged my resources, I can select that column and move it over to the Selected columns area on the right.
So it's important to spend a bit of time, then, to get used to the Azure portal, because if you're going to be working in the GUI, this is going to be your home as it relates to Azure resource management.
Azure CLI
The Microsoft Azure CLI is a command line interface tool. It lets you manage Microsoft Azure resources from a command line environment.
Now you could also launch this through the Azure Cloud Shell. In other words, when you're authenticated to the Azure portal, the GUI, you can launch Azure Cloud Shell and gain access to the CLI. Or you could download and install it on one of your machines on-premises. And the machine on-premises can be running Windows, it can be running Linux or it can be running the MacOS. And within any of these operating systems you can then issue Azure CLI commands if you know the syntax.
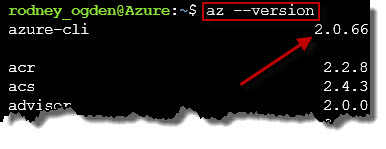
Now the syntax, once it's installed, begins with az followed by a
hierarchy or a subset of commands. So, for example, one of the first things
you should know is how to retrieve the version of the Azure CLI. Because if
you are
looking at an example on the Internet on how to do something in the CLI and
you've got a CLI installation that's a year or two old, what you see on the
Internet might be newer and it might not be available in your installed
version. So we can run az --version, so we know what version of
the CLI we're running.
We can learn about the syntax with az --help, where we might
notice that there's a vm command. So then we can get further
help on that, because it is a hierarchy, by typing in az vm
--help. Then we're going to get a help screen showing us what we can
do with Azure virtual machines through the CLI.
Now an important command, of course, is az login. This allows you
to authenticate to your Azure account so you can actually start managing
your subscription and the resources within it. When you issue the
az login command you're going to see a screen that looks like
this, where there's a note about having launched a web browser where you'll
have to sign into your Azure account if you're not already signed in.
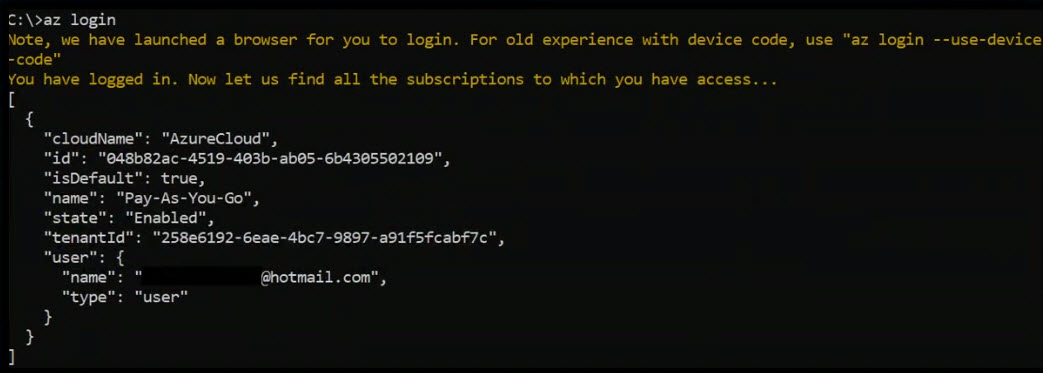
Then after you sign in, you'll see the clear text listed down below here
beginning with cloudName. It returns information about your
specific Azure account.
Now at this point, you will be authenticated and you can actually start to do
things like deploy virtual machines either manually or through an ARM template,
or work with storage accounts or databases, websites, work with user accounts,
and groups and permissions in Azure. Basically, the sky is the limit but
you'll be able to find out about the syntax by using az --help.
Install and Configure the Azure CLI
The Azure CLI, or command line interface, allows us to manage Azure resources at the command line level. Now, we can run this using Azure Cloud Shell which is accessible through the Azure Portal.
But in this example, we're going to talk about how you can download and then run the Azure CLI on any station of your choosing on-premises. So here in my web browser, I've gone to the documentation related to Installing the Azure CLI.
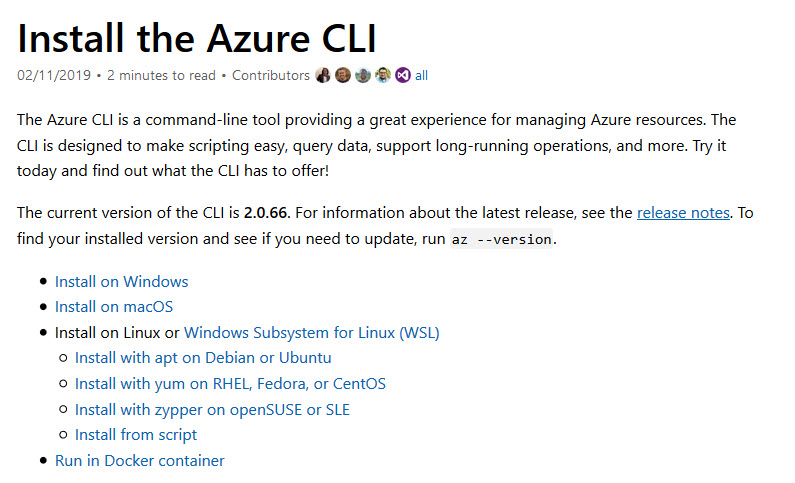
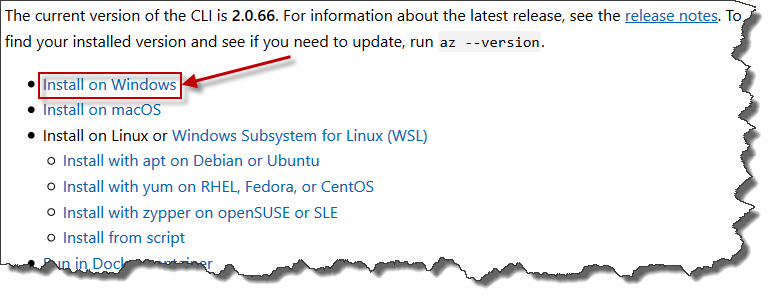
And we can see here there are instructions detailing how this is done for the Windows platform, the macOS, and Linux variants. We're going to be doing this in Windows. So I'm going to choose Install on Windows.
And I'm going to choose Download the MSI installer. And after a moment, we can see that the Azure CLI is in the midst of downloading.
Once the CLI is downloaded we can go ahead and run the installation. I'm going to go ahead and accept the terms in the license agreement and I'm going to choose Install. And after a moment we'll click Finish to complete the installation.
Once installed, I open a command prompt where I can begin by typing
az.
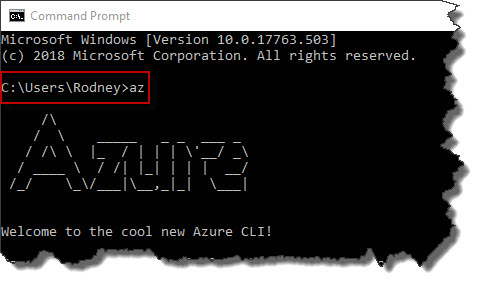
What's happening here is we're testing that the Azure CLI has been installed.
This is the prefix that starts all of the other hierarchical commands that
follow az.
So looks like we have some output, which is good, it's recognized. If I type
az --version, then we'll get some versioning information related
to Azure CLI components. And it's always important to make sure that we know
exactly which version of the CLI that we are using, which we see here is
2.0.66.
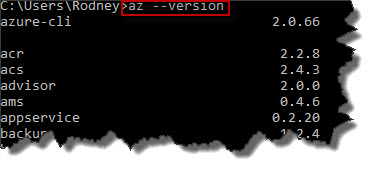
Now the reason that's important is to make sure that if we're looking at documentation on how to do something from the CLI that it will work in our version of it.
If I were to type az --help, then from here I would see some
next level commands that would be available after az.

This includes commands like vm, or storage, or
sql. That means when I type az vm --help
to get the next level commands after az vm.
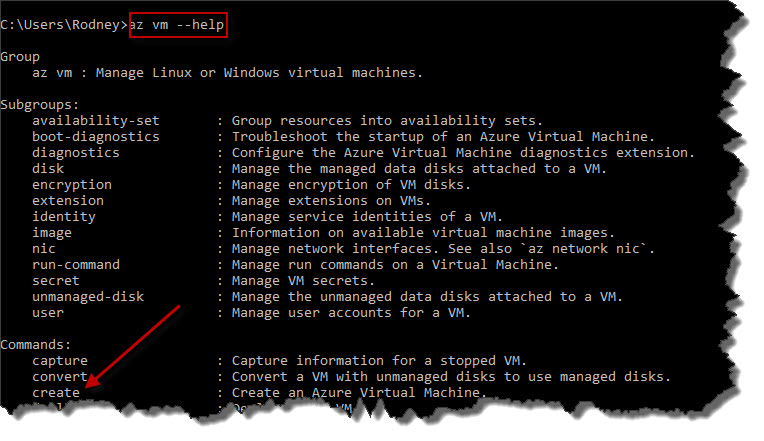
we see here create. And we can even take that a step further
with the command az vm create --help to even learn more about
how to use this command line syntax.

Now, we have examples of how to do it. So to create a Debian virtual machine, for example, so a Linux variant.
It's also important that we know how to authenticate to our account in Azure
so that we can manage resources. And we can do that with az login
command.

That's going to open up a web browser page like we see here where we can sign in to our Azure account if we're not already signed in. So I'm going to go ahead and click next to continue signing in. And then I'll go ahead and specify the password and I'll click Sign in. It then says that we have logged into Microsoft Azure, so it will redirect me to some CLI documentation, and I can go back to the command prompt and continue working. So here it is, it's redirected us automatically.
Let's flip back to the command prompt for a second. Back here we can see a note about how it launched a browser for us to login. And after successfully authenticating we can see that we are connected to our Azure Cloud subscription.
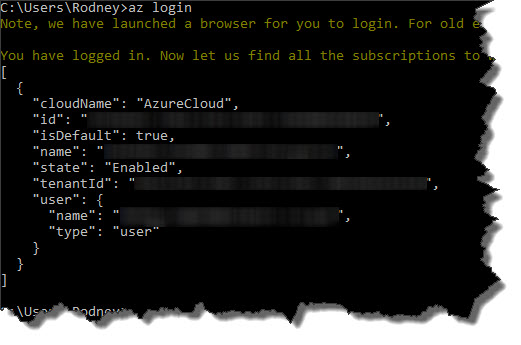
And so now that we are connected to our Azure account, we could issue
commands like az vm list to list out virtual machine information
for what we've got in our current cloud subscription.
Azure Cloud Shell CLI
In this demonstration, I'll use the Azure Cloud Shell CLI to deploy a Linux virtual machine.
I've already signed into the Azure portal. So up in the bar at the top, I'm going to click the command prompt icon that will let me launch the Cloud Shell.

Once the Cloud Shell loads, I need to ensure that I'm using either Bash or PowerShell. In this case, I'm using a Bash environment which is very familiar for Unix and Linux people. And I'm going to stick with this.

If I were to type az --version, I can see the version of the
Azure CLI that is available here. And I can kind of scroll up and get the
overall version at the very top, 2.0.66 is what it says here.
So now what I want to do is clear the screen with the clear
command.

Then I am going to deploy an Azure virtual machine. To do that, I'll use the
az vm create command. I'm going to use -n, and the
name of this virtual machine will be eastlinuxvm2. And I'm going
to assign it to a resource group with -g called rg1.
I'm going to use --image, and I'm going to base this on
Centos Linux. I'm going to generate some SSH keys, so
--generate-ssh-keys, where the public one will be stored inside
of the newly created virtual machine. And the private part of the key pair
will be stored here in the Bash shell environment. Or, if you're actually
doing this from a Linux station on-premises with the CLI installed, the
private key will be stored on that machine. And I'm going to create a user
here using --admin-username called azureuser. Here
is the command:
az vm create -n eastlinuxvm2 -g rg1 --image Centos --generate-ssh-keys --admin-username azureuser
Press Enter to begin the creation here of this virtual machine using the Azure Cloud Shell.
So now that our virtual machine is deployed, we can see the public IP address that it was assigned by default.

So at this point, what I'm going to do within the Cloud Shell is use the
ssh command to SSH into our newly deployed virtual machine. So to
do that, I'll type ssh. The account we created was
azureuser, and I'm going to use an @ symbol and specify the
public IP address of the virtual machine as we see it listed up above. Here
is the command:
ssh [email protected]
When I press Enter, it asks if I want to trust the unique digital fingerprint because it's the first time we've connected.

I'll go ahead and type in yes and press Enter. And after a moment,
we're in. We know by looking at the command prompt that we have successfully
SSHed into that remote host in the cloud.

And from here, it's business as usual. Which means we can issue any standard
commands that we would issue normally in Linux once connected to the host,
such as ifconfig, where we can see the internal IP address, the
private IP assigned for the subnet into which that Linux host was deployed.
Azure PowerShell
Microsoft PowerShell has been around for quite a while. We're up to version 6 these days. Azure PowerShell focuses on how to use PowerShell commands or cmdlets to manage the Azure environment.
PowerShell is a command line interface tool. But it's not just for developers. Administrators use it to manage the file system on a Windows client or manage the DHCP service on a Windows Server. Even third-party vendors are into PowerShell such as, managing VMware virtual machines through PowerShell or managing Amazon Web Services through PowerShell. But here, the focus is on managing the Azure environment through PowerShell. And doing stuff in the command line provides many benefits including automation and repeatability that otherwise might be somewhat cumbersome using the Azure portal or the Web GUI.
One way to get into Azure PowerShell is through Azure Cloud Shell. What this means is that we would first authenticate to Azure, using the Azure portal, the web GUI interface, from which we could then launch the Azure Cloud Shell where Azure PowerShell is available.
We can also download, install, and run Azure PowerShell on any of
our on-premises stations as well, whether we are running the Windows,
Linux, or MacOS operating systems. We have to bear in mind that if
we're installing Azure PowerShell on the Windows platform, one form of
the installer is an MSI file, a Microsoft installer file. Or we could
download a ZIP file. We can also do an installation directly from within
PowerShell itself. Such as Install-Module -Name Az, and you
notice that a lot of the Microsoft Azure modules have an Az prefix.
Depending on the distribution of Linux you're running, such as Ubuntu Linux,
you can install components using apt-get install followed by the
name of the package. And you'll need privileges to do this. A regular Linux
user won't be able to do this. So we could do this, for instance, to install
PowerShell on Linux in the first place, so we could get support to run Azure
PowerShell cmdlets.
Pictured here, we have some examples of how Azure PowerShell syntax works.
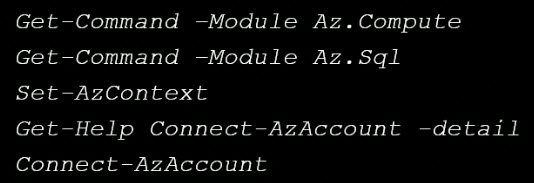
It really stems back to how regular PowerShell works where we have PowerShell commands, otherwise called cmdlets, that take the form of verb-noun. So, for example, Get is a verb, Command is a noun, separated by a dash, Get-Command. What this lets us do is retrieve a list of PowerShell cmdlets and specifically here, from specific modules where a module is really just a library or collection of PowerShell cmdlets.
So in the first command:
Get-Command -Module Az.Computewe're really saying, show me PowerShell cmdlets related to working with Azure Compute, which means virtual machines.
The second command:
Get-Command -Module Az.Sqlreally is saying, show me PowerShell cmdlets related to working with Azure SQL.
Then we've got another cmdlet:
Set-AzContextwhere the prefix or the verb is different. It's not Get, which is retrieve really, but rather Set, to make a change. And what we are doing here is setting the Azure Context. Why would you want to set AzContext? Well, you might be working in an environment where you have multiple Azure subscriptions and so you can set the Azure Context to a particular subscription before you start working with it using Azure PowerShell cmdlets.
You can also get help using the Get-Help cmdlet.
Get-Help Connect-AzAccount -detailSo if I know, for instance, there's a cmdlet called
Connect-AzAccount, and I don't know how to use it but I want to
figure it out, I could use Get-Help, give it the name of the
cmdlet, in this case Connect-AzAccount, and if I even want
detailed help, including syntax examples if available, I could use
-detail at the end.
The Connect-AzAccount is a very important cmdlet because it
allows you to authenticate to your Azure account. After which, of course,
you can use PowerShell cmdlets to work with your Azure resources.
Install and Configure Azure PowerShell
While you can run PowerShell cmdlets through the Azure portals, specifically in Azure Cloud Shell, you can also install the Azure PowerShell module, which contains all the cmdlet definitions on-premises. And that's what I'm going to do here. I've already started PowerShell as an administrator as we see here listed in the upper left of the window.

So to get the PowerShell module installed, I'm going to type,
install-module -name az. And then I'll press Enter.

I get a message about needing a new version of a provider to talk to a repository on the Internet. So I'm going to go ahead and press Enter which is the default of Yes, we allow this to happen.
Then I get a message about trusting installing something from a repository out on the Internet. I am going to type in yes because this time if I just press Enter, the default here it says is No. So I do trust it.

So what we're doing is reaching out to a repository to install this PowerShell module. The good thing about doing it from PowerShell is that it's the same method as long as you've got PowerShell running on Windows, or the MacOS, or even Linux.
Now we have a red message that says some commands are already available on the machine, and it gives me some name of the cmdlets.

And that will happen if you've got different versions of modules installed. So
all you have to do to avoid this and to use the latest installed version is to
use the -AllowClobber parameter. No problem, let's clear the
screen with the cls command. Let's bring up our command initially
that we used to install the module. And we'll simply add to the end of it
-allowclobber, that's one word, and we'll press Enter.

And again, we going to type in yes to trust the repository and let it be on its way.

And now notice this time no errors, we are good to go. And now if I run
get-module and use wildcards looking for PowerShell modules,
which are essentially libraries of cmdlets, if I look for them that begin
with az, and I use -list to show me what's been
installed, the command is:
get-module *az.* -listWe can see we've got all kinds of these great Azure PowerShell modules available, such as
Az.Compute.
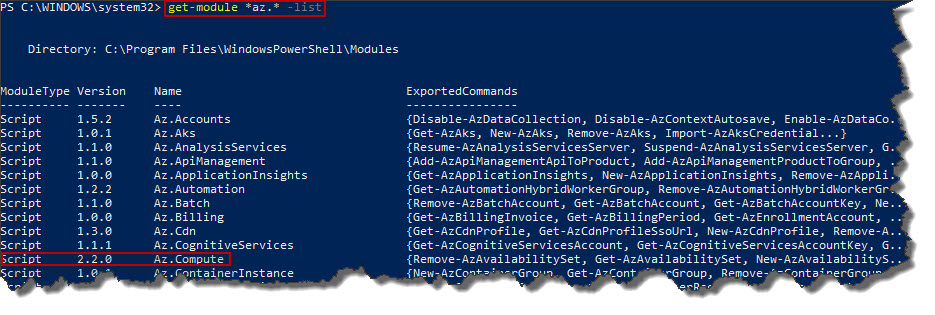
And we can even see some of the cmdlets listed here for working with virtual
machines, Az.Cdn for Content Delivery Network,
Az.Accounts for working with account information, and so on.
So what I could do is run things like
get-command -module az.compute to show me the PowerShell cmdlets
related to compute.
get-command -module az.computeHere it wants me to trust this file to do that. So I'm going to choose that I always want to run, so
a.

And here we now see a list of the many PowerShell cmdlets available within
that module where we can remove things like data disks or we can save virtual
disks. And as we go further up through the list of commands because there's a
lot of them available here, we see one for example called
So if I clear the screen, I can also run get-help new-azvm. And
I can even ask for detail by putting in -detail.
get-help new-azvm -detailNow, it says do you want to make sure you run
Update-Help so that
you have the most up-to-date information? Sure, I have some time. I'll go
ahead and type in the letter y for yes and press Enter.

After a moment the update is complete. So if I scroll back up here we'll see
examples of how we can actually use this cmdlet to work with new virtual
machines that are being created through PowerShell. So we have the synopsis
Creates a virtual machine, and we can see the many parameters available
potentially to be used with the New-AzVM cmdlet. And as we scroll
further down because we asked for detail with -detail, we can see
a detailed listing of each and every parameter. And furthermore, down at the
bottom we'll start seeing examples of how to use this cmdlet to create a
virtual machine.

The last thing we'll do here is talk about how to authenticate to our Azure
account here in PowerShell so we can actually do things like manage Azure
resources. To do that I'm going to run connect-azaccount.
connect-azaccount
That's going to pop up this Sign in screen for Azure, so I'll go ahead and put in my credentials. And then I'll go ahead and click Sign in. And after a moment, indeed we can see that we are connected to our Azure account.
Azure PowerShell Syntax
Azure Powershell cmdlets are a great way to manage your Azure resources at the command line. One way to do it is to install and download the Azure Powershell modules on your on-premises station. But another way that we're going to look at is through the Azure portal, where we can launch the Azure Cloud Shell.
So, I've already signed into the portal and I've got an icon at the top that's for the Cloud Shell, it kind of looks like a command prompt icon. So, I'm going to go ahead and click on it. That's going to start my Azure Cloud Shell.

I want to make sure in the upper left I'm using PowerShell and not a Linux Bash type of environment. And right away, I'm ready to go, I'm authenticated.
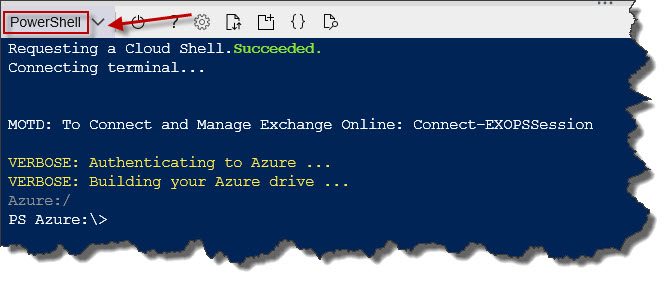
So I'm going to clear the screen with cls.
And I'm going to run
get-azvm. This is the cmdlet I know will list Azure virtual
machines. And we can see that we've got some of them here. They're deployed in
resource group called RG1. We can see their names, their locations, which is
the Azure region, and so on.

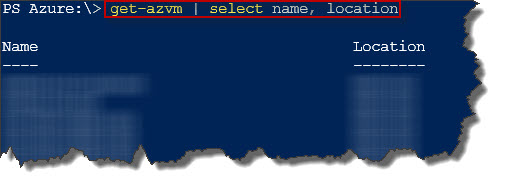
Now I can filter this list out a little bit. So for instance, I can run
get-azvm, and if I only want to see a few of these details, I
could use the the select alias. Now I say alias because
select is an alias that technically points to
select-object, but it's less to type. So I'll go with
select, and I'm going to select the name and location
properties, and I'll press Enter.
get-azvm | select name, location
And notice that we've filtered out the other properties that might not be of interest to us at the time.
Now I'm going to run get-command because I'm wondering is there
anyway to stop a virtual machine from PowerShell. So I'm going to put wildcard
or asterisks around the word stop.
get-command *stop*

And while we have a lot of cmdlets with the word stop, one that
jumps out here is Stop-AzVM. Sounds like what we want. So I'm
going to clear the screen (cls) and get help on it with syntax
examples.
get-help stop-azvm -example
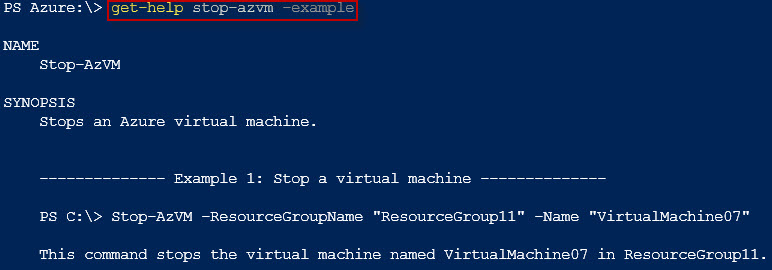
Well, indeed as we thought, it does stop a virtual machine. Says so right
here, and it's a pretty simple syntax. We give it the resource group, the
virtual machine was deployed into, and of course, the name of the virtual
machine, and we're ready to go. So I'm going to go ahead and execute a
stop-azvm command.
stop-azvm -resourcegroupname rg1 -name eastlinuxvm1The command will stop the server named eastlinuxvm1 in region group rg1.

So, it says this cmdlet will stop the virtual machine. You sure you want to continue? The default is yes, if I just press Enter. So, I'll just press Enter. And after a moment it will begin the process of shutting down the virtual machine. So I'm just going to go ahead and minimize the PowerShell window and back on the Virtual machine window, refresh my list of virtual machines here in the portal. And after a moment, we'll see that the virtual machine will be stopped. And sure enough, we can see that it's actually deallocating. So, after a moment, the state of the virtual machine will be stopped.
So we can use PowerShell cmdlets here in the Azure Cloud Shell which might be a little easier to work with than having to download it and install it on an on-premises station. But it really depends how you want to use it.
.ico)