Azure Fundamentals
 Azure Fundamentals: Storage Components
Azure Disk Storage
In the Microsoft Azure environment, virtual machine hard disks can be defined. And they come in the form of hard disk drives or HDDs. Or for better performance, you can have it backed by solid state drives or SSDs.
What we're really talking about is Azure using a virtual hard disk or a .VHD hard disk file that is used by a virtual machine. A virtual machine can have more than a single disk. It can have numerous data disks attached to it. So this is considered a managed disk solution. What that really means is that we can simply make a selection in the interface, or programmatically about what type of disk storage we want to use with a virtual machine. And it's automatically taken care of by the Azure environment. We don't have to worry about the underlying technical detailed configuration.
So we can choose from standard hard disk drives, or HDDs, and solid state drives. Or we can choose between ultra and premium SSDs. We'll get a sense of this on this screenshot, which we see we're in the midst of creating a virtual machine in the Azure cloud.
And you can see here, we can specify the disk type, in this particular case, for the operating system. But you can also do it for data disks. We have options such as Premium SSD, Standard SSD, and Standard HDD. Now, Premium gives us better disk performance or a higher disk IOPS value, where IOPS stands for Input and Output Operations Per Second. In this case, more is better.
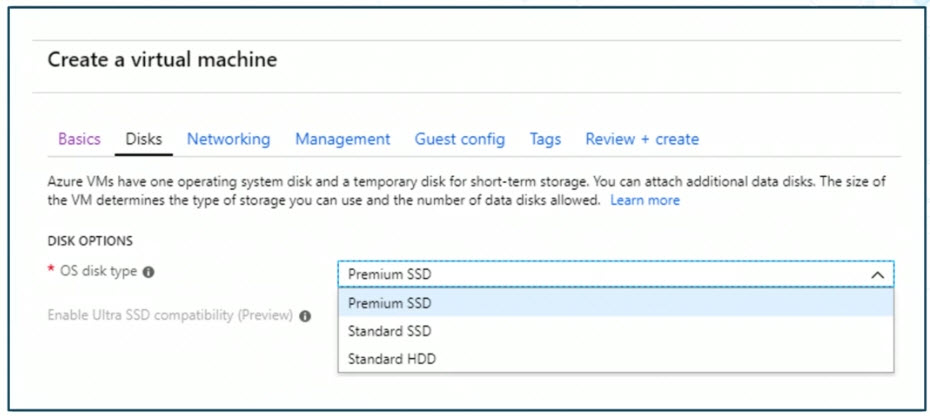
What's lacking in the drop down list here is the Ultra SSD option that we discussed previously. And the reason it's not there is because this is currently a preview feature in Azure. And you have to enroll in that preview in order for that option to be available.
Configure Azure Disk Storage
Microsoft Azure virtual machines use virtual hard disks. Each virtual machine is going to have at least one virtual hard disk, and it's going to be to host the operating system files. But we have the option, depending on the workload requirements running within that VM, to add additional data disks.
And so here in the Azure portal I'm going to go ahead and manually create a managed disk, and then I'm going to attach it to an Azure virtual machine. To get started here in the portal, I'm going to click Create a resource, towards the upper left, and I'm going to search for managed disk
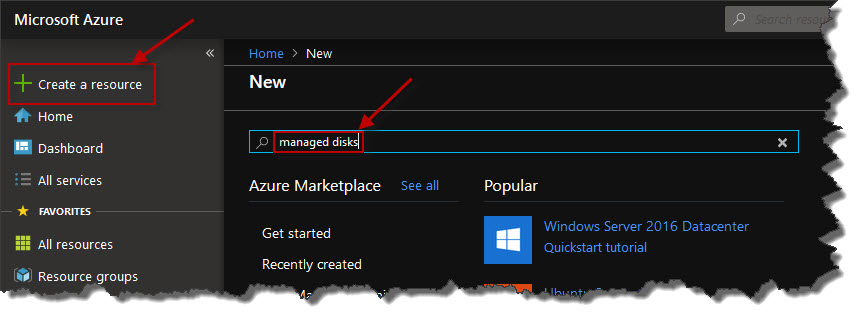
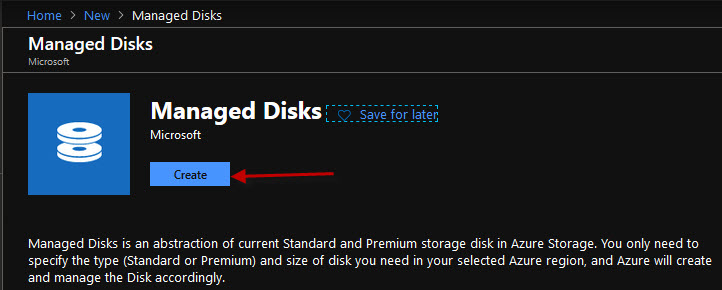
And sure enough, there is Managed disks, and then I'll click the Create button.
So the first thing you have to do is give it a meaningful name, I'm going to call this DataDisk1. I'm going to tie it to an existing resource group and I'm going to put it in a location or region closest to where the virtual machine is already deployed.
And as I go further down I then get to choose the account type, whether it's Premium, SSD, Standard SSD, or the older and slower Standard HDD for hard disk drive. Now, depending on your disk IO requirements, you might choose one or the other of these options. So for example, I'm just going to go middle of the road and choose Standard SSD.
Then I get to choose the source. So are we taking an existing snapshot and creating a disk from it? Or if I open that drop-down list, do we want to go to a storage one? We might have to have, for instance, uploaded VHD or a virtual hard disk file from on-premises to a storage account. Or I can just make an empty disk, which I'll choose here. I'll choose the none empty disk option.
I can then control the size of that virtual hard disk. I'm going to leave it at the default setting for this example, and then down at the bottom I'm going to click Create.
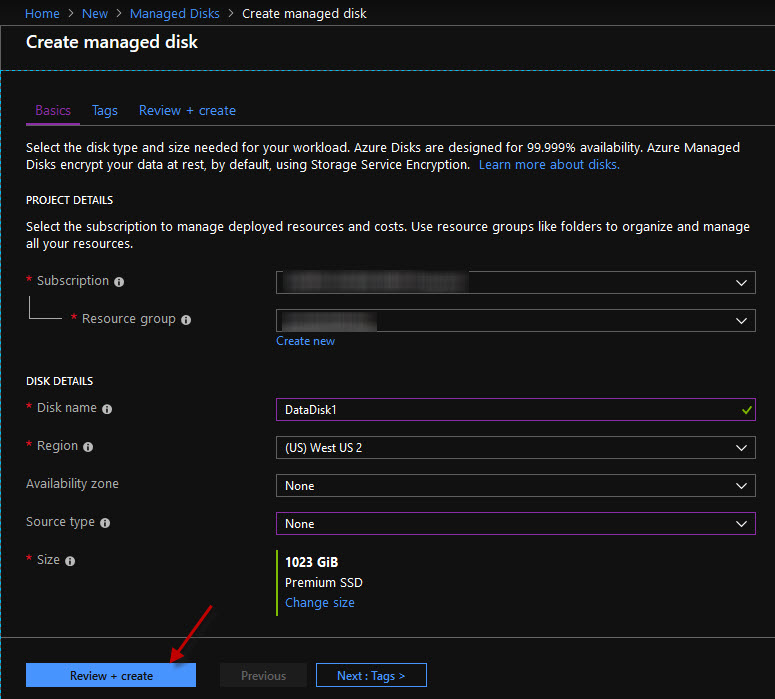
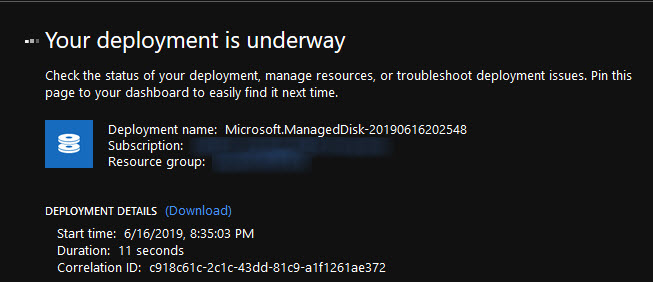
So after a moment, we'll have a managed disk in Azure disk that we can then work with by attaching to a virtual machine where it would be needed.
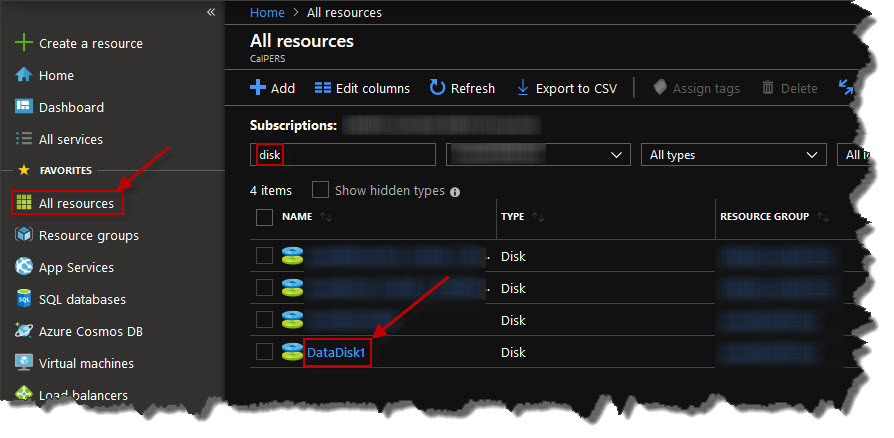
So if I were to go to All resources, from here I will see a number of items, including the disk I just created. So if I just filter it, let's say, for the word disk, after a moment, I might have to refresh, I'll see the DataDisk1 here that I've just created.
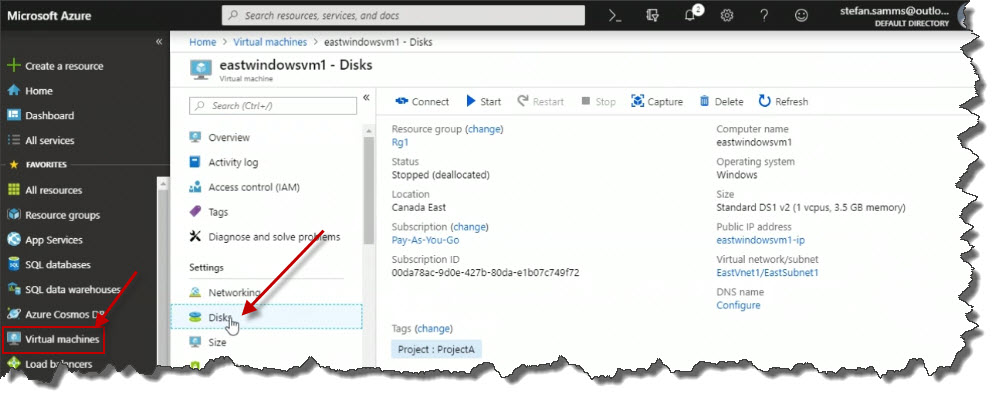
Now, if I were to go into a virtual machine's properties, so I'm going to click on the virtual machine's view over on the left. And let's say I pop up the Properties blade from one of my Windows virtual machines. So I'll click on that, and then I'll click on Disks in the Properties blade.
On the right we can see the existing OS disk, but notice that there are no data disks defined yet. But notice below that we've got a button that says Add data disk, so I'm going to go ahead and click on that.
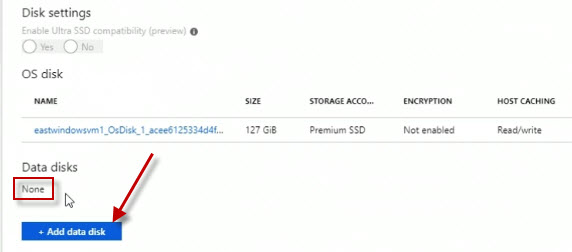
From the drop-down list I'm going to choose DataDisk1.
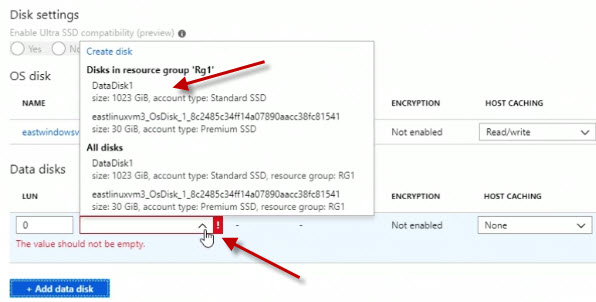
Now, once I've done that, I'm going to click Save to save the change.

So at this point I've added another virtual hard disk to an Azure virtual machine. And when I fire up that virtual machine, it will show up as another Disk device. So why don't we go ahead back to the Overview part of the Properties blade.
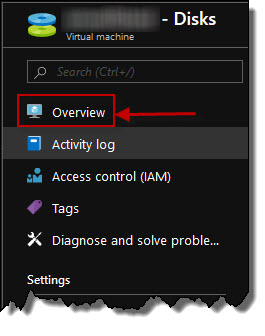
Start the virtual machine.

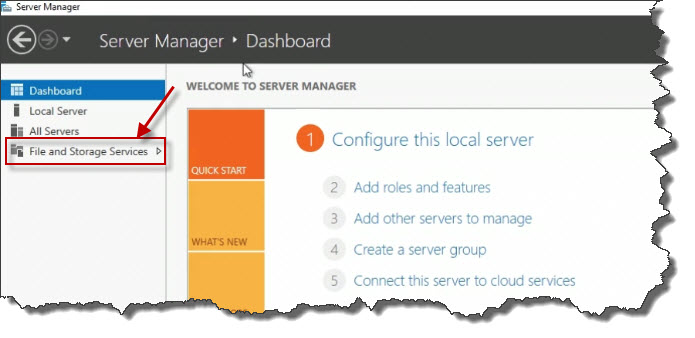
This is a Windows virtual machine, so I will RDP into it, and we'll take a look at that newly-added disk device. So I've RDP'd, or I've used the Remote Desktop Protocol client to connect to the public IP address of my Azure Windows virtual machine. And it automatically starts the server manager tools, so we can work from here by clicking File and Storage Services on the left.
Then click on Disks.
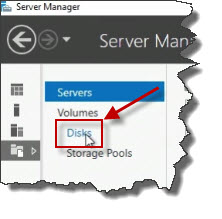
And what we're going to see is that we've got a disk here, now the partitioning is not known, because it's a brand new added disk. And it shows up here as Serial Attached SCSI or SAS. But notice the capacity here is about 1,000 gigabytes is what we're looking at, so that's pretty much the default size that was set in Azure. So at this point we would right click, depending on the operating system version, and whether it's Linux or Windows. You would use whichever method you would normally use to initialize a file system and make that a usable disk device.

Azure BLOB Storage
If you enjoy those old horror films from the 1950s, you might remember the movie The Blob. That's not the type of blob we're talking about here. We're talking about Binary Large OBjects, hence BLOBs, specifically how they relate to Azure storage accounts.
BLOB storage in the Azure cloud is really used as unstructured data storage. Where we don't always have the exact same type of file that is read from and written to in the exact way. Instead it's unstructured. So we can take snapshots of BLOB files, just like you could take a snapshot of a disk volume, and it serves as a point in time picture, so to speak, of the state of the data at that point in time.
There are also different storage tiers that you can choose from. So if you don't require frequent access to your BLOB objects, you might configure your Azure storage tier for your BLOB storage to use the cool storage tier. Whereas if you need frequent access to your BLOB files, instead you might then choose the hot storage tier, which is optimized for frequent access.
There are a variety of BLOB types, all of which are accessible over either HTTP or the more secure HTTPS. Whether you're using a GUI tool, like a web browser, whether you're using PowerShell commandlets, the Azure CLI, or even developer's access and BLOBs through the REST API, all of those methods use HTTP or HTTPS.
The Azure BLOB hierarchy starts with the storage account. So let's say we've got a storage account that we create called sa123, under which we can then create one or more containers. Think of these as being like folders on a disk that you use to organize all of your files. And so here, let's say we've got a BLOB container called pics for pictures, into which we upload a file called pic1.jpg, that is the actual BLOB.
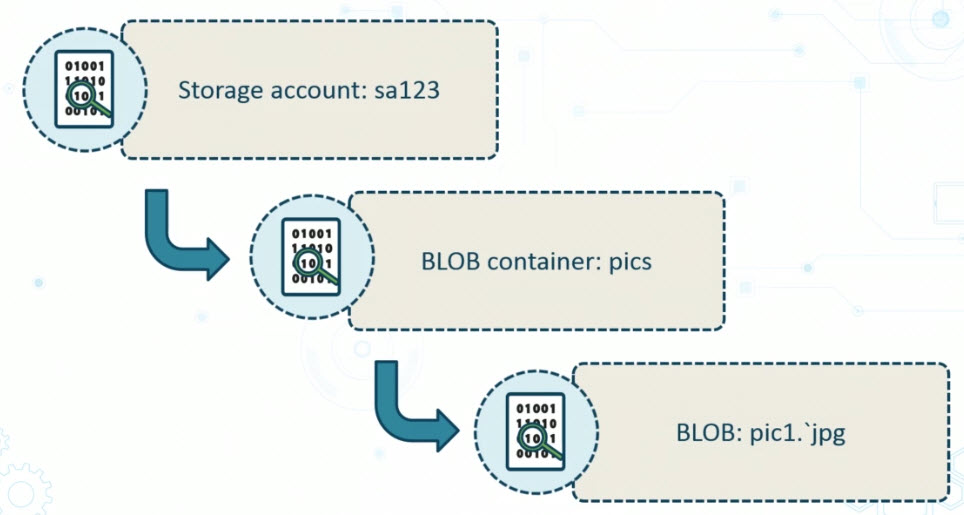
So when we put all this together and we access it over HTTP or HTTPS, the URL would look something like this:
https://sa123.blob.core.windows.net/pics/pic1.jpgAnd that can be a different name than, for example, what you started with on-premises before you uploaded it to your storage account, if that's how you're populating your storage account.
Block BLOBs are one type of BLOB. These are used for small and large files. And you can even upload multiple BLOBs at the exact same time. So this would be useful if you want to store things like pictures, office productivity documents, any type of media documents up in the cloud. And it's great that you can upload multiple files concurrently.
Another type of BLOB is a page BLOB. This one is generally used for large file cloud storage, and it's designed for files that will experience random reads and random writes. A great example of this would be virtual hard disk files, or VHDs. These are the virtual hard disks that are used by Azure virtual machines.
The last type of BLOB is an append BLOB. Now, this one is designed so that when we have new data, it gets added to the end of an existing BLOB. This means that any existing blocks of data that currently exist in the BLOB can't be updated or deleted. Why would you want this? Well, a great example of using this would be for logging purposes.
Create a Storage Account
In this demonstration, I'll be using the Azure portal to create a new Azure storage account.
As the name implies, an Azure storage account is a cloud storage location. But when you define a new storage account, there are a number of detailed settings to consider. Depending on things like the type of performance you want. Or the type of durability, or how many replicas of data you might need replicated throughout the Azure infrastructure.
In the Azure portal, I'm at the homepage where I could click Storage accounts.

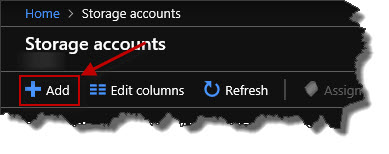
This takes me to the storage accounts view. I don't have any storage accounts listed right now, but I could add one by clicking the Add button.
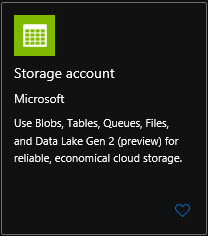
Alternatively, from the Home page, we could also click the Create a resource link over in the upper left. And from there, it opens up a new blade where we could search for what we want to create. So if I look for storage account, we could search for it that way.

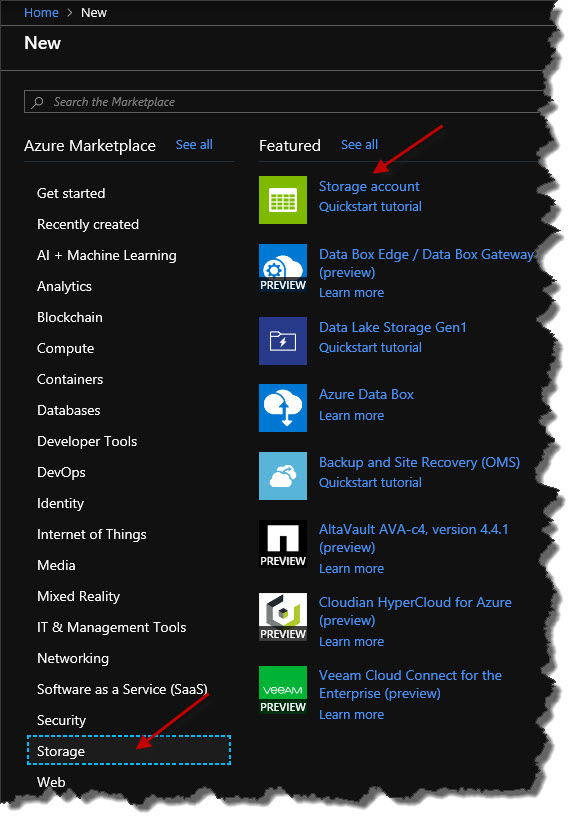
Alternatively, we can simply browse what's presented to us on the screen. So I could simply go down under the Storage category on the left and then on the right, within that, choose Storage account, which I will do.
The first thing we have to think about is the subscription to which this storage account will be tied. I only have one subscription so that's an easy choice.
Then I have to associate this with a resource group. I could either create a new one or choose from an existing one in the drop down list, which I will do. I'll choose Rg1.
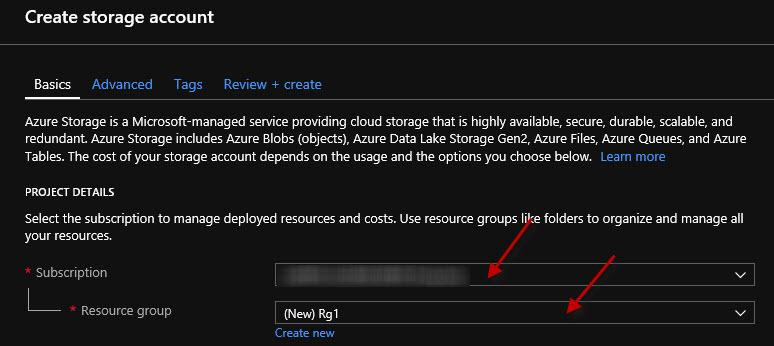
Further down below, I have to give a name to the storage account. Notice that uppercase letters will not be allowed. Lowercase are fine. But if I start using uppercase letters. It gives me a little red error message here about the fact that the name can only contain lowercase letters and numbers.
And notice if I back out of the capital letters here, that if I just put in a name that's already in use that isn't globally unique. It will tell me. So I'm going to go ahead and call this eaststorageaccount. Now if I append a number one (1), it'll determine whether or not that's a unique name. And in this case it is because we've got the green check mark. We don't have the red error text. And of course, we always need to make sure we adhere to organizational naming standards as it applies to the creation of Azure resources.
For the location, I'm going to specify (US) West US 2 that's my region.
The performance is either Standard or Premium. In other words, with Standard, do we want to use older hard disk technology like magnetic hard disks that spin. Or the newer solid-state storage which provides better performance? Of course, it also means an increased cost. Now, depending on what we're planning on doing with the stuff that we put in the storage account really determines the next couple of selections. So if we're not going to have frequent access to what we're going to store in the cloud, we might want to just stick with standard performance. But if we're going to have frequent access and we want it to be speedy, maybe we should look at using Premium.

I've also got to specify the Account kind, whether it's StorageV2 (general purpose v2). Or Storage (general purpose v1), or BlobStorage.
With general purpose StorageV2 (general purpose v2) type of storage, we have an access tier, Cool or Hot. Similar to Standard and Premium, for frequently access data and the speediest access we should be choosing the Hot access tier. If this is more of an archive type of usage scenario, we would look at using a Cool access tier.

If I were to switch this to Storage (general purpose v1), notice that we lose the option of selecting the storage tier.

And if I were to choose BlobStorage, Binary Large OBject, we then get a couple of additional options for replication. So the first option is locally redundant storage or LRS. This means that we've got some replication that will occur within the Azure environment but at a very small level. For example, across regions. Whereas Geo-redundant storage does provide replication across Azure regions geographically. And the benefit of doing this is that if there's some kind of a large-scale disaster or outage within an entire geographical region, your data's already been replicated elsewhere, and you can access it that way. Then we've got another variation called Read-ahead geo-redundant storage (RA-GRS). This is similar to replicating across Azure regions, the difference being that we would have read-access only to a replica.

So depending on what your storage requirements are will determine what you select here. It's important to realize that if we were to choose StorageV2 (general purpose v2), we can change it later on if we want to for example, BlobStorage. If we're going to be working with storage, let's say of virtual machine hard disks. So we can always change our mind later. So generally speaking, the general purpose v2 account kind is what you'll see used more often than not in Azure.
Click Next.

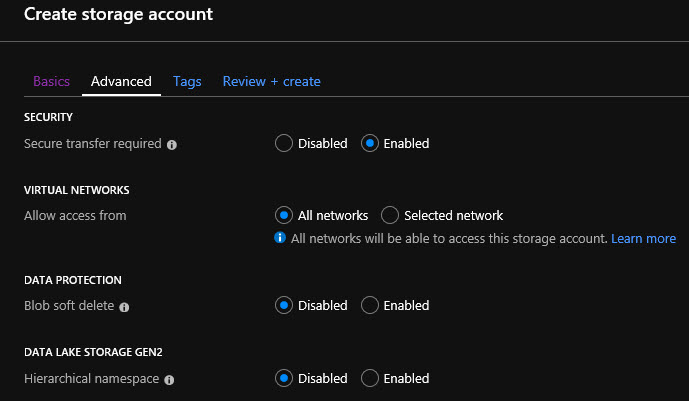
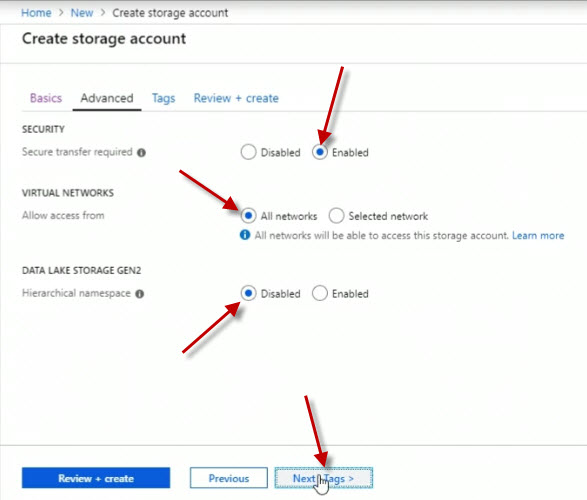
On the Advanced blade, we have a couple of options such as whether we want to enable secure transfer. This would mean only allowing connections over HTTPS or newer versions of SMB, the Server Message Block protocol as opposed to older, less secure standards. So I'm going to leave that on Enabled.
Then we can determine where we want to allow access from in terms of virtual networks. And currently, it says All networks. If I were to click Selected network, then from the drop-down list, I could choose an existing Azure virtual network that I previously have defined. However, I'm going to leave it on All networks for now.
We're going to talk about DATA LAKE STORAGE GEN2 later on, so I'm going to leave that disabled as a default setting.
Click Next.
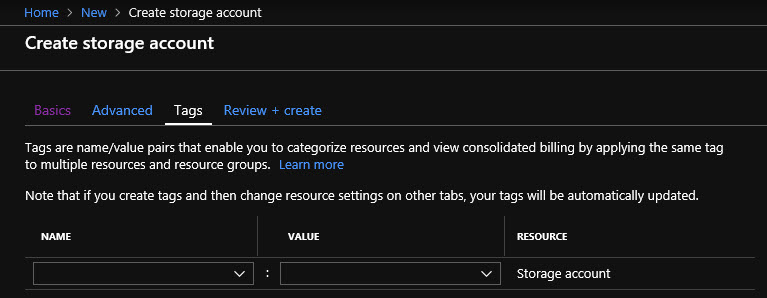
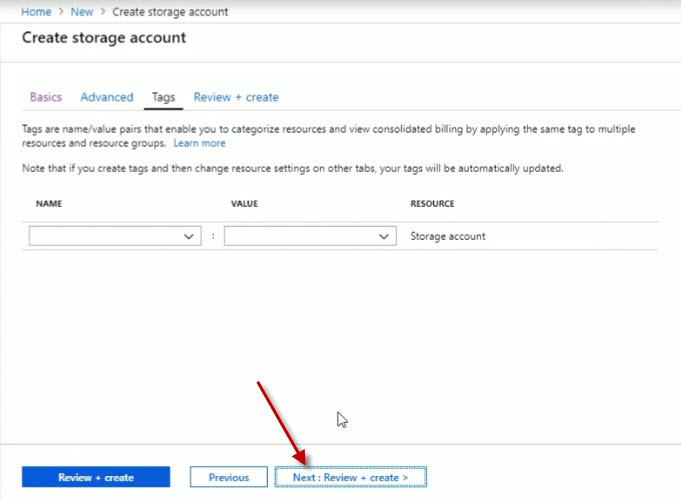
So we then get to decide whether we want to assign a tag to this storage account. And remember, tagging is just metadata, it's extra information that you might use here. So you can search, or sort, or assign costs to a department or a project.
Click Next.
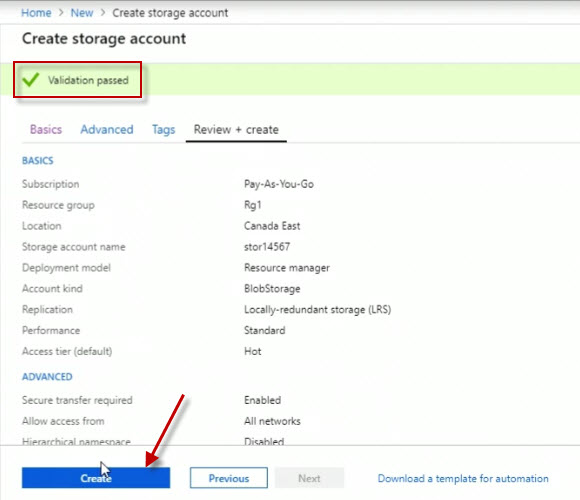
Now notice it says the validation has passed based on my selection. We have a little summary here of what's going to be created.
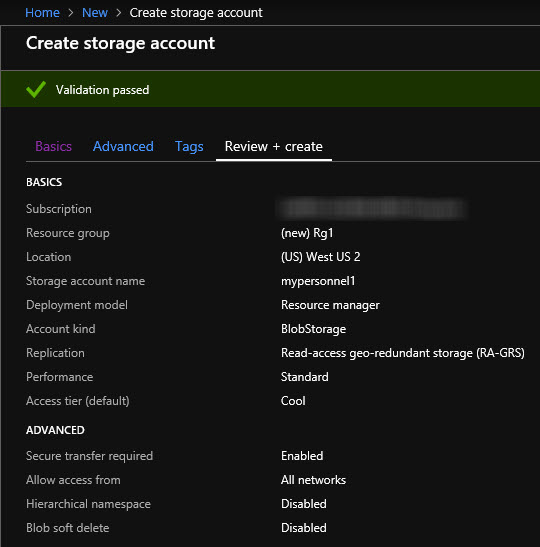
I'm okay with this. I'm going to click on the Create button to create the storage account.
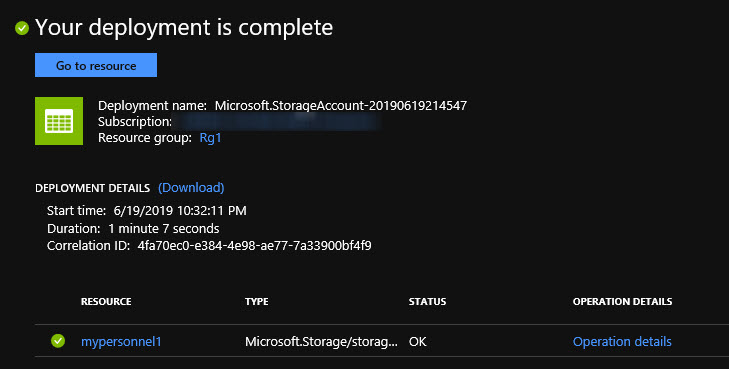
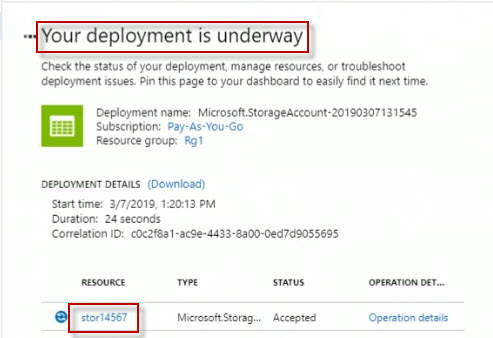
And it's taking us into an overview screen for the deployment of our new storage account. We can see some information related to it down below.
But at the same time, I can simply go over to All resources on the left. And after I refresh it, we'll see that we do have our new storage account listed. And like always, we can see the resource group, it was deployed into the region or location. And in this case, if you've added the Tags column, you'll see that here too. The Tags column is not normally here by default unless you go to Edit columns,
So we have a number of properties available then after we've configured an Azure storage account. But there you have it, that's how you can initially create the storage account here in the Azure portal.
Azure Blob Storage GUI Management
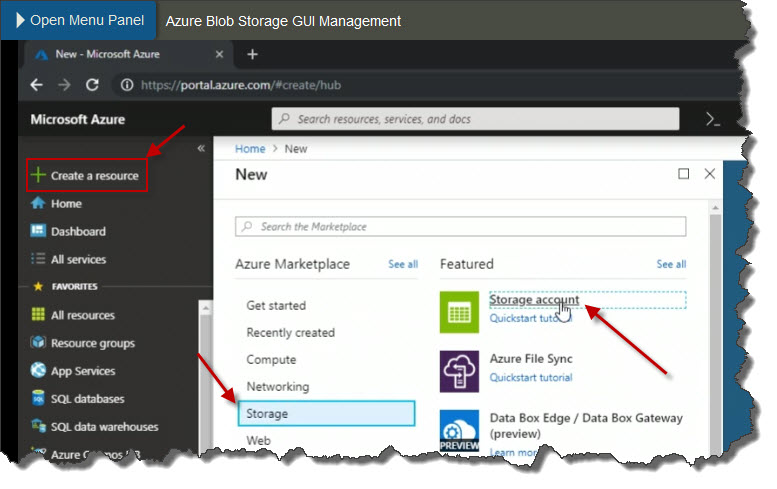
In this demonstration I'm going to use the Azure portal to create a new Azure storage account, and then we'll configure to be used for BLOB storage. To get started here in the portal, I'm going to click Create a resource over on the left. I want to create a storage account, so one way for me to do that, is to go under the Storage category here and then on the right to choose Storage accounts.
Now I have to tie it to a resource group. So I've already got one called Rg1, and down below I have to give it a name. The name must use lower-case letters and numbers and must be between 3 and 24 characters long. Now notice if I start typing in things like capital letters, it says here that
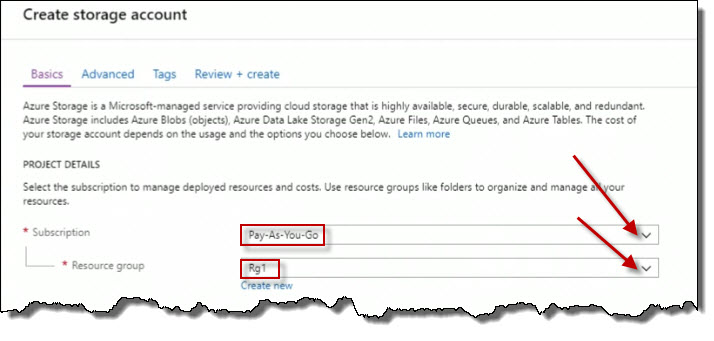
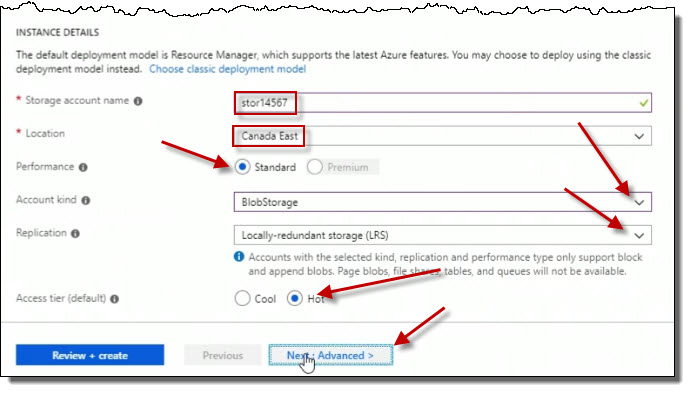
For Location, choose a storage location that reflects where it might be used geographically.
For Performance, I can choose between Standard and Premium types of storage. Since we are setting up a BLOB storage account, Standard must be used. Premium does not support BLOB storage.
The Account level drop-down, select BlobStorage.
Set the Replications to Locally-redundant storage (LRS). Locally-redundant storage as meaning that your data is replicated only within an Azure data center. If you've got a problem with an Azure data center, you could lose all your data if you don't have it stored elsewhere. Geo-redundant storage will replicate your data across multiple Azure regions. In the case of an Azure data center problem, even an Azure regional disaster, your data's still been replicated elsewhere. Then you've also got read-ahead geo-redundant storage, RA-GRS. This means is that you've got a primary replica that's writable, and then the replica itself from that is only allowable through read access.
For Access tier (default), set it to Hot. This is under the assumption that I'm going to be accessing the BLOBs that I will populate the storage account with on a frequent basis.
Click on Next : Advanced >
For Security, Secure transfer required to Enabled.
For VIRTUAL NETWORKS, set Allow access from to All networks.
And for DATA LAKE STORAGE GEN2, set Hierarchical namespace to Disabled.
click on Next : Tags >
For the Tags, no tags will be set up. Click on Next : Review + create >
At this time, Azure will run a validation check. Once completed, you should a message about the Validation passed. Click on Create to complete the process.
We can see clearly our deployment is underway, we have a link here to our new storage account down below.
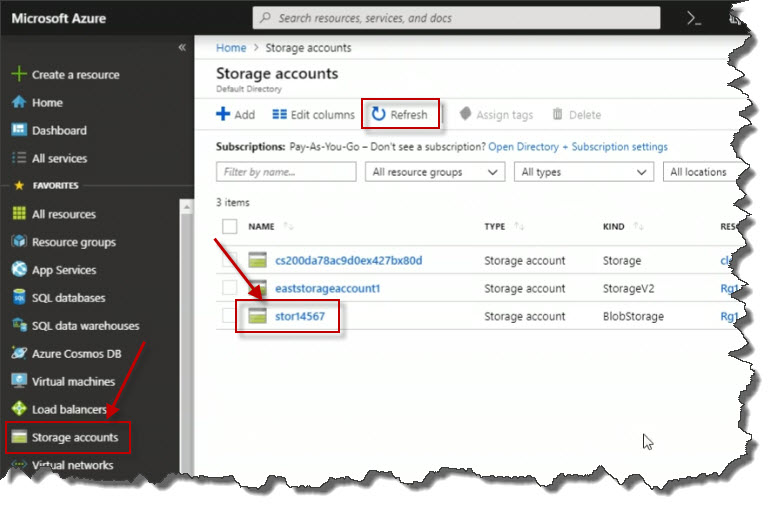
Notice on the left also, we've got a view just for Storage accounts. So if I click that, I'll see any storage accounts. And remember, if you don't see your new storage account here, you can always click Refresh until such time that it shows up and the deployment has completed. The one just created is showing up here, I'm going to click on the link for the name of my storage account to go and do its properties blade.
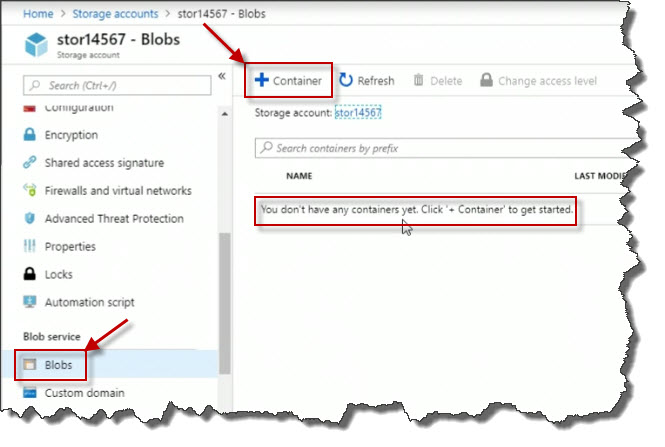
There are a number of things that I can do here, for example, if I scroll all the way down, I can click on Blobs and it says, we don't have any containers yet. Containers are kind of like folders used to organize Blobs. So what I'm going to do then is click Container.
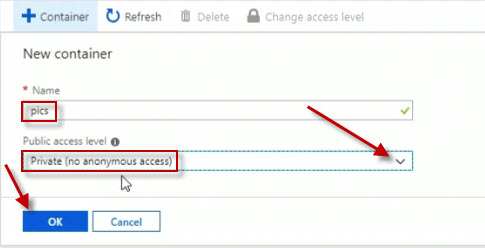
Create a container named pics for pictures.
For the Public Access level, select Private (no anonymous access)
Click on OK.
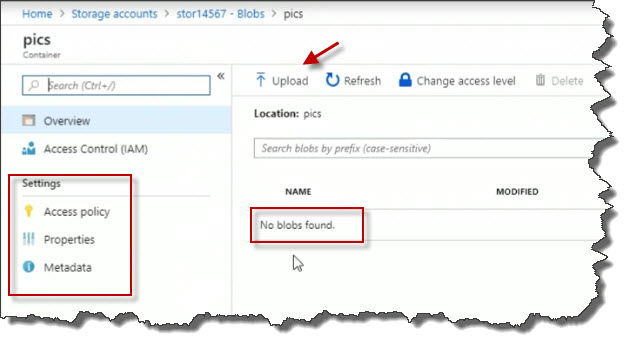
After a moment there's the pics container. So I'll click it to open it up.

That gives me a new properties blade related to the container. From here I can upload Blobs. So I'm going to go ahead and upload Blobs by clicking on Upload.
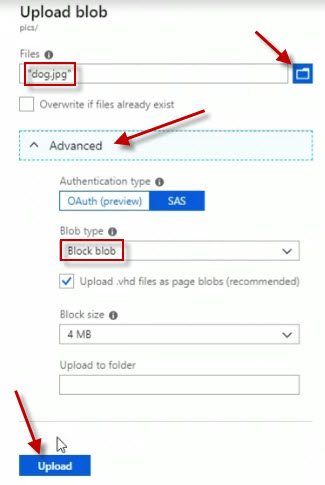
On the far right, I'll click the Select a file button. After you've selected one or more local files, open up Advanced to specify details about the upload.
For Blob type, select Block blob.
Click the Upload button.
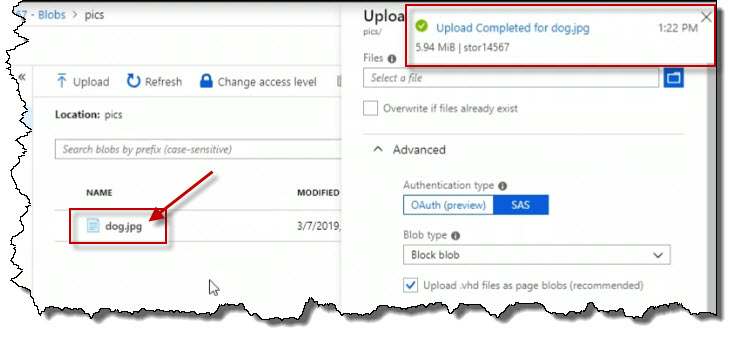
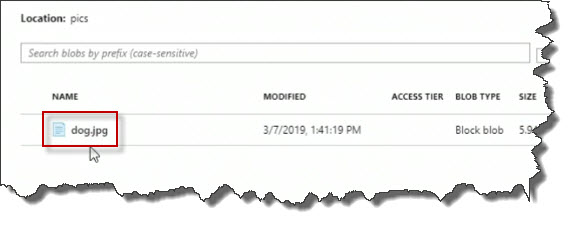
And after a moment we can see it's uploaded this jpg. It's showing up right here in the list. Click on the file in the container.
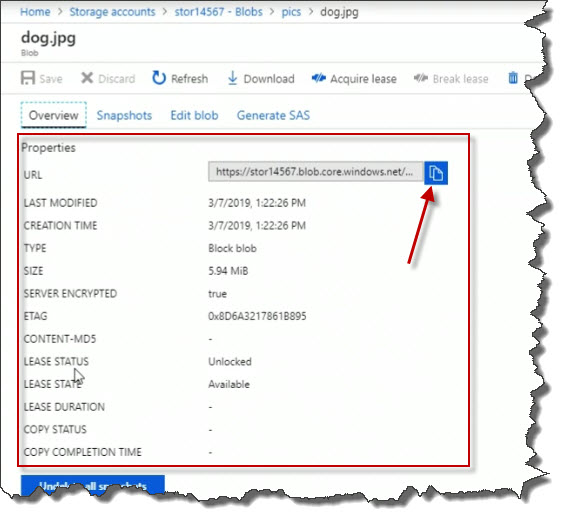
Here the file's details or properties. Notice that, by default, server-side encryption is enabled for protection of data at rest. Click the URL copy icon to copy the URL.
Open a web browser and paste the URL into the address line. Click Enter to navigate to the address. I get this kind of an error message, resource not found. That's because we didn't allow anonymous access.

Go back to Azure and navigate back to the file in the container list. Cick on the Overview link. Click the Change access level button at the top.
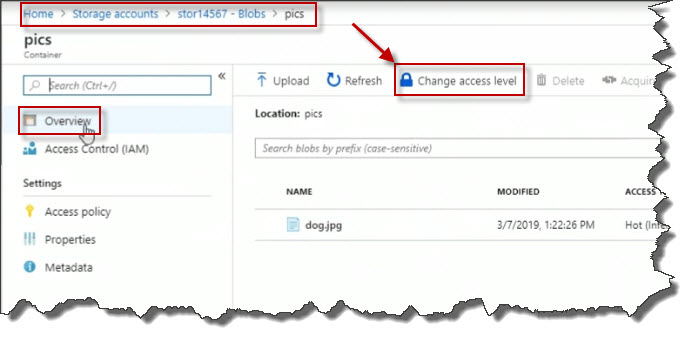
Change Public access level to Blob (anonymous read access for blobs only) And click on OK.
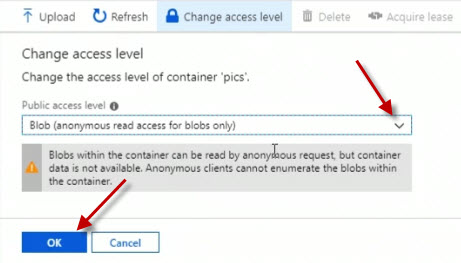
Go back into our browser here where previously it failed, and let's refresh it. And sure enough, now we have access to the picture of the dog.
We can see how we can build a storage account and configure a variety of Blob Storage options, and then how we can start to work with content in the Blob Storage account.
Azure Blob Storage CLI Management
You can use the Azure CLI to manage Azure storage accounts and the contents
within them. To get started here, I'm going to build a new storage account
in Azure. I've already run az login, and I've already
authenticated to my Azure account. So the next thing I want to do here is
I'm going to run the following command:
az storage account create -n stor1988 -g rg1 -l canadaeast --sku "Standard_LRS"where the arguments are defined as:
| Argument | Description |
|---|---|
-n |
the name of the storage account |
-g |
the resource group that is already defined in Azure |
-l |
the location or Azure region |
--sku |
the type of replication desired |
Press Enter. And it's going to create my storage account, and it's going to be called stor1988. Azure returns a lot of information about what it's just done. But what we're looking for here is the provisioningState being set to Succeeded.
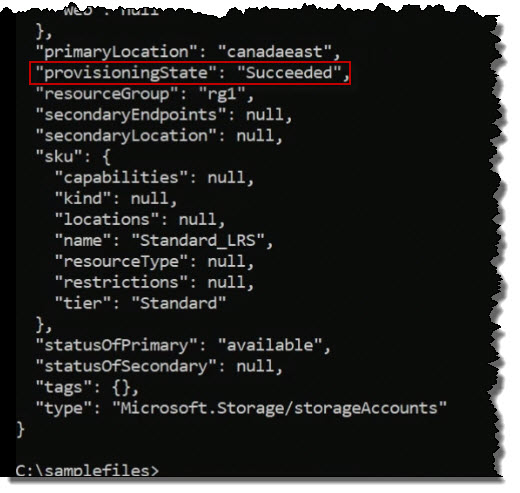
Next we are going to clear the screen.
cls
Next, I am going to issue a command to list all of the storage accounts.
az storage account listAnd again I am going to get a long list of information for every storage account defined on the system.
If I want to limit the information to just the names of all of the storage accounts, I would use the pipe symbol (|). In this case, it would be:
az storage account list | find "name"The information returned would look like this:
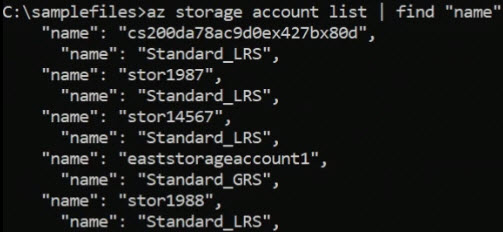
When you want to work with a storage account, let's say programmatically as a developer. Or like we are here in a command line environment, you need an access key. Here in the portal, if I go to the Storage accounts view, I can see our storage account is there.
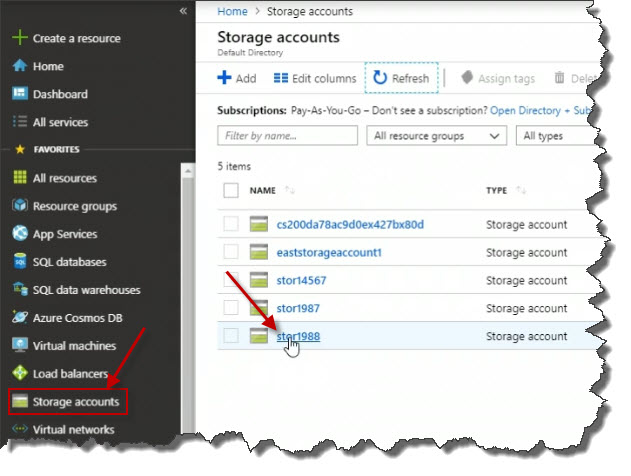
If I click on it, there's access keys shown here in the Properties blade.
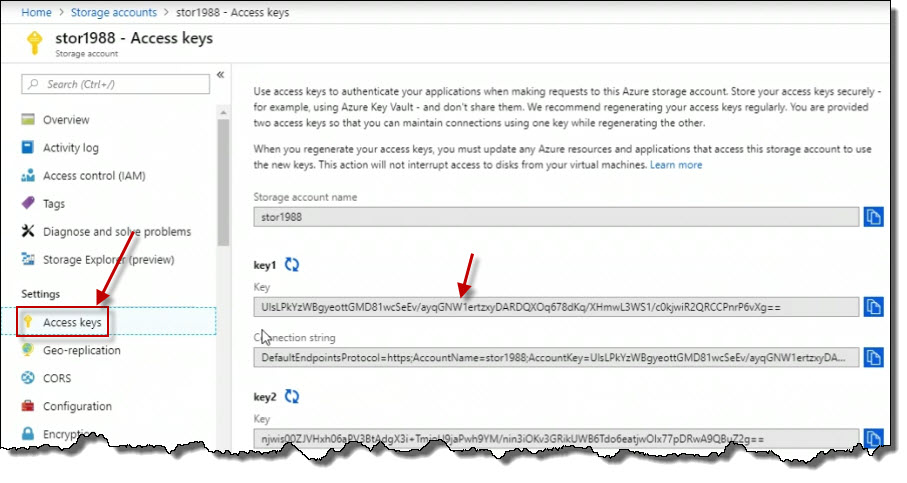
And we've got a couple of access keys, key1 and key2, and you can regenerate them independently of one another. So that one could still be used by code that might reference a specific connection string or a key. While the other one, you are changing, because from a security standpoint, i t's pretty smart to change keys periodically to enhance security.
I can copy the keys here.
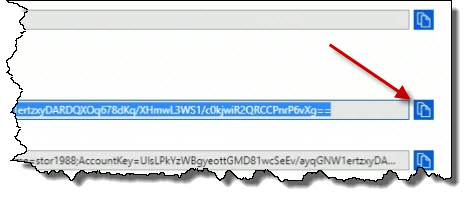
I'm going to copy the first key. It doesn't matter which one you use when you are using command line tools or programmatic access.
To list the keys from the CLI, use the following command:
az storage account keys list --account-name [name] --resource-group [rgname] --output tableI will be able to easily digest Key1 and Key2.

So we can see it and we could highlight it and copy. Why do we have to copy it? Well because I want to create a container in my storage account and then upload an on-premises file into that container. But you can't do that until you start working with the access key, one of them, either one, it doesn't matter.
What I want to do is I want to create a container.
az storage container create --name [containername] --account-name [name] --account-key [key]Here is a sample:

In the sample, it returns "created": true. That's good news.
Here in the current directory on drive C called samplefiles, if
I do a dir, I've got a file called dog.jpg.
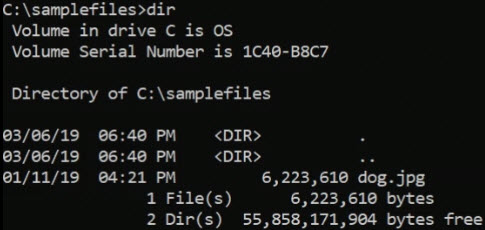
Let's upload that file. So do that, I'm going to run the following command:
az storage blob upload --container-name [containername]
  --name [tgtfilename] --file [srcfilename]
  --account-name [name] --account-key [key]
The
--name represents the name of the target file name. There's
no spaces in my folder or filename so I don't need to put anything in quotes.
Assuming the syntax is correct, when I press Enter, it will upload that
file. Here is a sample:

And we're just going to flip over in a moment to the Azure Portal to check that out. Okay, it looks like it's finished. Let's go to the portal. When we were last here in the portal, we were looking at our storage account properties blade and we had gone to the access keys. Well, let's drill down a bit further down, shall we? Let's go down into Blobs, and there's the pics container.
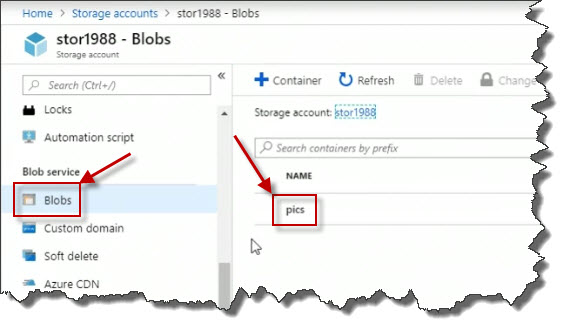
There's the dog.jpg file.
Azure Blob Storage PowerShell Management
We can manage Azure Storage accounts using Windows PowerShell cmdlets, either in the Azure Cloud Shell, which is accessible in the portal, or on-premises where I've already downloaded and installed Azure PowerShell.
I've already connected to my Azure account through the following command:
connect-azaccount
Build Storage Account
To build a storage account, I'm going to run the follwing command:
new-azstorageaccount -resourcegroupname rg1 -name stor1989 -location canadaeast -skuname "standard_lrs"where the arguments are defined as:
| Argument | Description |
|---|---|
-name |
the name of the storage account |
-resourcegroupname |
the resource group that is already defined in Azure |
-location |
the location or Azure region |
-skuname |
the type of replication desired |
What happened is our storage account was created.

When you are scripting with PowerShell, with the CLI, you can get very fancy with this and use parameter values that you might ask the user for when running a script.
To verify our work, use the following command:
get-azstorageaccountHere is the output:

We have verified the new storage account is present.
It is possible to take advantage of some of PowerShell capabilities. Let's
create a variable that equates to the execution of
get-azstorageaccount command. The following command sets the
variable to the command.
$ctx=get-azstorageaccount -r rg1 -name stor1989The variable
ctx is now set to the command.
To execute the command, use:
$ctxThis produces the following output:

To display endpoint or connection information, execute the following command:
$ctx.contextThe following output is produced:
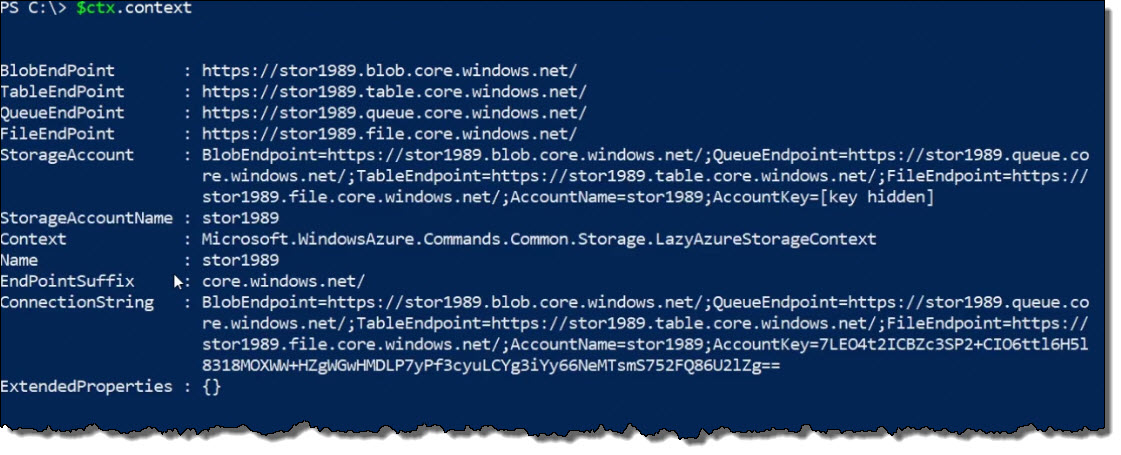
Next, let's create a container in the storage account. Since we have a variable, use the following command:
new-azstoragecontainer -name "pics" -context $ctx.contextThe output from the command is as follows:

We now have our pics folder.
Let's get some content up there. Let me change directory to
C:\samplefiles. When I list the directory, I see the following:
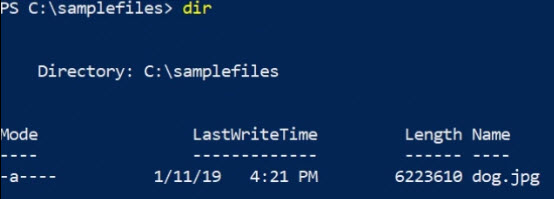
I'm going to go ahead and upload dog.jpg to the pics container. The command is:
set-azstorageblobcontent -file c:\samplefiles\dog.jpg -container pics -blob dog.jpg -context $ctx.contextThis will upload the
dogs.jpg file to the pics
container.
Resource Groups
To list out the resource groups and list only the names, use the following command:
get-azresourcegroup | select resourcegroupname
Azure Files
If you've performed IT network administrator duties over the years, you've probably shared a folder on a computer. And then connected to it from other computers. And that's exactly what's going to happen here with Azure files, except that the shared folder's hosted in the Cloud. So it's a cloud-based file share that allows access over the Server Message Block, or SMB, protocol. This is really what is used with Windows file and print sharing. They are mountable from the cloud or from on-premises machines. This is assuming that firewall rules allow that. The client devices might be running a Windows operating system, the Mac OS, or even a Linux variant. As long as it supports SMB, it doesn't matter. That also includes apps on smartphones. So let's say you've got an Android smartphone, you could install an app that supports SMB and map a drive into the Azure Cloud to do this.
To to manage Azure files, we can use the Azure Portal GUI. We can also manage and work with Azure file shares using the Azure CLI, and also, using Azure PowerShell cmdlets.
What Is Needed
In order to work with Azure files, what do you need? First, you require an Azure Storage account. Within the storage account, you can then configure your Azure file share. So you have to provide it a share name and a quota, which is really just a size limit. And remember, access from the Server Message Block protocol, or SMB, requires access to TCP port 445. So depending on where the clients are coming from that need to map to this or mount this shared folder, you're going to have to make firewall provisions to allow this to happen.
From Windows, we might map a drive letter either using the GUI or the net use command. Like we would normally to map to a file server on-premises that has a shared folder. You can connect directly to the UNC path. You could even use a mount point path. This really just means it's more like the Unix and Linux world where you've got a folder that you connect to that points to the other shared folder out in the Azure Cloud, as opposed to a drive letter.
Configure Azure File Storage
In this demonstration, I'm going to use the Azure portal to configure Azure file storage. Remember, Azure file storage is really just defining a shared folder in the Azure cloud, much like you might designate a shared folder on a file server on-premises. The concept is the same.
The first thing you need is a storage account, so let's first go to the Storage accounts view over on the left. Click on storage account here called stor1989. Note: this was created in a previous section.
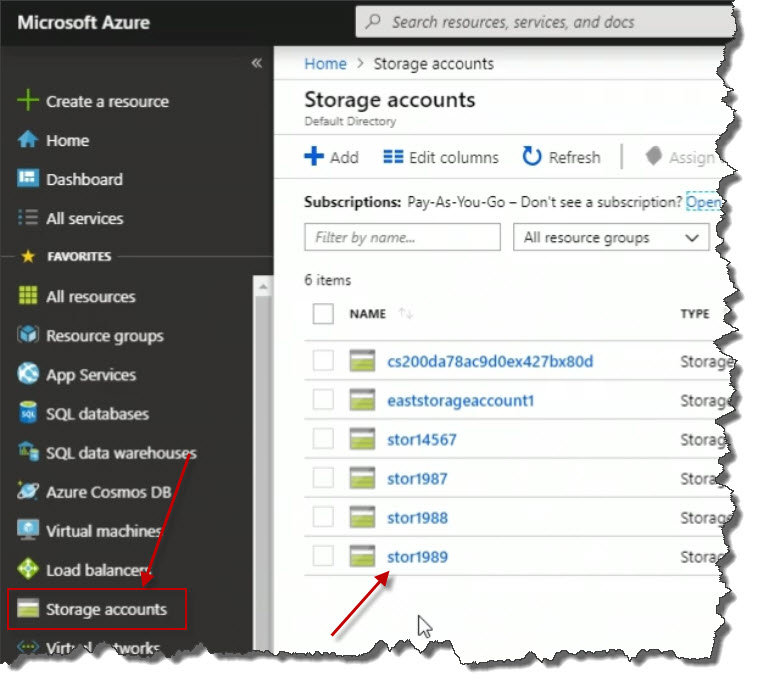
Within the Properties blade for that storage account, I'm going to scroll all the way down until I see Files. Click on it. When I click Files on the right, I can see I don't have any file shares yet.
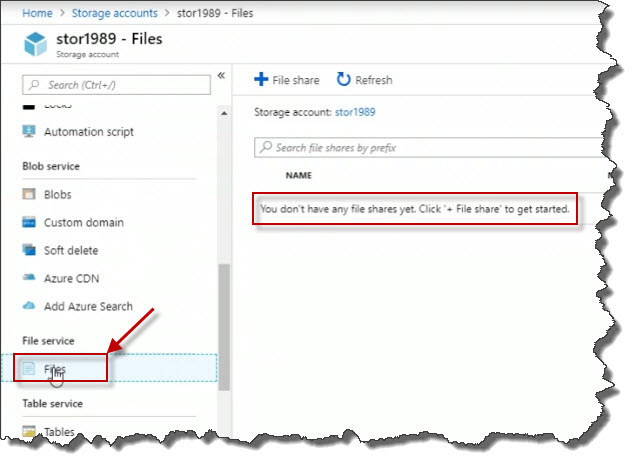
I'm going to click the add File share button at the top.

And this one, I'm going to call, let's say shared_files. Notice that if I put in an underscore, do you see what happened there? It doesn't like it. And if I hover over the little red block with the white exclamation mark, it tells me the rules for naming this. And bear in mind that in Azure, unfortunately, the rules for naming resources are not 100% consistent, but that's why the help is right in front of us, at least in the GUI.
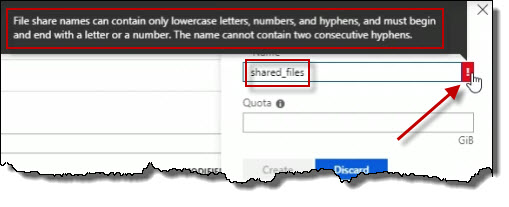
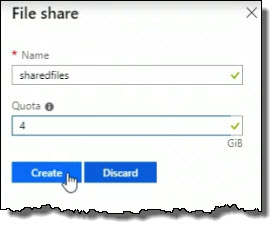
I'm going to call this sharedfiles, and let's say for the for the Quota, maybe I'll set it to 4 gigabytes. And then I'll go ahead and create it, so I'm going to click Create.
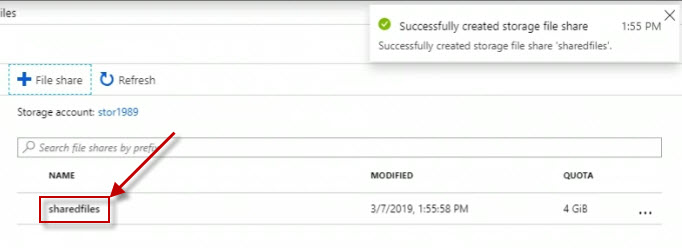
So right away, we can see it's there, sharedfiles. Click on it.
I can actually upload content to it. And you can add directories within it as well, so you can make subdirectories to organize large amounts of files. How about I click Upload to upload some content here?
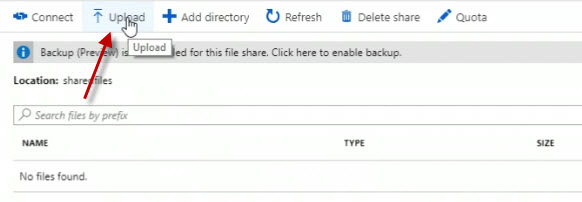
Over on the right, it opens up an Upload files blade. So I'm going to click the little folder icon, the blue folder icon, to upload a file.
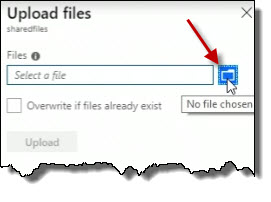
So I'm going to choose an on-premises file. And once I've done that, I'll just click the Upload button.
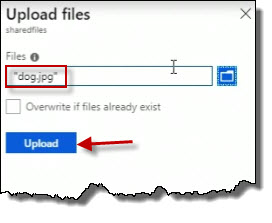
So it's in the midst of uploading that content.
Create Connection to Shared Folder From Azure VM
Now, the next thing we're going to do is we're going to figure out how we can make a connection to the shared folder from a virtual machine running within the Azure cloud. But you just as well could do it from on-premises, as long as TCP port 445 is opened up.
When you're looking at a Azure file share, like we are now, you're going to see this Connect button up at the top.
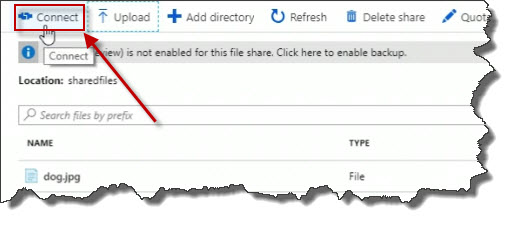
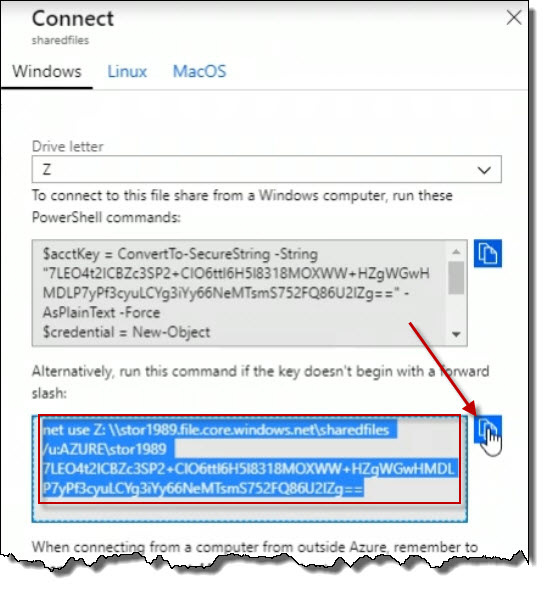
When you click on the Connect button, connection information is provided. There
is information for Windows, Linux and for MacOS. In this example, copy the
command for the net use section by clicking on the copy to
clipboard button.
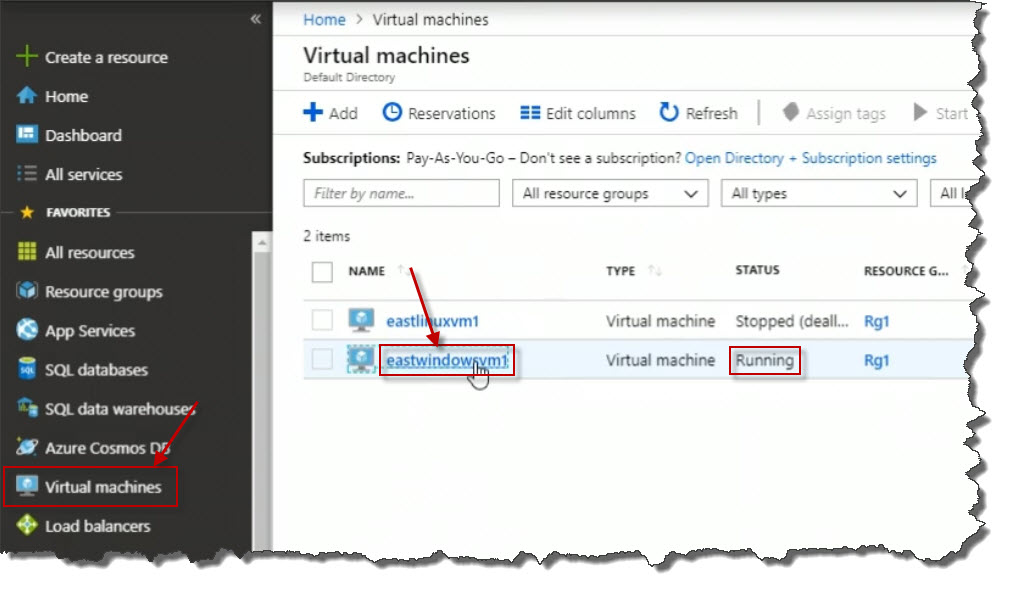
Next, locate a virtual machine to create the mapping on. Click on Virtual machines on the left menu. Then click on a virtual machine to create the mapping on. For this example, we are click on eastwindowsvm1. Make sure the virtual machine is running. Click on the virtual machine to open it up.
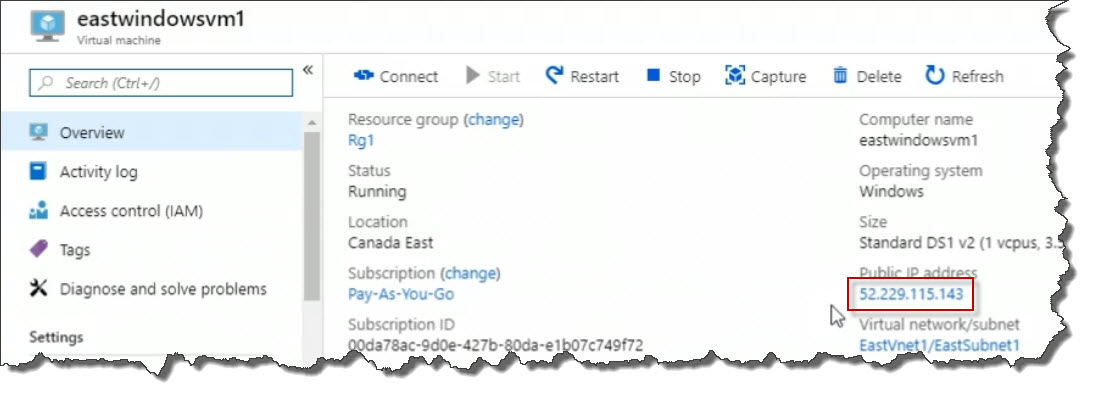
On the Virtual machine properties page, take note of the public IP address.
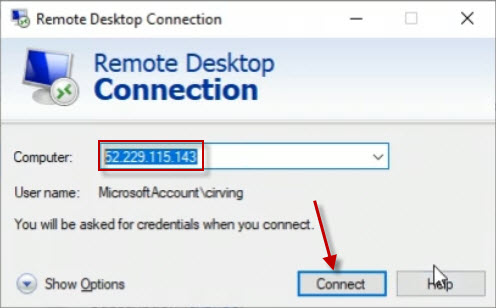
From you on premise computer, use the remote desktop client to connect to the remote computer. Use your credentials to complete the connection.
On the remote, virtual machine, open a command prompt. Paste that
net use command into the command prompt and hit enter.

To check the mapping, type in z:.

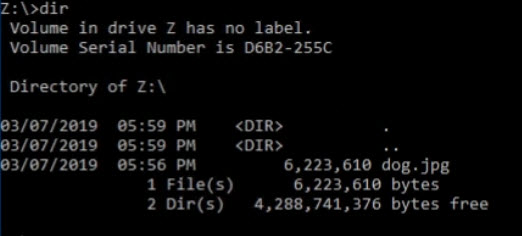
Enter the dir command to list the files. And there is the
dog.jpg file.
Azure Key Vault
The Azure Key Vault is a secured location in the Azure cloud. But what does it store and how is it really used? So what we can do is store secrets like cryptographic keys. You can even import or generate certificates, PKI certificates. You can create your own passwords.
You would store this in a central, safe location, all of these different types of security mechanisms. Because then you could have applications that your developers might build that will access the key vault to gain access to these items. That might be required to make connections to other application components out on the network, for example. So that's really what this is about.
Now when it comes to standards compliance, Azure Key Vault is backed by FIPS 1402-2 Level 2 hardware security module, or HSM. An HSM device is a firmware device that is used at certain standards. This is a US government compliance standard for trustworthiness, to store these secrets. You can also take existing HSM keys that you might already have on-premises or with another provider and bring them in to your Azure Key Vault.
Well, to manage this whole ecosystem of secrets, you start by creating a key vault in Azure, whether you're going to use the portal or command line tools. And from there, you can then create secrets. So you can generate PKI certificates, you can create secret passwords. Or you can upload secrets like certificates, for example. Lastly, you would then configure apps. Now this is more of a developer thing, normally, to retrieve secrets from the key vault.
Implement an Azure Key Vault
In this demonstration, I'm going to create an Azure Key Vault, and I'm going to do it using the Azure portal.
Why would you create a Key Vault? You create an Azure Key Vault because you want to store some kind of a secret, like passwords, or PKI certificates, or that kind of thing, cryptographic keys. Because your applications need that information, maybe to connect to other application components.
To begin the process of building my Azure Key Vault here in the portal, I'll click Create a resource over on the left menu. Search for the word key. Right away I see the words Key Vault.
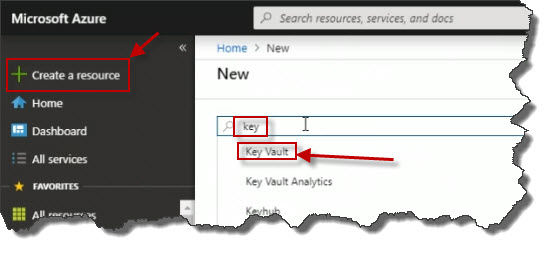
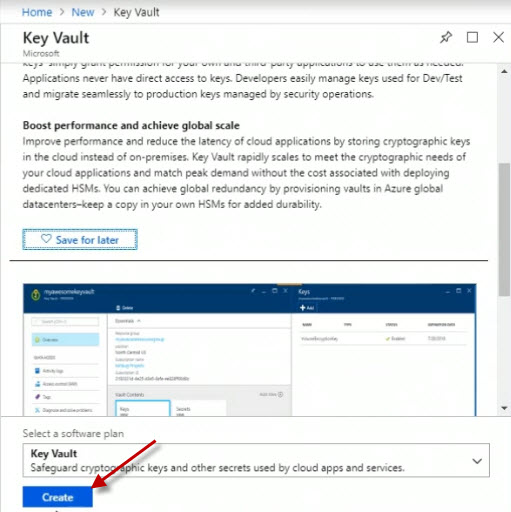
I'll click Create.
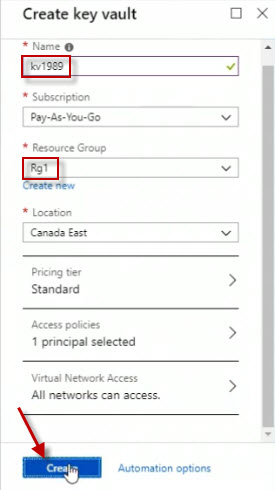
Fill in the values for the new key vault and click on the Create button.
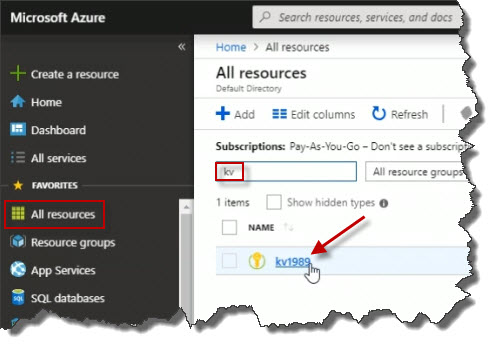
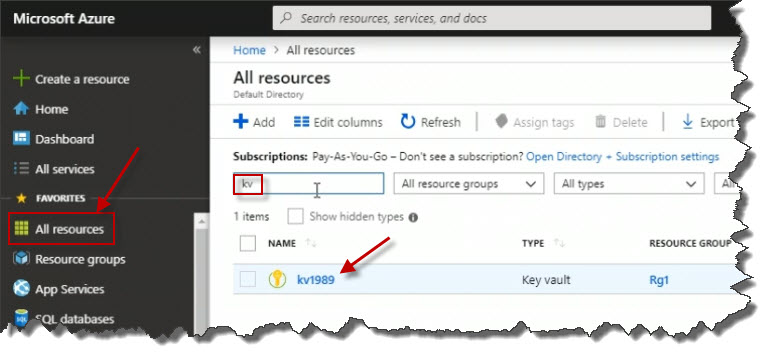
Eventually, a little notification will display indicating the creation of the key vault. To access the key vault, click All resources over on the left. Search for the name of the key vault by entering kv in the search box. Click on kv1989 to open it.
On the left menu, click on Access policies.
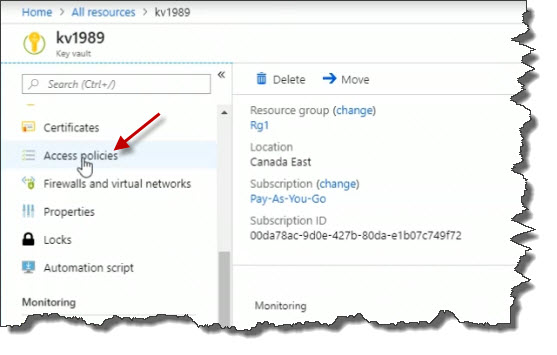
I can see an existing access policy, but I can click Add new.

I can choose a template, for example. Maybe I only want someone to be able to manage secrets as opposed to PKI certificates stored in this Key Vault. So I could choose the template Secret Management.
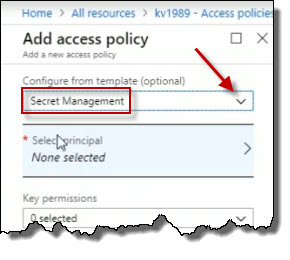
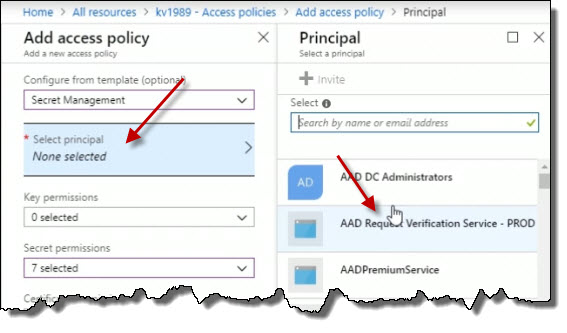
Next, choose a principal. Principal is a user or a group that I want to select that would have access to do that. So we can modify our access polices.
In another demo, we're going to talk about how you can come into Keys, Sequence, and Certificates, to start working with the actual content within the Key Vault.
Create an Azure Key Vault Secret
An Azure Key Vault is only useful if it contains some kind of secret. These secrets could be PKI certificates or cryptographic keys or passwords. And these would be used by code built by developers. The code would access the vault here. Gain access to some of these secrets, which it might need to authenticate to other services elsewhere.
let's start here in the portal by going to the All resources view on the left. In the Filter by name field, I'll type kv because I know my key vault starts with that prefix. And there it is: kv1989.
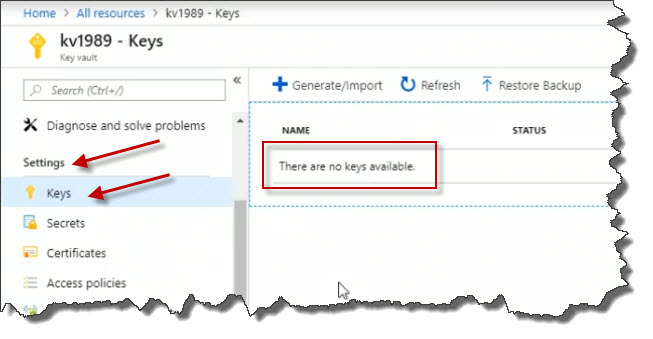
If I click it to open up its properties blade, as I scroll down, under Settings, I see Keys. And when I click it, any keys I've created that are stored in the vault will be listed here. Currently, there are none.
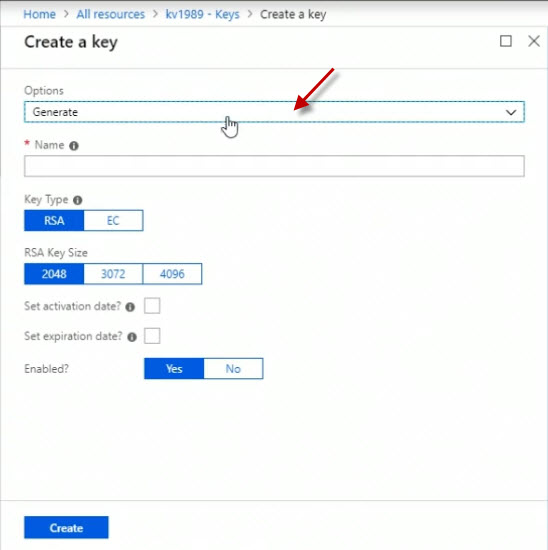
But I could click Generate/Import.

Click on Options.
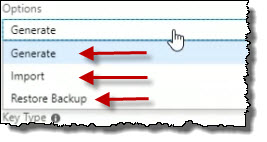
I could Generate key pairs. Or I could Import them from here or Restore from Backup.
I've got options. It says Generate, under Key Type, it could be RSA or EC. There is also a Key Size.
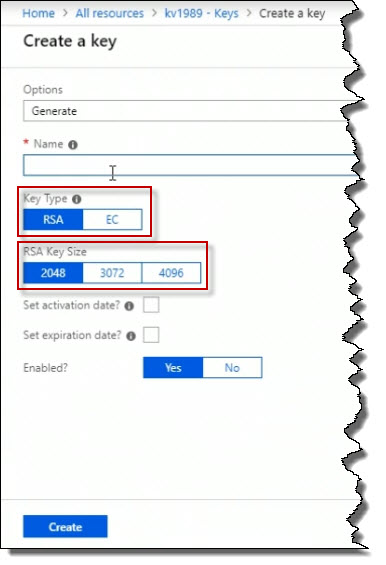
So for example, let's say I call this Key1. And I click on the Create button.
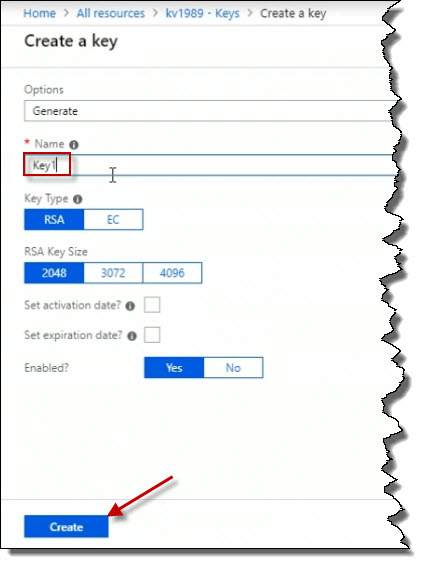
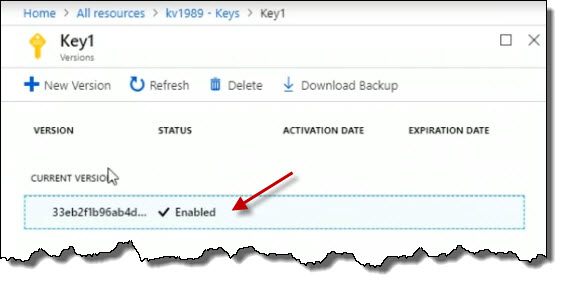
Now we've got a key called Key1 that now exists in this particular key vault. Click on Key1 to open it.

Here are the details related to it. Click on the particular key value.
Here are the details related to it.
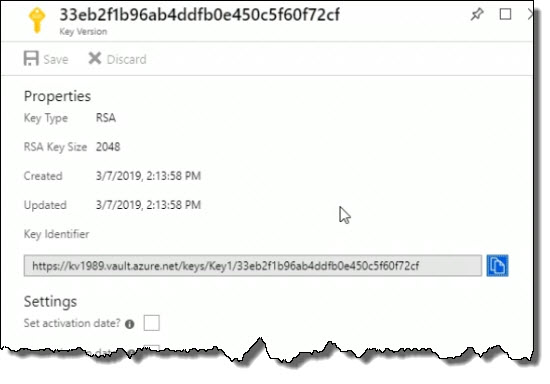
Down below, I can see the Permitted operations. How can this key be used? For encryption, decryption, signatures, verifying signatures, and so on.
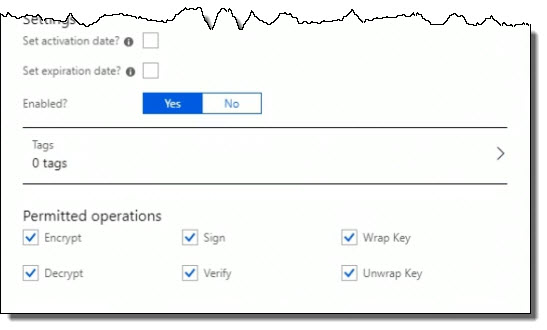
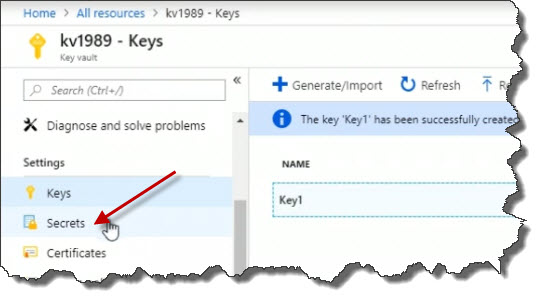
Let's continue on talking about different types of items in the key vault, including secrets. Close all the windows and return back to the key vault. Click on Secrets.
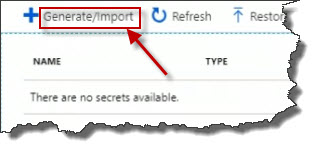
I can click Generate/Import.
I'm going to make a manual secret here called Secret1. And I'll enter in a secret value. Remember, this is what would be used by applications that reach into this vault to grab this stuff. I'll click Create.
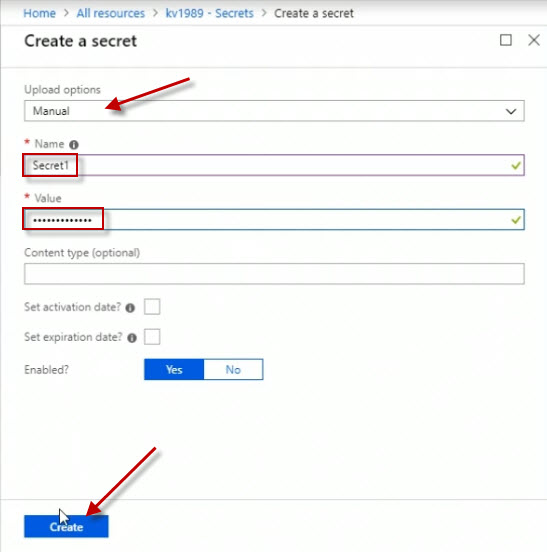
I've now got a secret called Secret1 in the vault. Now I will click it.

Click on the current version to view its details.
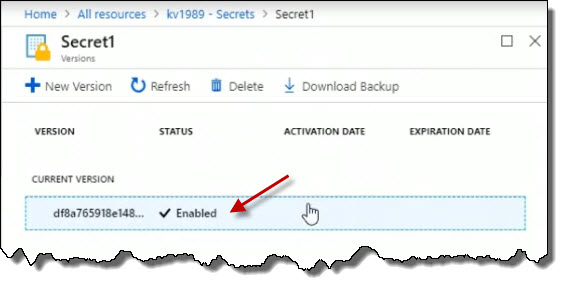
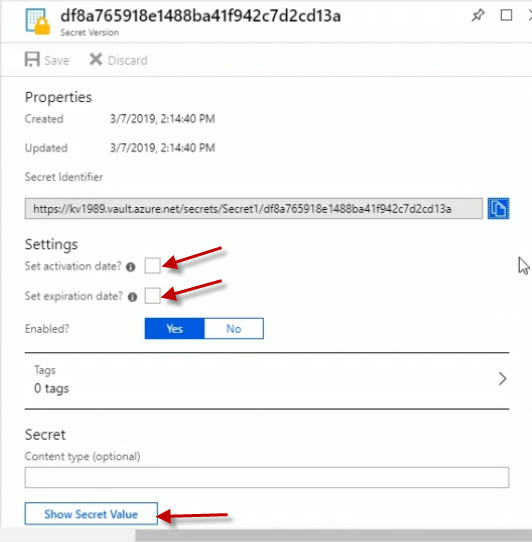
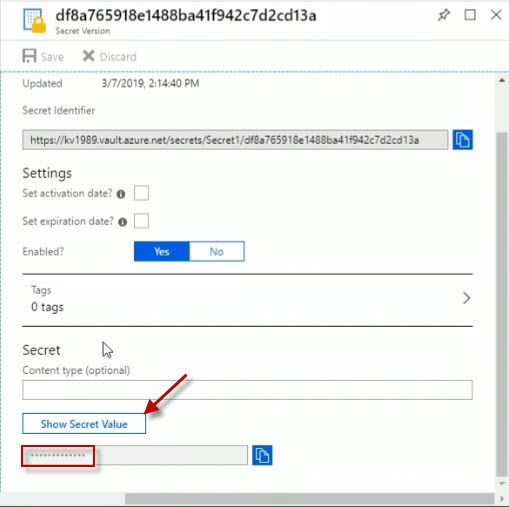
We could see if it's got an activation date of when it's allowed to start being used, when it expires. And I can also choose the Show Secret Value button to actually show my secret value.
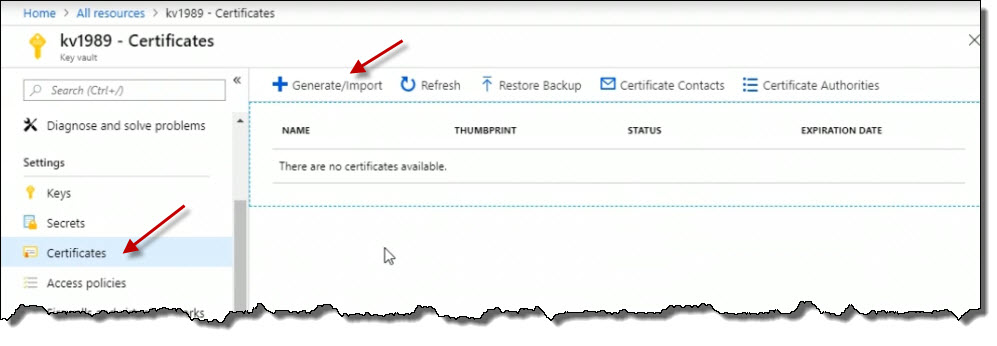
Return back to the Key vault. Click on Certificates. We can work with certificates here, either importing them or generating them. Cick the Generate/Import button.
Here is the Create a certificate dialog.
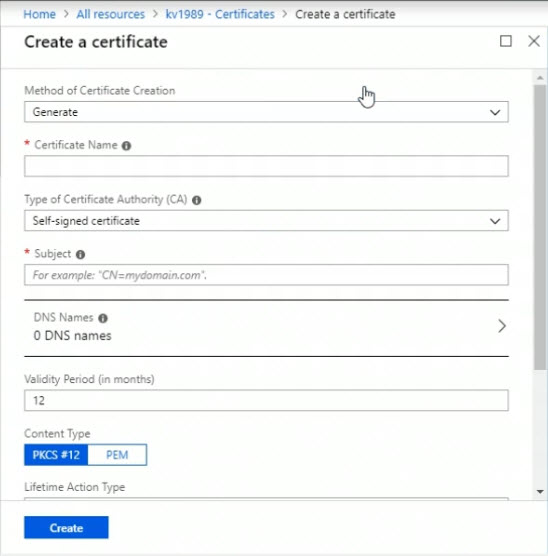
Under the Method of Certificate Creation, the options that are available include Generate and Import.

Under the Type of Certificate Authority (CA), the options include Self-signed certificate, Certificate issued by an integrated CA and Certificate issued by a non-integrated CA.
When choosing things like a Certificate Authority, or CA, this is at the top of the hierarchy and it's the one that issues certificates. Keep in mind that if you generate a self-signed certificate, really, no device will trust it. This is because every device, even mobile phones, such as within a web browser or external to the web browser has a list of trusted certificate authorities whose certificates it will trust. And that's why when you connect to online banking, for instance, your web browser or your app on your mobile phone will trust a certificate. This is because it trusts the certificate authority that issued it.
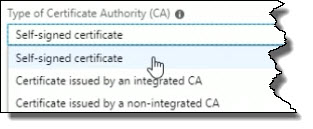
Now we get a sense of the types of items that we can create within an Azure Key Vault.
Retrieve Secrets from the Azure Key Vault
Once you've created an Azure Key Vault and populated it with secrets, how do you gain access to them? Well let's start by looking at how to do that here in the Azure portal.
Start by going to the All resources view on the left. I will find the key vault I'm interested in which in my case is called kv1989. Click on it.
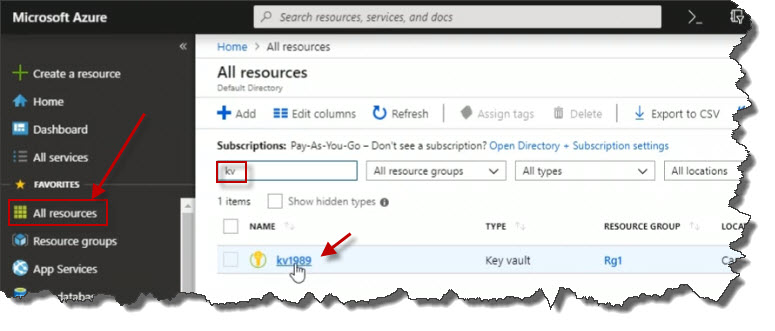
Here is the properties blade for that key vault. I can see on the left that I have keys, secrets and certificates. I'm going to go to Secrets because I know I've got one here called Secret1.
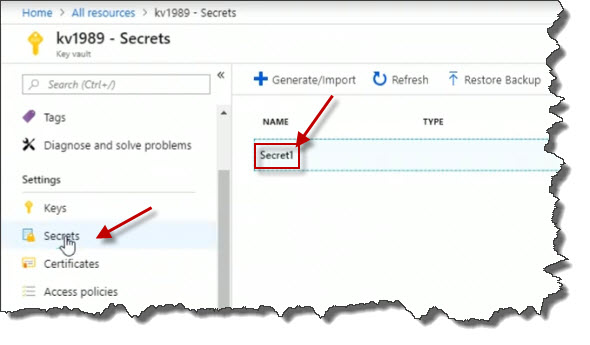
Click on the current version.
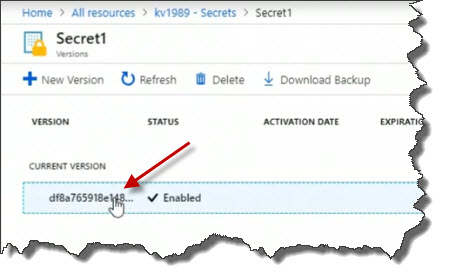
I will get to the Secret Version page. Click the Show Secret Value button to expose the secret key. So that's how we can gain access to that secret using the portal.
Command Line
PowerShell
What about through the command line? Let's start by taking a look at PowerShell. Here in PowerShell I can use the following command:
(get-azkeyvaultsecret -vaultname kv1989 -name secret1).secretvaluetextWhen we press Enter, the value returned is the value assigned to that key.

Azure CLI
Let's take a look at how to do the same thing but in the Azure CLI. Now just like with PowerShell, in the Azure CLI, I have to have connected and authenticated to my Azure account, which is already done. It was done in Powershell, it's also done here in the CLI. So I'm going to run the following command:
az keyvault secret show --name secret1 --valut-name kv1989Here is the output.
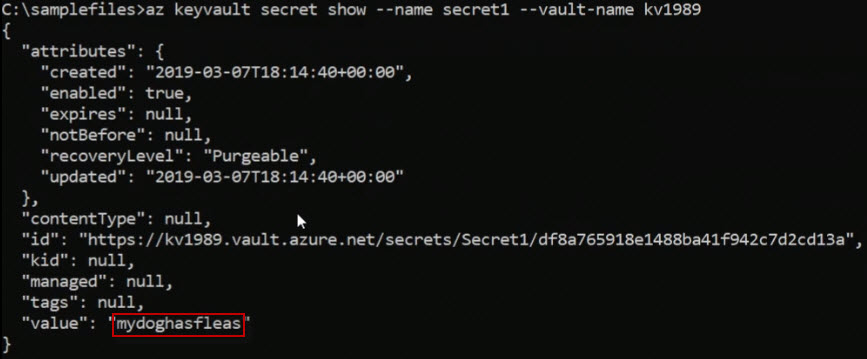
The value is then displayed.
.ico)